13 RSYNC
1)概述
功能:可以实现完全备份、增量备份
        单向手动备份:手动执行命令或定时计划任务
        单向定时备份:触发式(inotify:文件状态检查命令)

问题:RSYNC数据源删除数据、备份端不会删除

解决:server端利用ssh连接到备份端,在备份端执行下载任务(加入 --delete 选项会识别server端删除,并在备份端也删除)
2)RSYNC:镜像同步工具
软件名:rsync
命令格式:	rsync	-avz	源数据位置	目标数据位置
                    -a		归档模式,递归并保留对象属性
                    -v		显示同步过程
                    -z		传输中进行压缩
                    --exclude="	"		排除
                    --include=“ 	”		包含
[root@localhost filedst]# rsync -avz --exclude="*.bak" rsync://user1@192.168.18.201/YQ /filedst		#不包含 以.bak结尾的文件

[root@localhost filedst]# rsync -avz --include="1.txt" rsync://user1@192.168.18.201/YQ /filedst		#包含1.txt文件
传输协议:
        ssh协议(借):(最好有免密)
                下载:
                	rsync	-avz	用户@server端IP://源数据位置		备份端目标位置
                上传:
                	rsync	-avz	备份端目录/*		用户@server端IP://源数据位置
                注:ssh协议下, --delete 选项不支持
        rsync协议:
                 下载:
                 	rsync	-avz	rsync://用户@server端IP/共享模块名		本地目录
                 上传:
                	 rsync	-avz	本地目录/*	rsync://用户@server端IP/共享模块名
                注:rsync协议下,支持 --delete选项(可将server删除的部分,备份端同步删除)
3)rsync工作原理
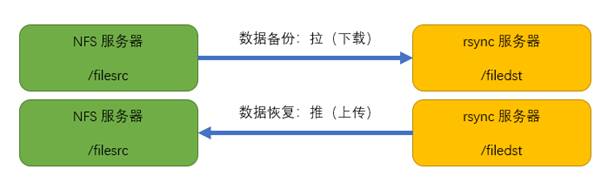
既然涉及到数据同步,必要的两个概念是:源地址(文件),目标地址(文件),以及以哪一方为基准,例如,想让目标主机上的文件和本地文件保持同步,则是以本地文件为同步基准,将本地文件作为源文件推送到目标主机上。
rsync在进行数据同步之前需要先进行用户身份验证,验证方式取决于使用的连接方式:
ssh登录验证模式:使用ssh协议作为基础进行用户身份认证,然后进行数据同步。
rsync登录验证模式:使用rsync协议进行用户身份认证(非系统用户),然后进行数据同步。
**数据同步方式:**推送(上传)、拉取(下载)
4)rsync特性(优点)
1、能更新整个目录树和文件系统
2、有选择性的保留符号链接、硬链接、文件属性、权限、设备以及时间等
3、对于安装来说,无任何特殊权限要求
4、对于多个文件来说,文件传输效率高
5、能用ssh或自定义端口作为传输入口端口
5)实验
(1)利用ssh,rsync备份
前提:
1.server端、备份端都安装完成rsync (yum安装rsync)
2.server端准备 /filesrc 作为源目录、备份端准备 /filedst 作为备份目录
3.两端分别实现ssh免密登录
[root@localhost ~]# ssh-keygen -t rsa -b 2048				#rsync server端
[root@localhost ~]# ssh-copy-id root@192.168.18.202

[root@localhost ~]# ssh-keygen -t rsa -b 2048				#备份端
[root@localhost ~]# ssh-copy-id root@192.168.18.201
4.实现备份(server端变化数据,备份端实现下载、上传、)
下载:
[root@localhost filesrc]# touch {1..4}.txt											#服务端创建4个文件

[root@localhost filedst]# rsync -avz root@192.168.18.201:/filesrc/ /filedst/		#备份端进行下载
receiving incremental file list
./
1.txt
2.txt
3.txt
4.txt

sent 103 bytes  received 259 bytes  241.33 bytes/sec
total size is 0  speedup is 0.00
增量备份:
[root@localhost filesrc]# echo "qqqq" >> 3.txt										#服务端更改其中一个文件

[root@localhost filedst]# rsync -avz root@192.168.18.201:/filesrc/ /filedst/		#备份端进行增量备份
receiving incremental file list
3.txt

sent 43 bytes  received 165 bytes  416.00 bytes/sec
total size is 5  speedup is 0.02
上传:
[root@localhost filesrc]# rm -rf *													#服务端删除所有
[root@localhost filesrc]# ll
总用量 0

[root@localhost filedst]# rsync -avz /filedst/* root@192.168.18.201:/filesrc/		#备份端上传带服务端
sending incremental file list
1.txt
2.txt
3.txt
4.txt

sent 257 bytes  received 92 bytes  698.00 bytes/sec
total size is 5  speedup is 0.01

[root@localhost filesrc]# ll														#服务端再次检查源目录
总用量 4
-rw-r--r-- 1 root root 0 11月  8 14:44 1.txt
-rw-r--r-- 1 root root 0 11月  8 14:44 2.txt
-rw-r--r-- 1 root root 5 11月  8 14:45 3.txt
-rw-r--r-- 1 root root 0 11月  8 14:44 4.txt
[root@localhost filesrc]# cat 3.txt
qqqq
(2)搭建rsync服务
步骤:
1)服务端:
1.修改主配置文件 /etc/rsync.conf
[root@localhost filesrc]# vim /etc/rsyncd.conf
[root@localhost filesrc]# tail -n11 /etc/rsyncd.conf
address = 192.168.18.201
port 873
log file = /var/log/rsyncd.log
pid file = /var/run/rsyncd.pid
[YQ]
    comment = Welcome..
    path = /filesrc
    read only = no
    dont compress = *.gz *.bz2
    auth users = user1
    secrets file = /etc/rsync_users.db
2.创建认证 /etc/rsyncd_users.db (对应主配置文件的指向)
[root@localhost filesrc]# vim /etc/rsync_users.db
[root@localhost filesrc]# cat /etc/rsync_users.db				#对应主配置文件的secrets file选项
user1:123456													#用户:密码
[root@localhost filesrc]# chmod 600 /etc/rsync_users.db
[root@localhost filesrc]# systemctl start rsyncd
[root@localhost filesrc]# netstat -anpt |grep rsync
tcp        0      0 192.168.18.201:873      0.0.0.0:*               LISTEN      7388/rsync
注意:
1)创建完认证后,需要将认证文件权限改为 600
2)设置映射用户对共享目录有权限
[root@localhost ~]# setfacl -m u:nobody:rwx /filesrc
3)关闭服务用 kill -9 pid 杀死以后,进程号的配置文件不会被删除,需手动删除,才可正常启动
(可写脚本实现)
2)备份端进行测试:
拓展:备份端声明密码环境变量后,可以实现免密备份
[root@localhost filedst]# vim /etc/profile
[root@localhost filedst]# tail -n1 /etc/profile			#声明密码环境变量
export RSYNC_PASSWORD=123456
[root@localhost filedst]# source /etc/profile			#使环境变量生效
下载:
[root@localhost filesrc]# touch {1..4}.txt											#server端创建4个文件

[root@localhost filedst]# rsync -avz rsync://user1@192.168.18.201/YQ /filedst/		#备份端下载
receiving incremental file list
./
1.txt
2.txt
3.txt
4.txt

sent 103 bytes  received 254 bytes  714.00 bytes/sec
total size is 0  speedup is 0.00
备份端增量备份:
[root@localhost filesrc]# echo "yqqqqqqy" >> 2.txt 									#server端修改其中一个文件

[root@localhost filedst]# rsync -avz rsync://user1@192.168.18.201/YQ /filedst/		#备份端增量备份
receiving incremental file list
2.txt

sent 43 bytes  received 162 bytes  410.00 bytes/sec
total size is 9  speedup is 0.04
server端删除、备份端同步删除:
(与之前的区别在于:仅增加了 --delete 选项)
[root@localhost filesrc]# rm -rf 1.txt 3.txt 												#server端删除两个文件

[root@localhost filedst]# rsync -avz --delete rsync://user1@192.168.18.201/YQ /filedst/		#备份端同步删除
receiving incremental file list
deleting 3.txt
deleting 1.txt
./

sent 27 bytes  received 90 bytes  234.00 bytes/sec
total size is 9  speedup is 0.08
(3)单向实时备份
仅在server端操作(利用ssh登录备份端直接操作)
1.步骤:
1)安装inotify 工具(源码包解压安装),实时对文件状态监控
[root@localhost inotify-tools-3.14]# ./configure && make && make install
[root@localhost inotify-tools-3.14]# echo $?
0
拓展:源码包安装inotify-tools.zip
命令:	inotifywait				#长期监控(推荐)
        inotifywatch			#监控触发一次即停止
        inotifywait		-mrq		-e		监听的动作		源目录
                    -m			始终监听
                    -r			 递归
                    -q			纸打印监控事件的信息
                    -e			后面写监听的动作
监听动作:
| create | delete | modify | attrib | move |
|---|---|---|---|---|
| 创建 | 删除 | 内容 | 权限 | 移动 |
2)写个脚本,介个inotify工具实现单向实时备份
[root@localhost ~]# vim src.sh
[root@localhost ~]# cat src.sh
#!/bin/bash
a="inotifywait -mrq -e create,delete,modify,attrib,move /filesrc"
$a | while read directory event file
do
	ssh 192.168.18.202 'export RSYNC_PASSWORD=123456;rsync -avz --delete rsync://user1@192.168.18.201/YQ /filedst'
done
2.测试:在server端执行创建、修改、删除等动作,在备份端查看
拓展:调整inotify监控的文件数量
| 调整inotify内核参数(/etc/sysctl.conf) | |
|---|---|
| mak_queue_events | 监控队列大小 |
| mak_user_instances | 最多监控实例数 |
| max_user_watches | 每个实例最多监控文件数 |
(4)配置unsion+inotify实现双向实时同步
1 前提:服务端、备份端都需安装软件
1.源目录、备份目录
2.ssh能免密登录
3.准备inotify、unsion软件包
2 步骤:
1.解压,进入,安装inotify
[root@localhost inotify-tools]# tar -xf inotify-tools-3.14.tar.gz && cd inotify-tools-3.14 && ./configure && make && make install
2.解压,进入,安装ocaml
[root@localhost inotify-tools]# tar -xf ocaml-3.10.1.tar.gz
[root@localhost inotify-tools]# cd ocaml-3.10.1/
[root@localhost ocaml-3.10.1]# ./configure
[root@localhost ocaml-3.10.1]# make world opt && make install
3.解压,进入,安装unsion
[root@localhost inotify-tools]# tar -xf unison-2.13.16.tar.gz
[root@localhost inotify-tools]# cd unison-2.13.16
[root@localhost unison-2.13.16]# make UISTYLE=text THREADS=true STATIC=true	#已经存在Makefile文件,不需要./configure
[root@localhost unison-2.13.16]# cp unison /usr/local/bin/						#把生成的脚本拷贝出来
4.配置脚本
filesrc端(src.sh)
#!/bin/bash
a="inotifywait -mrq -e create,delete,modify,attrib,move /filesrc"
b="/usr/local/bin/unison -batch /filesrc ssh://192.168.18.202//filedst/"
$a | while read directory event file
do
	$b
done
filedst端(dst.sh)
#!/bin/bash
a="inotifywait -mrq -e create,delete,modify,attrib,move /filedst"
b="/usr/local/bin/unison -batch /filedst ssh://192.168.18.201//filesrc/"
$a | while read directory event file
do
	$b
done
5.两个脚本都在所在端,脱离终端,放入后台运行
[root@localhost ~]# nohup bash -x src.sh &		#filesrc端
[root@localhost ~]# nohup bash -x dst.sh &		#filedst端
拓展:
nohup命令:在执行后,会产生一个nohup.out的记录文件
set	-u
        设置后,当调用未声明变量时,则提示“变量为空”,无法调用		(设置后,带有变量式删除,若变量未声明,则无法删除)
        未设置时,当调用未声明变量时,仍能正常调用,调用的变量值为空
set	-x
        设置后,执行命令时,先显示执行的命令,再执行命令
3 测试
两端分别:创建文件、该文件、删除文件,判断另一段数据变化
**注意:**需要在目录中创建隐藏文件,在删除最后一个文件时,也能触发另一端的删除动作