6 cacti监控
一:介绍
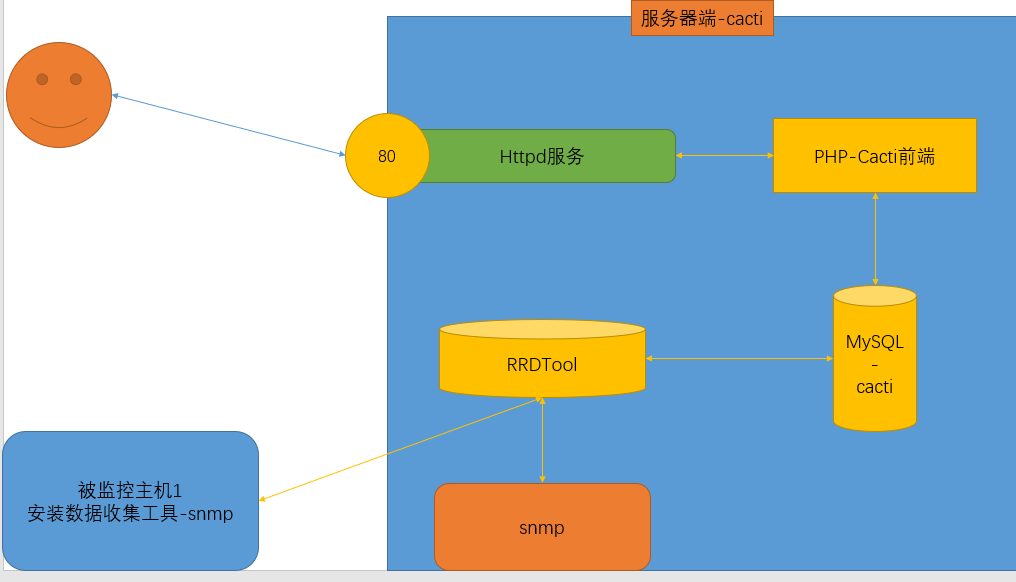
cacti使用php语言实现,主要用SNMP服务获取数据,对系统资源,网络流量变化类的监控
工作流程:
1.RRDtool利用SNMP协议,对监控的主机进行数据收集
2.手机的数据,在RRDtool中进行轮询保存到rrd数据库中
3.用户通过LAMP环境,在mysql中查找对应的数据库文件
4.通过rrdtool命令进行绘图,返回给用户查看
SNMP(简单网络管理协议)
安装: net-snmp、net-snmp-utils
二:搭建cacti监控
实验前准备:
1)防火墙
2)通过网络源安装软件
3)epel-release扩展源
4)PHP扩展源:(本次启用72版本)
[root@localhost ~]# yum -y install  http://rpms.remirepo.net/enterprise/remi-release-7.rpm
[root@localhost ~]# vim /etc/yum.repos.d/remi-php72.repo
[root@localhost ~]# grep "enabled=1" /etc/yum.repos.d/remi-php72.repo
enabled=1
1.实验步骤:
| 虚拟机 | 环境 | 步骤 |
|---|---|---|
| 7-1 | cacti服务端 | 1.搭建LAMP环境 安装httpd,启动,自启动httpd 安装mariadb,写入配置文件,启动,自启动mariadb 时区信息导入数据库,并在数据库中创建库,授权用户 PHP安装与配置,修改运行时区,重启httpd 2.安装RRDtool工具 3.安装snmp 启动、自启动snmpd 编写配置文件,收集tcp信息 4.cacti配置 下载压缩包、解压,将目录放到 /var/www/html 配置cacti连接数据库、导入数据库文件、修改cacti目录权限 5.通过浏览器安装 6.添加定时计划任务 7.启动,开机自启cacti |
| 7-2 | cacti-client被监控端 | 安装snmp,编写配置文件,启动服务 |
| 7-1 | cacti服务i去 | 添加被监控的设备 |
2.实验详细步骤:
1)搭建LAMP环境:
a、安装httpd,启动,自启动httpd
[root@localhost ~]# yum -y install httpd
[root@localhost ~]# systemctl enable httpd --now
b、安装mariadb,写入配置文件,启动i,自启动mariadb
[root@localhost ~]# yum -y install mariadb-server mariadb
[root@localhost ~]# vim /etc/my.cnf.d/server.cnf
[mysqld]
character-set-server=utf8mb4
collation-server=utf8mb4_unicode_ci
innodb_file_format = Barracuda
max_allowed_packet = 16777777
join_buffer_size = 512M
innodb_file_per_table = ON
innodb_large_prefix = 1
innodb_buffer_pool_size = 1024M
innodb_additional_mem_pool_size = 512M
innodb_flush_log_at_trx_commit = 2
log-error                      = /var/log/mysql/mysql-error.log
log-queries-not-using-indexes  = 1
slow-query-log                 = 1
slow-query-log-file            = /var/log/mysql/mysql-slow.log
[root@localhost ~]# systemctl enable mariadb --now
c、 时区信息导入数据库,并在数据库中创建库,授权用户
[root@localhost ~]# mysql_tzinfo_to_sql /usr/share/zoneinfo/ | mysql -uroot mysql

#进入mysql查看导入成功
[root@localhost ~]# mysql
MariaDB [(none)]> select * from mysql.time_zone;
MariaDB [(none)]> select * from mysql.time_zone_name;

#创建库、授权
MariaDB [(none)]> create database cacti;
MariaDB [(none)]> grant all on cacti.* to 'cactiuser'@'localhost' identified by '123456';
MariaDB [(none)]> grant select on mysql.time_zone_name to 'cactiuser'@'localhost';
MariaDB [(none)]> flush privileges;				#刷新授权信息
d、PHP安装与配置,重启httpd
[root@localhost ~]# yum install -y php php-common php-bcmath php-cli php-mysqlnd php-gd php-gmp php-intl php-json php-ldap php-mbstring php-pdo php-pear php-snmp php-process php-xml php-zip

[root@localhost ~]# vim /etc/php.ini
[root@localhost ~]# grep "^date.timezone" /etc/php.ini
date.timezone = 'Asia/Shanghai'
[root@localhost ~]# systemctl restart httpd
2)安装RRdtool
[root@localhost ~]# yum -y install rrdtool
3)安装snmp
1. 启动、自启动snmpd6098
2.编写配置文件,收集tcp信息
[root@localhost ~]# yum -y install net-snmp net-snmp-utils lm_sensors
[root@localhost ~]# systemctl enable snmpd --now
[root@localhost ~]# snmpwalk -v 2c -c public 192.168.18.201 system		#收集public组中的信息
[root@localhost ~]# grep "^tcp " /usr/share/snmp/mibs/TCP-MIB.txt		#检查tcp文件的标识为6
tcp      OBJECT IDENTIFIER ::= { mib-2 6 }
[root@localhost ~]# vim /etc/snmp/snmpd.conf
[root@localhost ~]# egrep "^com2sec|^view|^access" /etc/snmp/snmpd.conf
com2sec notConfigUser  default       public
view    systemview    included   .1.3.6.1.2.1.1
view    systemview    included   .1.3.6.1.2.1.6
view    systemview    included   .1.3.6.1.2.1.25.1.1
access  notConfigGroup ""      any       noauth    exact  all    none none
view all    included  .1                               80
[root@localhost ~]# systemctl restart snmpd							#重启snmpd
[root@localhost ~]# snmpwalk -v 2c -c public 192.168.18.201 tcp		#收集tcp信息
4)cacti配置
1.下载压缩包、解压,将目录放到 /var/www/html
2.配置cacti连接数据库、导入数据库文件、修改cacti目录权限
#下载压缩包、解压,将目录放到 /var/www/html
[root@localhost ~]# wget https://www.cacti.net/downloads/cacti-1.2.18.tar.gz
[root@localhost ~]# tar -xf cacti-1.2.18.tar.gz
[root@localhost ~]# cp -a cacti-1.2.18 /var/www/html/cacti
[root@localhost ~]# chown -R apache:apache /var/www/html/*

#配置cacti连接数据库
[root@localhost ~]# vim /var/www/html/cacti/include/config.php
$database_type     = 'mysql';
$database_default  = 'cacti';
$database_hostname = 'localhost';
$database_username = 'cactiuser';
$database_password = '123456';					#仅修改了此处
$database_port     = '3306';
$database_retries  = 5;
$database_ssl      = false;
$database_ssl_key  = '';
$database_ssl_cert = '';
$database_ssl_ca   = '';
$database_persist  = false;

#导入数据库文件、修改cacti目录权限
[root@localhost ~]# mysql -uroot cacti < /var/www/html/cacti/cacti.sql
[root@localhost ~]# chown -R apache:apache /var/www/html/*
[root@localhost ~]# chmod 777 /var/www/html/cacti/log
[root@localhost ~]# chmod 777 /var/www/html/cacti/rra
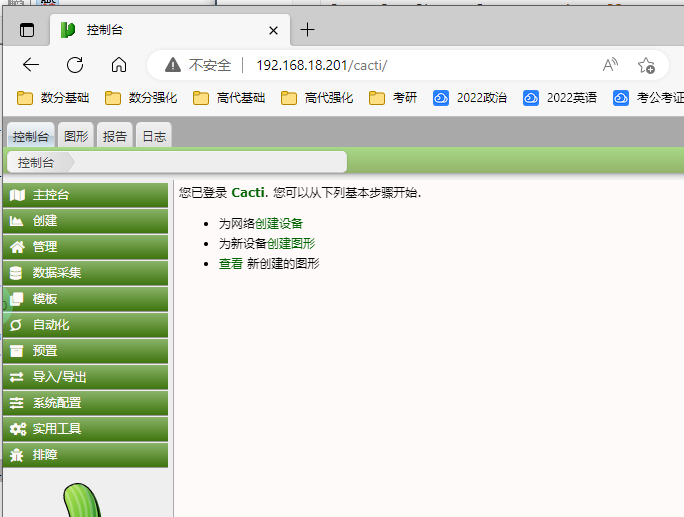
5)通过浏览器安装
初始用户密码:admin admin
6)7-2客户端配置
安装snmp,编写配置文件,启动服务
[root@localhost ~]# yum -y install net-snmp net-snmp-utils lm_sensors
[root@localhost ~]# vim /etc/snmp/snmpd.conf
[root@localhost ~]# egrep "^com2sec|^view|^access" /etc/snmp/snmpd.conf
com2sec notConfigUser  192.168.18.201       public123
view    systemview    included   .1.3.6.1.2.1.1
view    systemview    included   .1.3.6.1.2.1.6
view    systemview    included   .1.3.6.1.2.1.25.1.1
view	all	      included	 .1			80
access  notConfigGroup ""      any       noauth    exact  all none none
[root@localhost ~]# systemctl enable snmpd
[root@localhost ~]# systemctl restart snmpd
7)7-1添加定时计划任务
[root@localhost ~]# crontab -e
[root@localhost ~]# crontab -l
* * * * * php /var/www/html/cacti/poller.php &>/dev/null
8)7-1启动、自启动cacti
[root@localhost ~]# touch /etc/sysconfig/cactid
[root@localhost ~]# cp -a /var/www/html/cacti/service/cactid.service /etc/systemd/system/
[root@localhost ~]# systemctl enable cactid --now
[root@localhost ~]# systemctl status cactid					#检查cactid正常运行
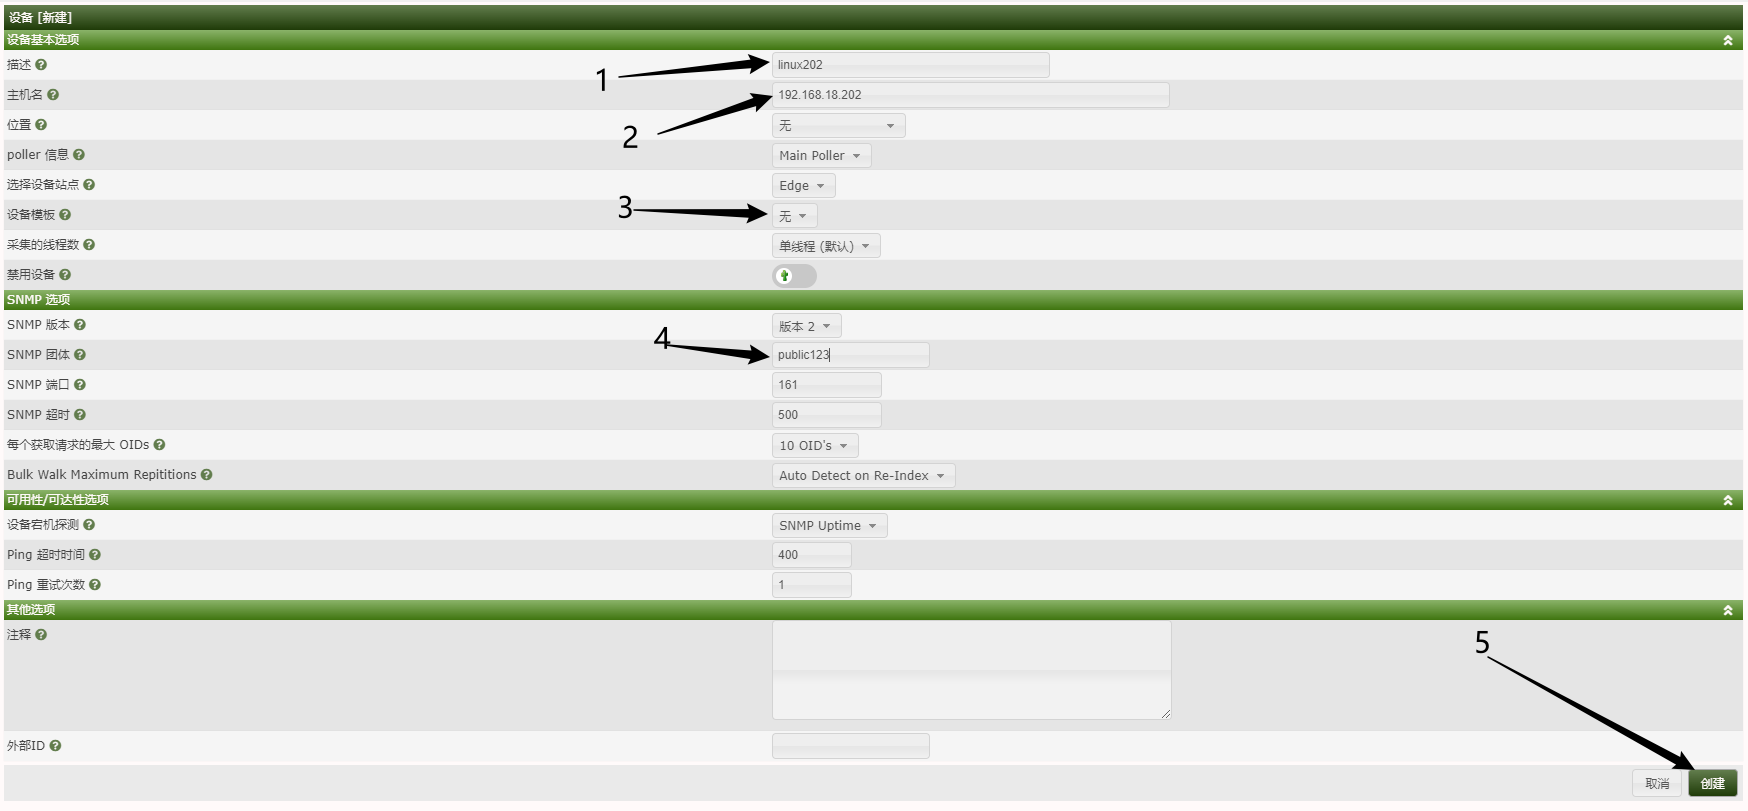
9)7-1web中添加被监控的设备
1.创建监控
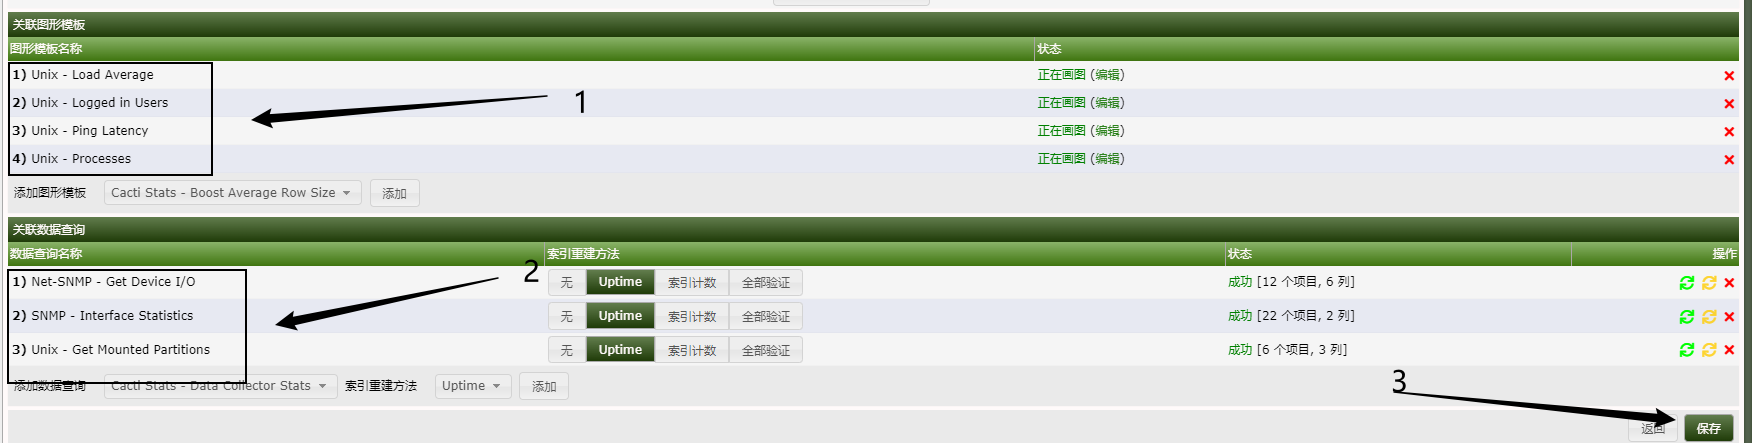
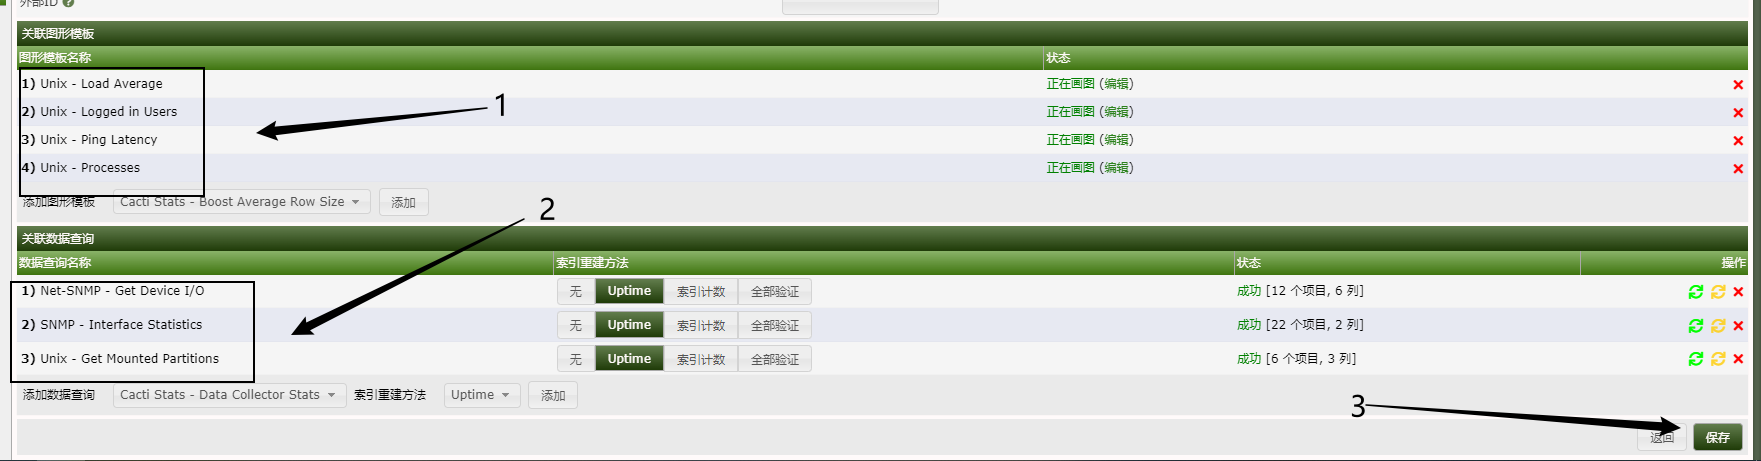
2.添加监控的图形模板、项
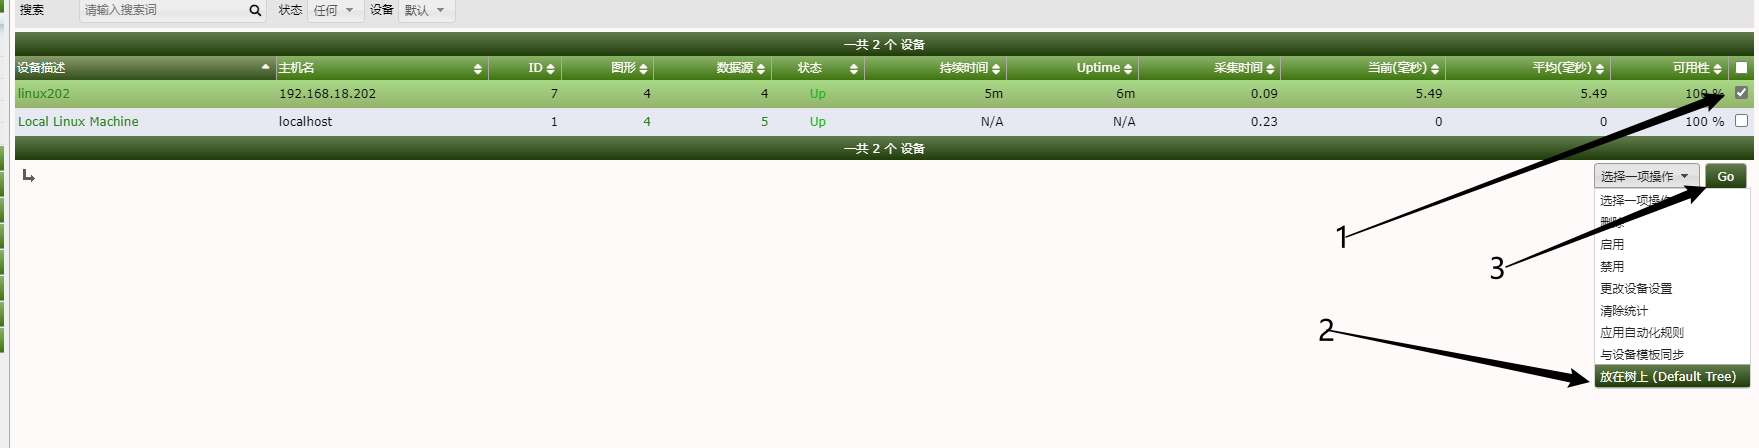
3.将新的监控设备放到树上
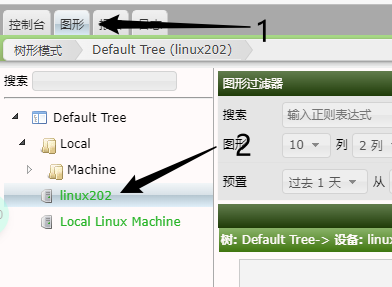
4.查看图形,需要等待采集
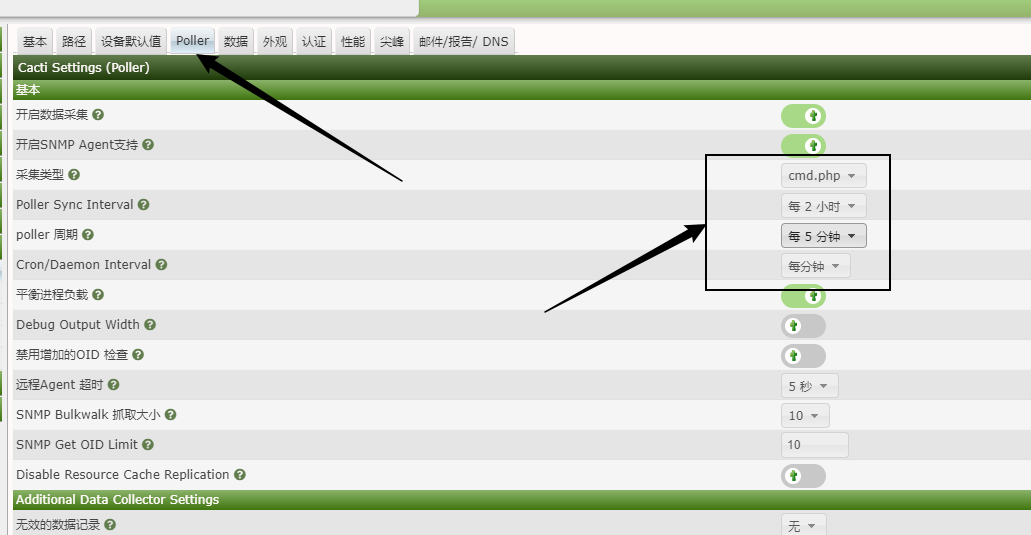
5.更改记录刷新时间