7 nagios
一:概述:
**主要监控:**网络服务、主机资源等
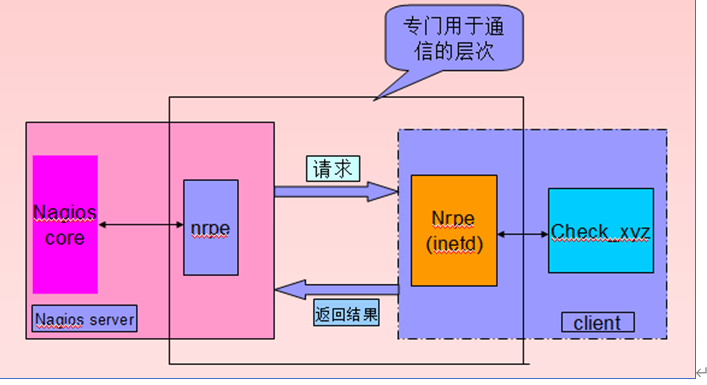
nagios监控:
数据间接收集:(被动监控)由server使用nrpe客户端,连接client的nrpe服务端,采集后返回给server,适合一些系统类资源监控
                                CPU负载、磁盘使用情况、等
                                nrpe——》nrpe(inetd)——》check_xyz——》nrpe(inetd)——》nrpe——》nagios core——》决策(C/S架构)
数据直接收集:(主动监控)由server直接探测client,适合监控一些网络服务
                                sshd、httpd、mysqld
                                nrpe(inetd)——》check_xyz——》被监控的服务——》nagios core——》决策(C/S架构)
拓展:
    C/S架构:client/server 客户端/服务端架构
    B/S:	Web/server  网页/服务端架构
原理图:
二:拓展:nagios配置文件的区别和关联关系
/usr/local/nagios/
				libexec/
						check_*						  	#探测脚本
				etc/									#配置文件目录
						nagios.cfg						#nagios主配置文件
						objects/						#子配置文件目录
								command.cfg			 	#模板调用的检测命令
								*.cfg					#主机的监控配置文件
**总结:**主配置文件调用了子配置文件目录下的主机监控配置文件,其中调用了检测命令配置文件,检测命令配置文件再去调用检测命令
nagios.cfg obkects/ *.cfg command.cfg libexec/check_ *
三:实验一 7版本安装最新版nagios
1、进入官方网站,下载软件包,利用官方手册安装(一键安装)
#7-1服务端配置
[root@localhost ~]# ls
anaconda-ks.cfg  ifcfg-ens33  nagiosxi  scripts  xi-latest.tar.gz
[root@localhost ~]# cd nagiosxi/
[root@localhost nagiosxi]# ./fullinstall
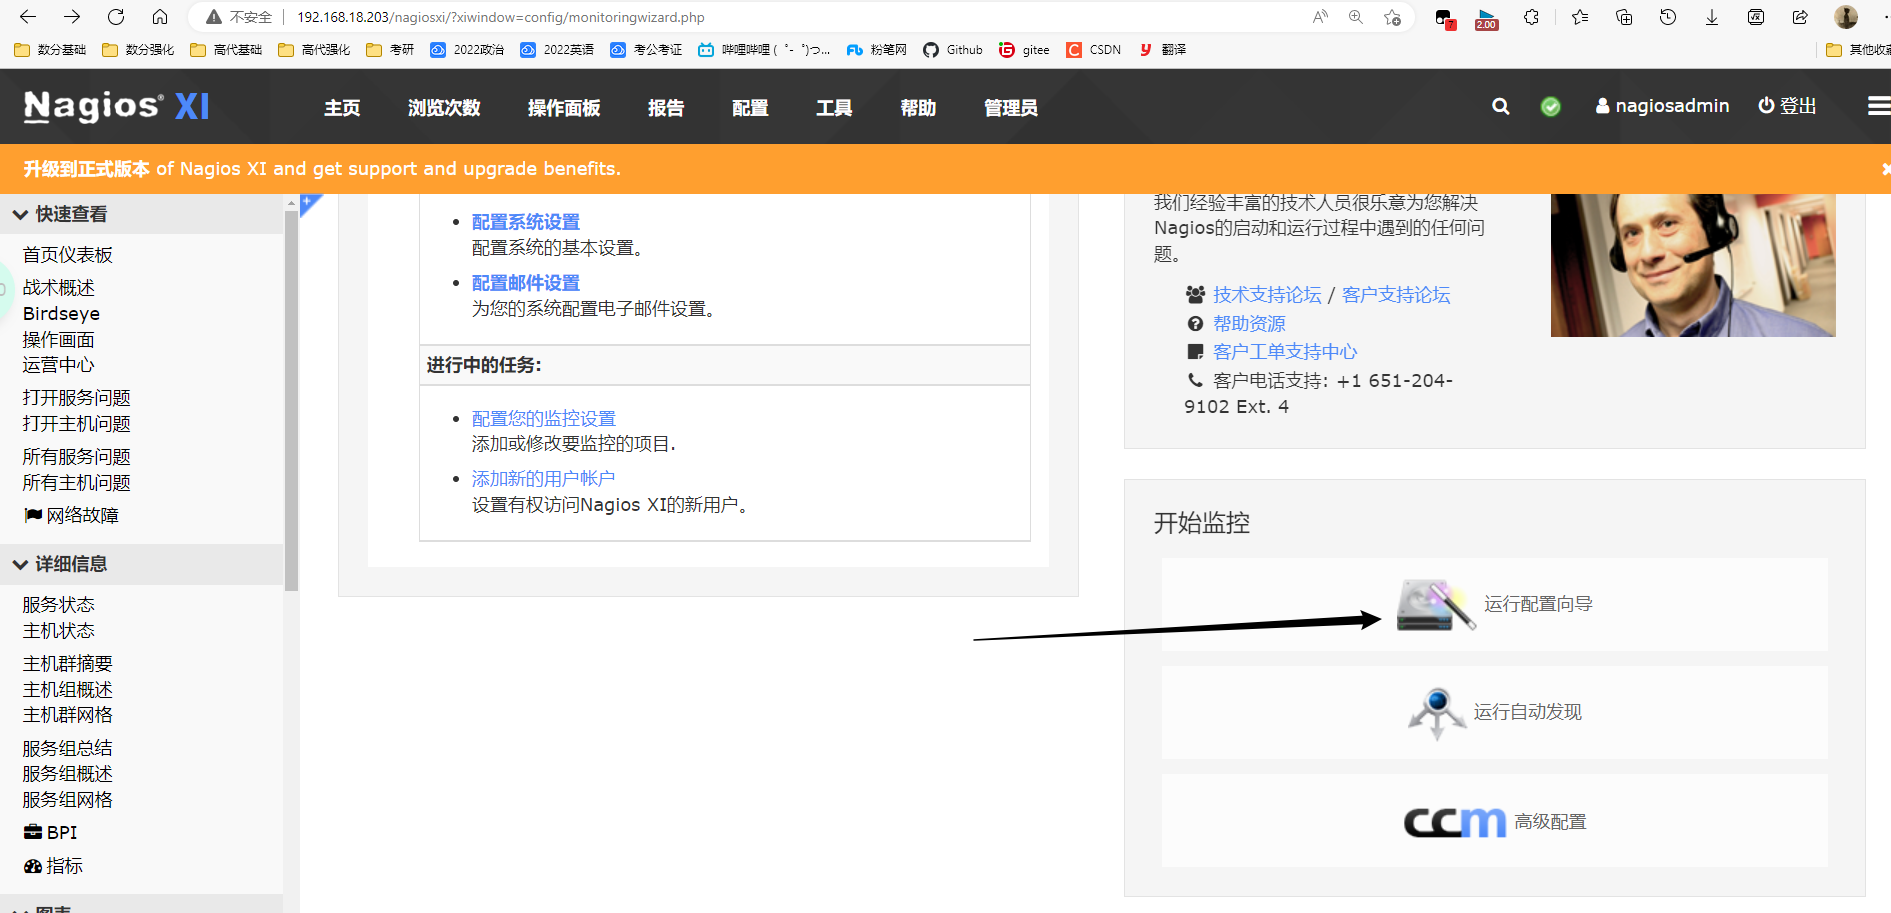
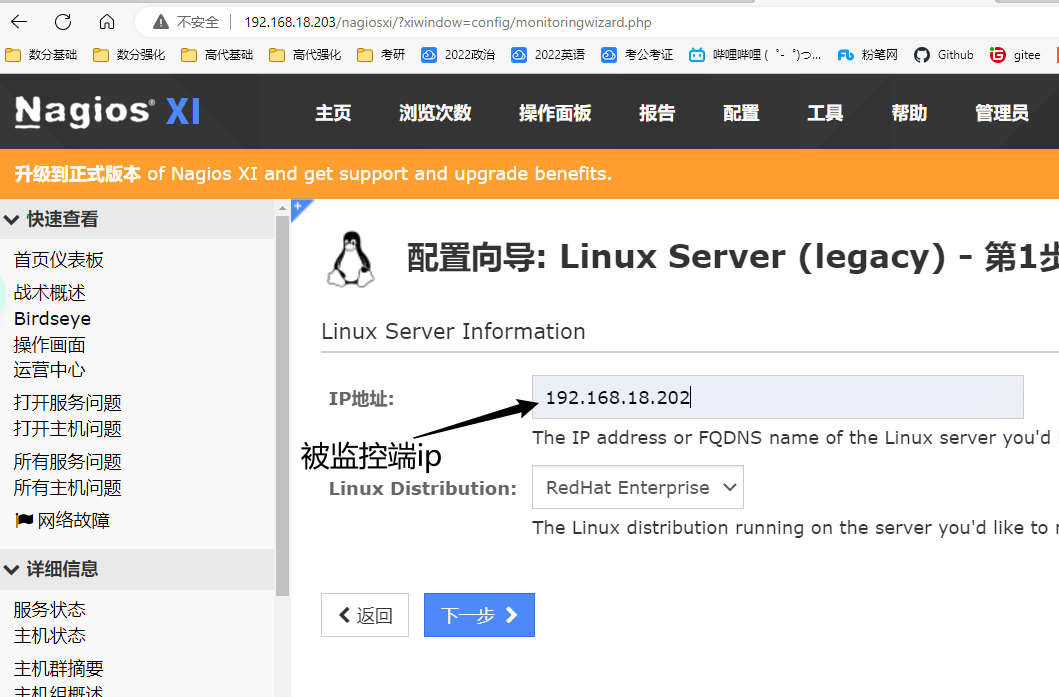
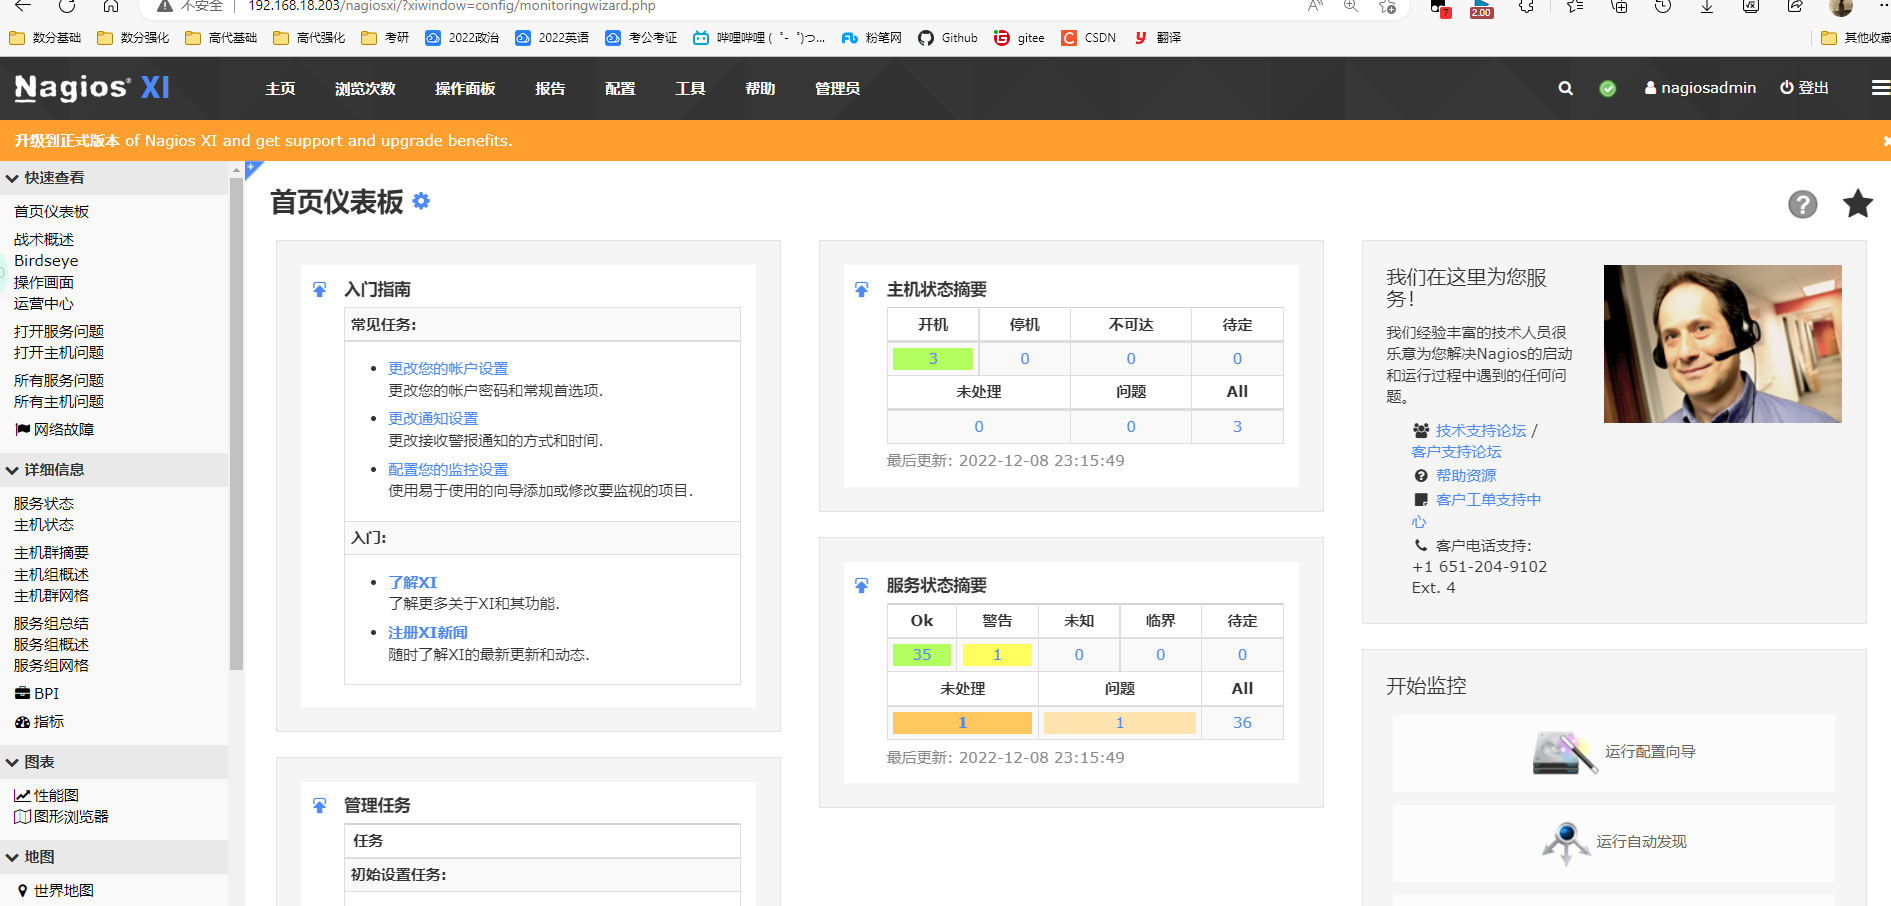
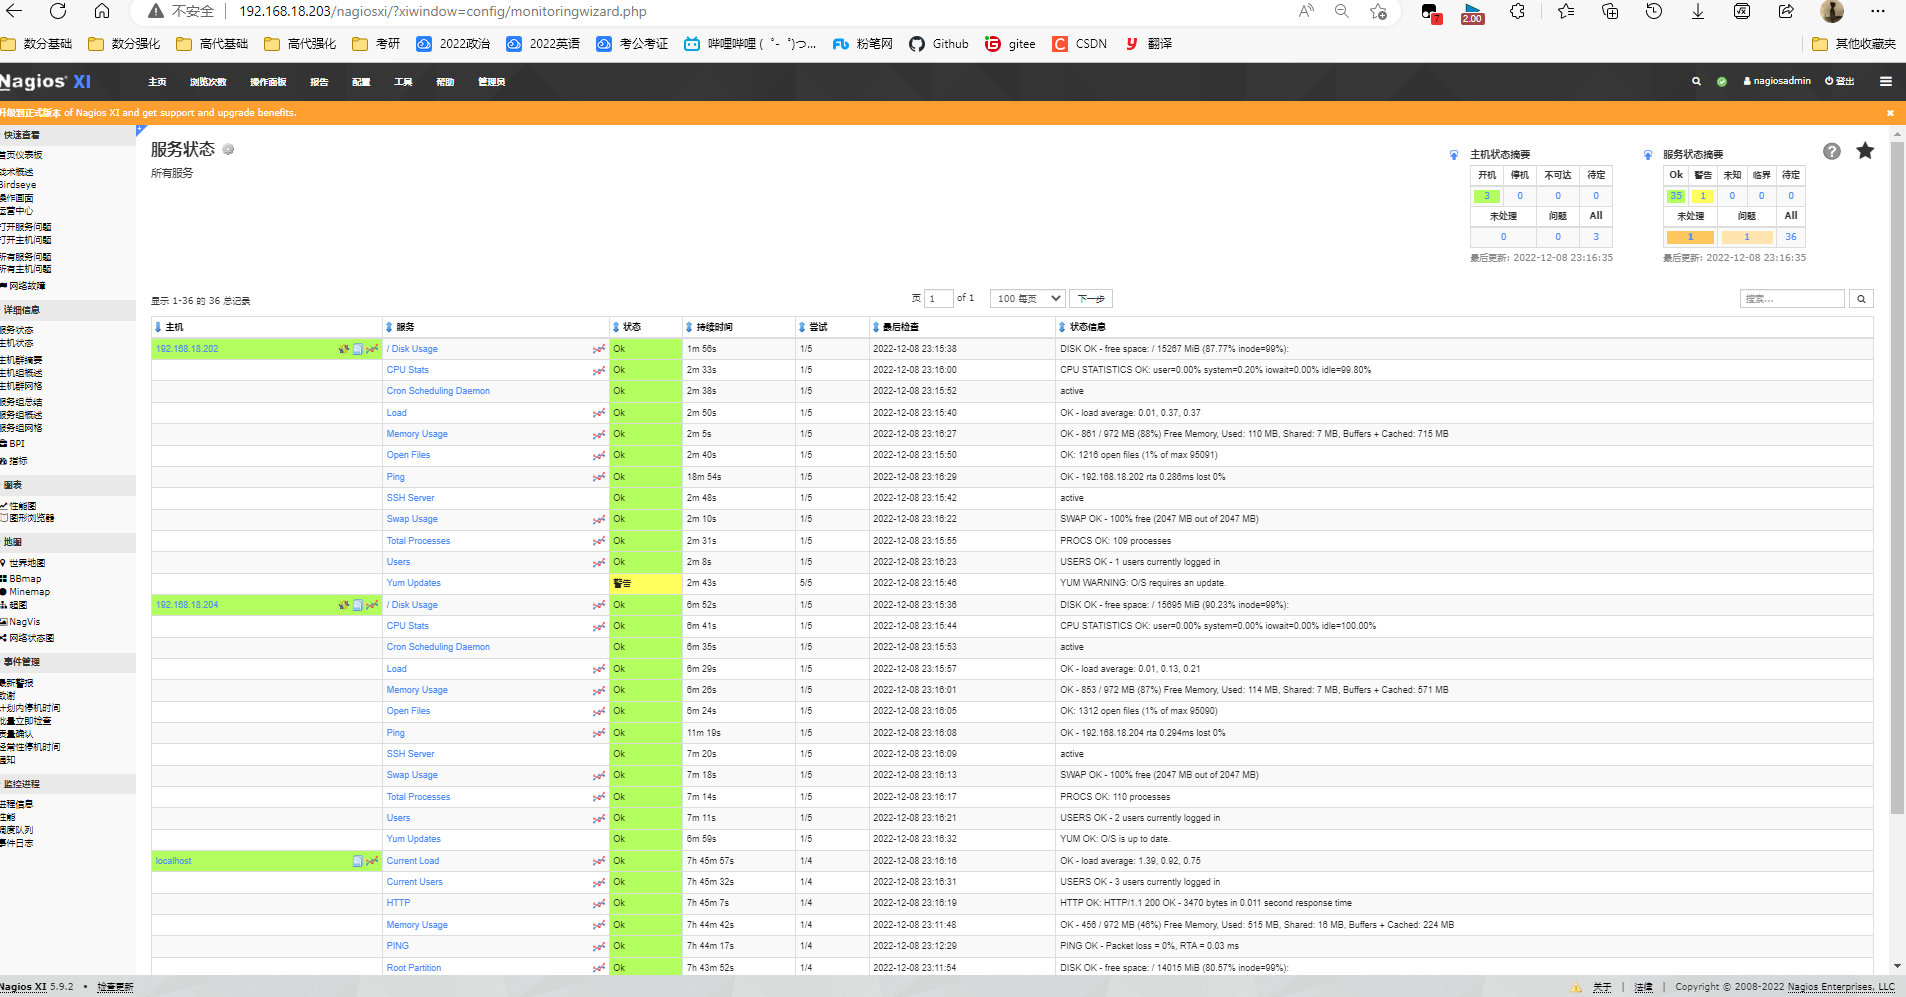
2、再通过浏览器web管理将,7-2加入监控
3、7-2、7-4客户端配置客户端
#7-2、7-4客户端配置
[root@localhost ~]# tar -xf linux-nrpe-agent.tar.gz
[root@localhost ~]# cd linux-nrpe-agent/
[root@localhost ~]# ./fullinstall
4、7-1再用web管理进行下一步安装
四:实验二 6版本安装nagios
| 虚拟机 | 环境 | 步骤 |
|---|---|---|
| 6-1 | nagios服务器,nrpe客户端 | 1.配置nagios网页 本地安装所需依赖,LAMP环境 创建nagcmd组,并将新用户nagios、apache加入组 解压nagios-3.3.1.tar.gz,进入、检查、编译make all、安装(不一样的) 生成密码文件(保护目录)、重启httpd 2.安装,配置插件管理 解压nagios-plugins-1.4.14.tar.gz,进入,检查,编译,安装 设置自启动nagios,创建软链接方便调用命令 检查语法,启动nagios 浏览器登录,进行查看 3.安装nagios客户端 解压,进入nrpe,检查,编译,安装 编写自定义监控主机的配置文件 linux20.cfg 在nagios主配置文件(nagios.cfg)中调用 linux20.cfg文件 检查语法,重启nagios 进入浏览器查看监控 4.增加被监控主机的资源项 linux20.cfg中新增内容 创建新监控配置文件 mysql.cfg 在command.cfg中新增check_load、check_mysql脚本的调用 检查主配置文件对监控配置文件的调用 检查nagios语法,重启nagios测试 |
| 6-2 | nagios客户端,nrpe服务端 | 1.nagios客户端配置 安装依赖gcc、gcc-c++、openssl、openssl-devel 创建nagcmd用户 安装nagios-plugin 安装nrpe服务端,修改nrpe配置文件,创建软链接,并初始化nrpe,检查5666端口 2.重新配置nrpe配置文件 重新修改nrpe配置文件(作为nrpe的服务端监控本机的资源,更改负载的条件) 杀死nrpe进程,重新初始化nrpe 安装数据库,创建库,并远程登陆的用户(方便6-1对6-2的数据库服务进行监控) |
1)6-1配置nagios网页
1.本地安装所需依赖,LAMP环境
[root@localhost ~]# yum -y install gcc gcc-c++ httpd mysql mysql-server mysql-devel php php-mysql glibc glibc-common *.gd*
2.创建nagcmd组,并将新用户nagios、apache加入组
[root@localhost ~]# useradd nagios
[root@localhost ~]# groupadd nagcmd
[root@localhost ~]# gpasswd -a nagios nagcmd
正在将用户“nagios”加入到“nagcmd”组中
[root@localhost ~]# gpasswd -a apache nagcmd
正在将用户“apache”加入到“nagcmd”组中
3.解压,进入、检查、编译、安装
./configure --prefix=/usr/local/nagios --with-command-group=nagcmd 		#检查
--enable-event-broker --sysconfdir=/etc/nagios							#候补选项:需要指定nagios 配置文件位置时,这样指定。本次实验未指定
[root@localhost ~]# unzip nagios.zip
[root@localhost ~]# cd nagios
[root@localhost nagios]# tar -xf nagios-3.3.1.tar.gz
[root@localhost nagios]# cd nagios
[root@localhost nagios]# ./configure --prefix=/usr/local/nagios --with-command-group=nagcmd
[root@localhost nagios]# make all							#编译
[root@localhost nagios]# make install						#安装二进制运行程序
[root@localhost nagios]# make install-init					#初始化脚本
[root@localhost nagios]# make install-config				#配置文件样本
[root@localhost nagios]# make install-commandmode			#设置运行目录权限,命令相关
[root@localhost nagios]# make install-webconf				#设置nagios配置文件到apache子配置文件下
4.生成密码文件(保护目录)、重启httpd
[root@localhost nagios]# grep "htpasswd.users" /etc/httpd/conf.d/nagios.conf				#查看目录保护的文件指向位置
   AuthUserFile /usr/local/nagios/etc/htpasswd.users
   AuthUserFile /usr/local/nagios/etc/htpasswd.users
[root@localhost nagios]# htpasswd -c /usr/local/nagios/etc/htpasswd.users nagiosadmin		#生成密码文件
[root@localhost nagios]# service httpd restart
[root@localhost nagios]# chkconfig httpd on
2)6-1安装,配置插件管理器
1.解压,进入,检查,编译,安装
[root@localhost nagios]# tar -xf nagios-plugins-1.4.14.tar.gz
[root@localhost nagios]# cd nagios-plugins-1.4.14
[root@localhost nagios-plugins-1.4.14]# ./configure --with-nagios-user=nagios --with-nagios-group=nagios --with-mysql --enable-perl-modules
[root@localhost nagios-plugins-1.4.14]# make && make install
2.设置自启动nagios,创建软链接方便调用命令
[root@localhost ~]# chkconfig nagios on
[root@localhost ~]# ln -s /usr/local/nagios/bin/* /usr/local/bin/
[root@localhost ~]# ln -s /usr/local/nagios/sbin/* /usr/local/sbin/
3.检查语法,启动nagios
[root@localhost ~]# nagios -v /usr/local/nagios/etc/nagios.cfg		#检查语法
Total Warnings: 0
Total Errors:   0

Things look okay - No serious problems were detected during the pre-flight check

[root@localhost ~]# service nagios start							#启动
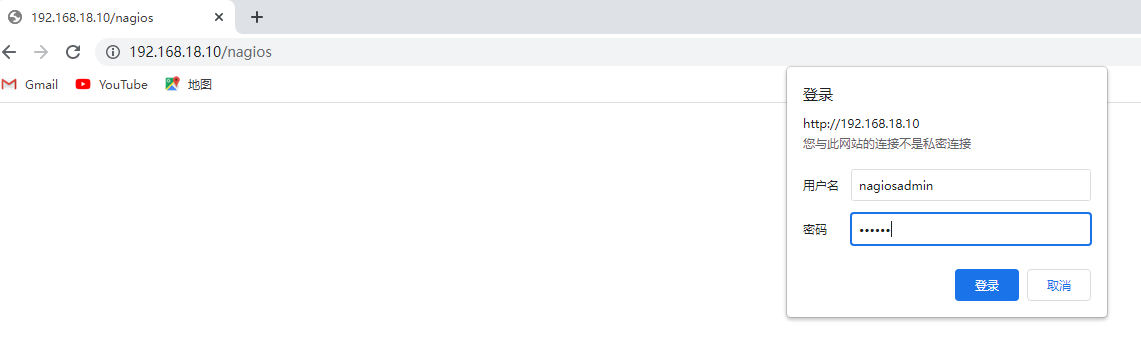
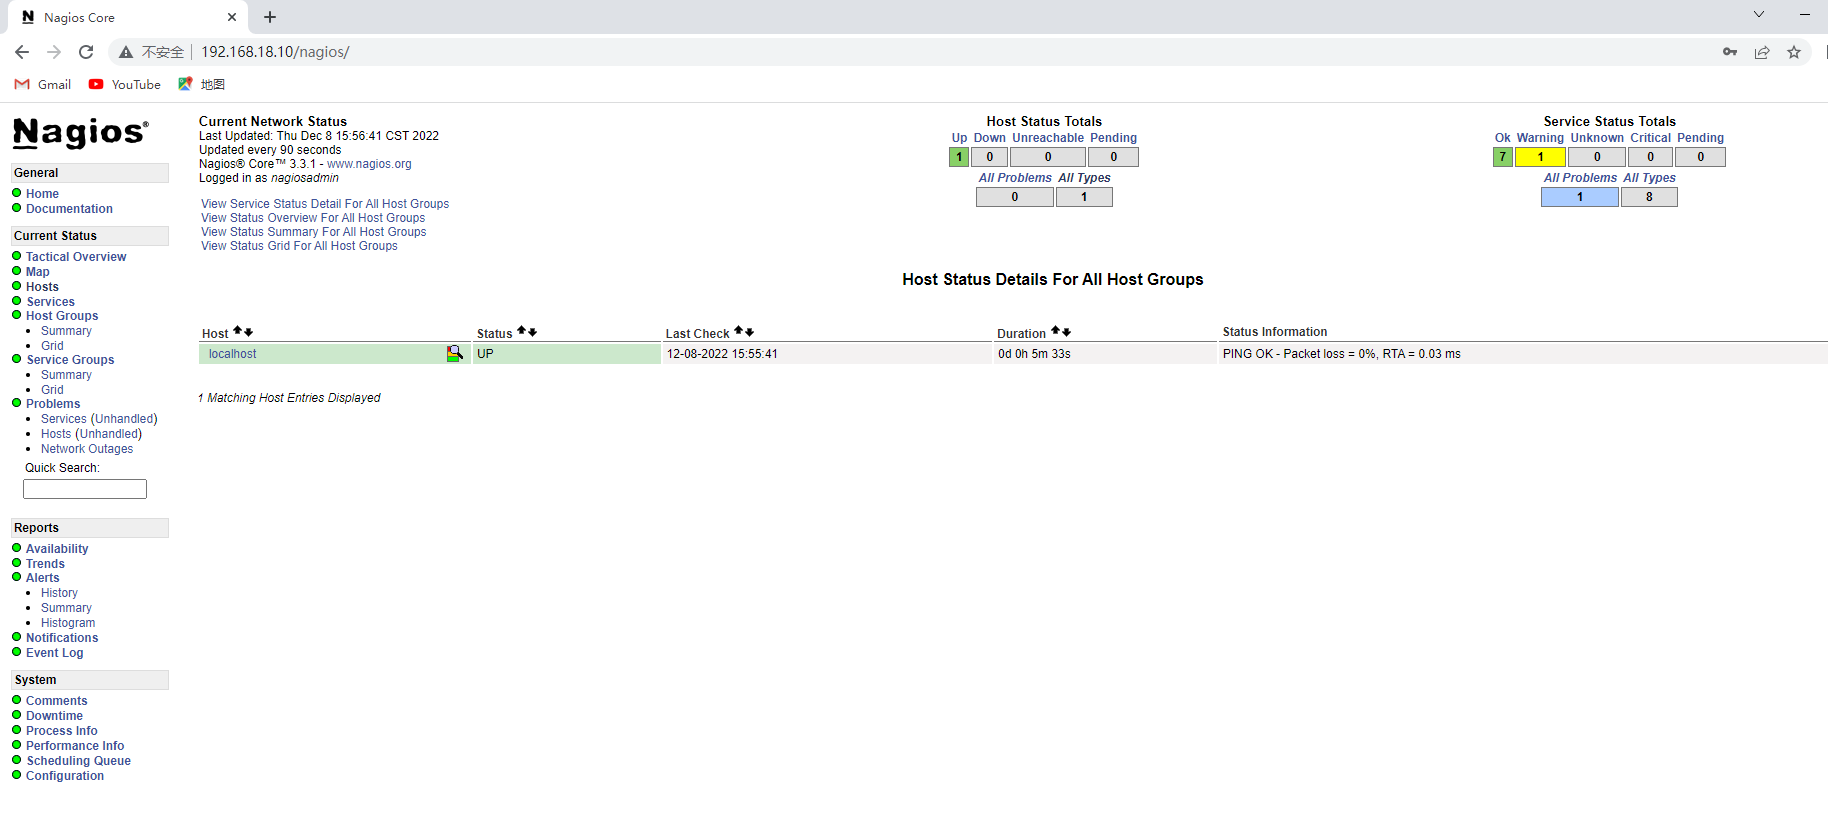
4.浏览器登录,进行查看
3)6-2 nagios客户端配置
1.安装依赖gcc、gcc-c++、openssl、openssl-devel
[root@localhost ~]# yum -y install gcc gcc-c++ openssl openssl-devel
2.创建nagcmd用户
[root@localhost ~]# useradd nagios
3.安装nagios-plugins
[root@localhost ~]# unzip nagios.zip
[root@localhost ~]# cd nagios
[root@localhost nagios]# tar -xf nagios-plugins-1.4.14.tar.gz
[root@localhost nagios]# cd nagios-plugins-1.4.14
[root@localhost nagios-plugins-1.4.14]# pwd
/root/nagios/nagios-plugins-1.4.14
[root@localhost nagios-plugins-1.4.14]# ./configure --with-nagios-user=nagios --with-nagios-group=nagios
[root@localhost nagios-plugins-1.4.14]# make all && make install
4.安装nrpe服务端,修改nrpe配置文件,创建软链接,并初始化nrpe,检查5666端口
[root@localhost ~]# cd nagios
[root@localhost nagios]# tar -xf nrpe-2.12.tar.gz
[root@localhost nagios]# cd nrpe-2.12
[root@localhost nrpe-2.12]# pwd
/root/nagios/nrpe-2.12
[root@localhost nrpe-2.12]# ./configure --enable-ssl --with-ssl-lib=/usr/lib/ #安装nrpe服务端
[root@localhost nrpe-2.12]# make all
[root@localhost nrpe-2.12]# make install-plugin
[root@localhost nrpe-2.12]# make install-daemon
[root@localhost nrpe-2.12]# make install-daemon-config
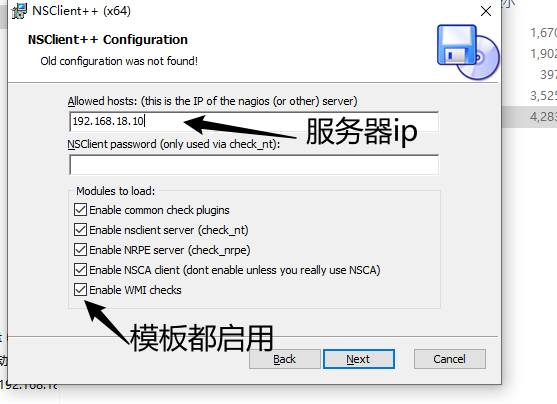
[root@localhost ~]# vim /usr/local/nagios/etc/nrpe.cfg #修改nrpe配置文件
[root@localhost ~]# grep "allowed_hosts" /usr/local/nagios/etc/nrpe.cfg
allowed_hosts=192.168.18.10,127.0.0.1
[root@localhost ~]# ln -s /usr/local/nagios/bin/* /usr/local/bin/ #创建软链接,并初始化nrpe
[root@localhost ~]# nrpe -c /usr/local/nagios/etc/nrpe.cfg -d
[root@localhost ~]# netstat -anpt |grep 5666 #检查nrpe运行
tcp 0 0 0.0.0.0:5666 0.0.0.0:* LISTEN 39378/nrpe
4)6-1 nagios服务端安装 nrpe的客户端
1.解压,进入nrpe,检查,编译,安装
[root@localhost ~]# cd nagios
[root@localhost nagios]# tar -xf nrpe-2.12.tar.gz
[root@localhost nagios]# cd nrpe-2.12
[root@localhost nrpe-2.12]# pwd
/root/nagios/nrpe-2.12
[root@localhost nrpe-2.12]# ./configure --enable-ssl --with-ssl-lib=/usr/local/lib/
[root@localhost nrpe-2.12]# make all && make install-plugin
2.编写自定义监控主机的配置文件 linux20.cfg
[root@localhost ~]# vim /usr/local/nagios/etc/objects/linux20.cfg
[root@localhost ~]# cat /usr/local/nagios/etc/objects/linux20.cfg
define host{
	use		linux-server
	host_name	CentOS-20
	alias		20
	address		192.168.18.20
	}
define service{
	use		generic-service
	host_name	CentOS-20
	service_description	SSH
	check_command	check_ssh
	}
3.在nagios主配置文件(nagios.cfg)中调用 linux20.cfg文件
[root@localhost ~]# vim /usr/local/nagios/etc/nagios.cfg
[root@localhost ~]# grep "linux20.cfg" /usr/local/nagios/etc/nagios.cfg
cfg_file=/usr/local/nagios/etc/objects/linux20.cfg
4.检查语法,重启nagios
[root@localhost ~]# nagios -v /usr/local/nagios/etc/nagios.cfg

[root@localhost ~]# service nagios restart
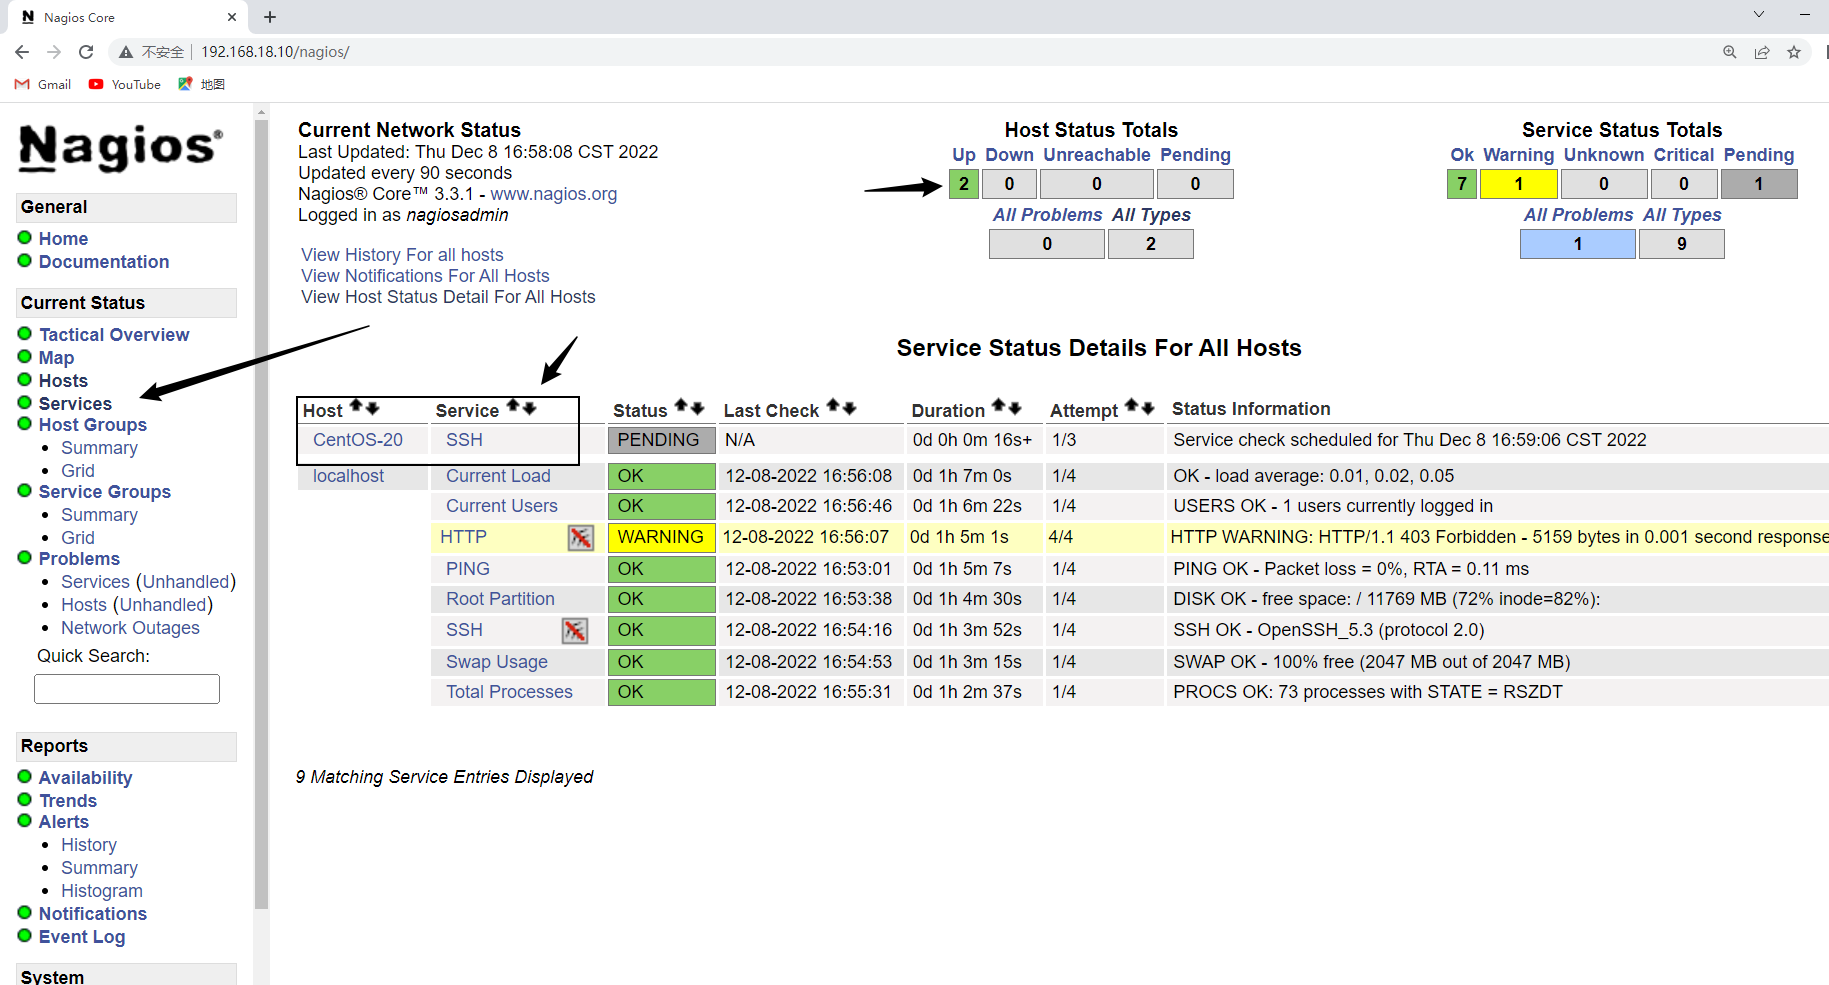
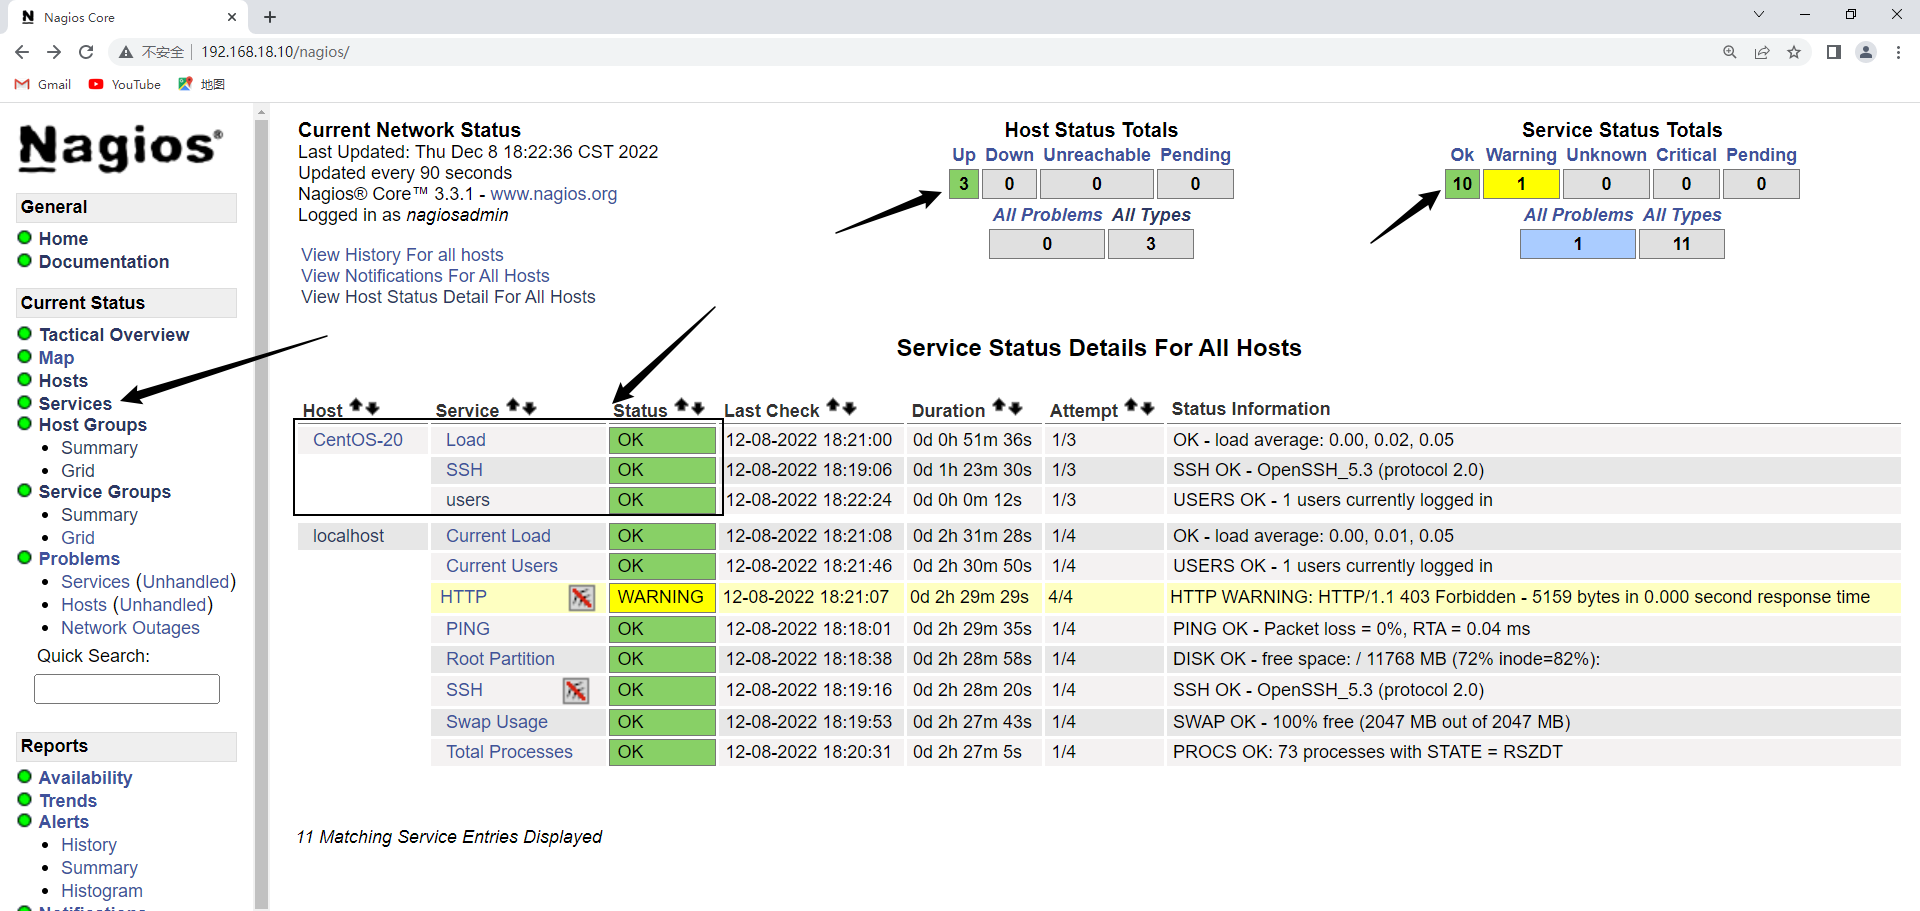
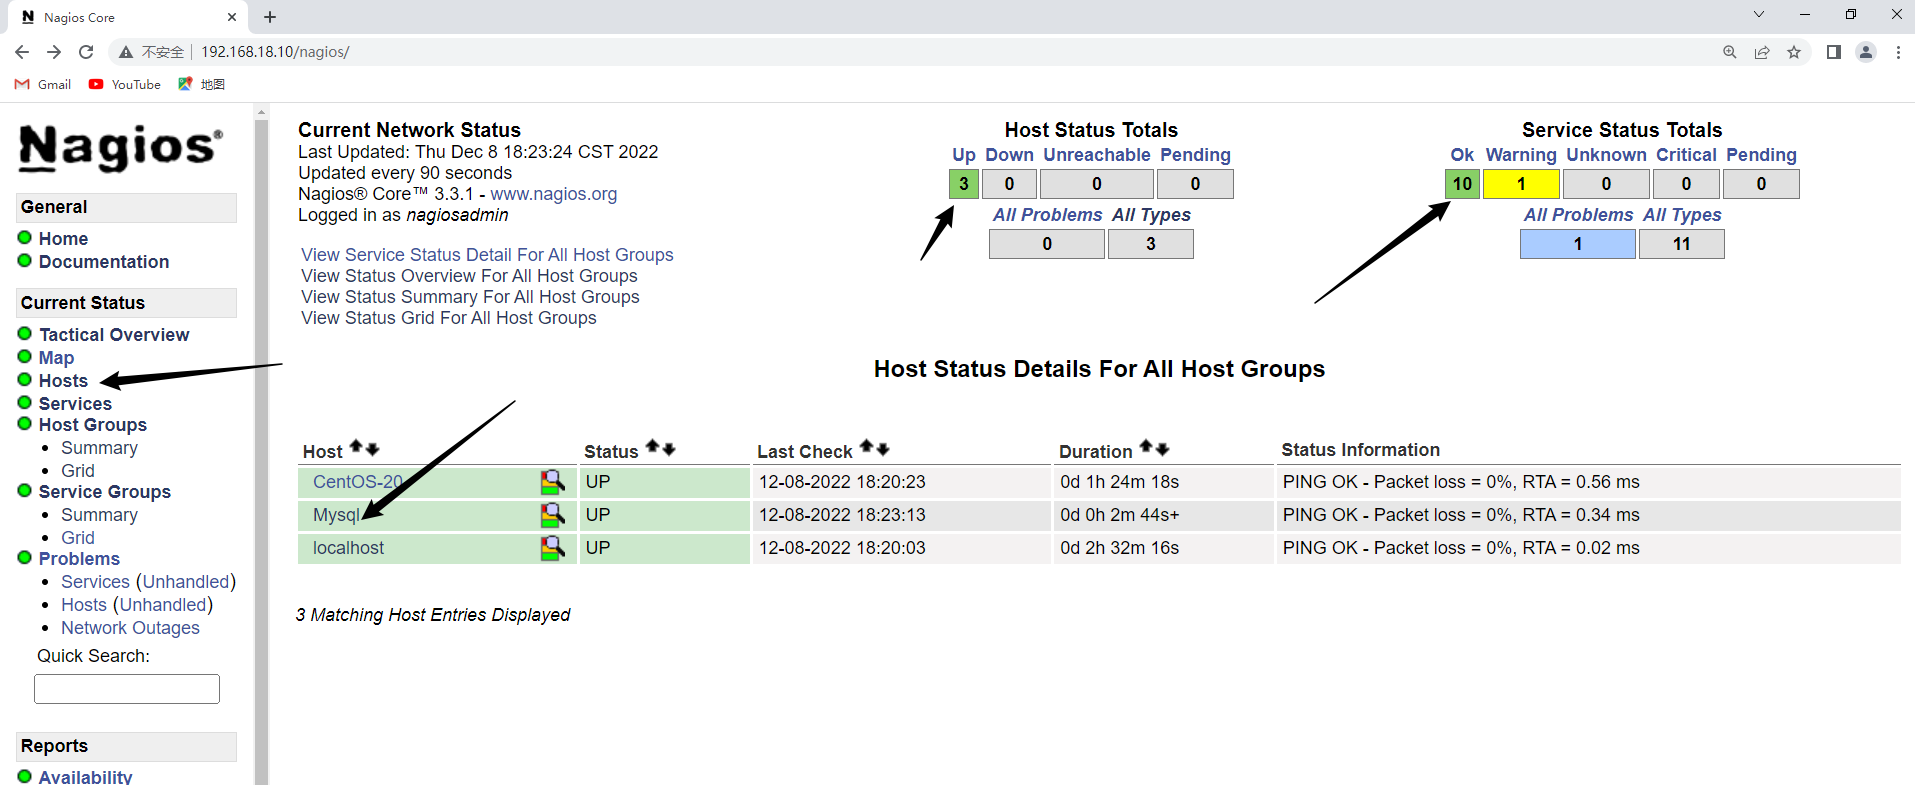
5.进入浏览器查看监控
5)6-2 nagios客户端重新配置nrpe配置文件
1.重新修改nrpe配置文件(作为nrpe的服务端监控本机的资源,更改负载的条件)
[root@localhost ~]# vim /usr/local/nagios/etc/nrpe.cfg
[root@localhost ~]# grep "check_load" /usr/local/nagios/etc/nrpe.cfg
command[check_load]=/usr/local/nagios/libexec/check_load -w 3,2,1 -c 5,4,3
#command[check_load]=/usr/local/nagios/libexec/check_load -w $ARG1$ -c $ARG2$
2.杀死nrpe进程,重新初始化nrpe
[root@localhost ~]# netstat -anpt |grep :5666
tcp        0      0 0.0.0.0:5666                0.0.0.0:*                   LISTEN      39378/nrpe
[root@localhost ~]# kill 39378

[root@localhost ~]# nrpe -c /usr/local/nagios/etc/nrpe.cfg -d				#重新初始化nrpe
[root@localhost ~]# netstat -anpt |grep :5666
tcp        0      0 0.0.0.0:5666                0.0.0.0:*                   LISTEN      39410/nrpe
3.安装数据库,创建库,并远程登陆的用户(方便6-1对6-2的数据库服务进行监控)
[root@localhost ~]# yum -y install mysql mysql-server
[root@localhost ~]# service mysqld start
[root@localhost ~]# mysql

mysql> create database nagios;

mysql> grant select on nagios.* to nagios@'%' identified by '123456';
6)6-1 增加被监控主机的资源项
1.linux20.cfg中新增内容
[root@localhost ~]# vim /usr/local/nagios/etc/objects/linux20.cfg
[root@localhost ~]# cat /usr/local/nagios/etc/objects/linux20.cfg
define host{
	use		linux-server
	host_name	CentOS-20
	alias		20
	address		192.168.18.20
	}
define service{
	use		generic-service
	host_name	CentOS-20
	service_description	SSH
	check_command	check_ssh
	}
define service{
	use		generic-service
	host_name	CentOS-20
	service_description	Load
	check_command	check_nrpe!check_load
	}
define service{
	use		generic-service
	host_name	CentOS-20
	service_description	users
	check_command	check_nrpe!check_users
	}
2.创建新监控配置文件 mysql.cfg
[root@localhost ~]# cat /usr/local/nagios/etc/objects/mysql.cfg
define host{
	use		linux-server
	host_name	Mysql
	alias		Mysql	Server
	address	192.168.18.20
	}
define service {
	host_name 	Mysql
	check_period	24x7
	max_check_attempts	2
	normal_check_interval	1
	retry_check_interval	1
	contact_groups		admins
	notification_interval	5
	notification_period	24x7
	notification_options	w,u,c,r
	check_command check_mysql
	}
3.在command.cfg中新增check_load、check_mysql脚本的调用(客户端的check_users默认调用了)
[root@localhost ~]# vim /usr/local/nagios/etc/objects/commands.cfg
[root@localhost ~]# tail -n 8 /usr/local/nagios/etc/objects/commands.cfg
define command{
	command_name	check_nrpe
	command_line	$USER1$/check_nrpe -H $HOSTADDRESS$ -c $ARG1$
	}
define command{
	command_name	check_mysql
	command_line	$USER1$/check_mysql -H $HOSTADDRESS$ -u nagios -p 123456
	}
4.检查主配置文件对监控配置文件的调用
[root@localhost ~]# vim /usr/local/nagios/etc/nagios.cfg
[root@localhost ~]# egrep "linux20|mysql" /usr/local/nagios/etc/nagios.cfg
cfg_file=/usr/local/nagios/etc/objects/linux20.cfg
cfg_file=/usr/local/nagios/etc/objects/mysql.cfg
5.检查nagios语法,重启nagios测试
[root@localhost ~]# nagios -v /usr/local/nagios/etc/nagios.cfg
[root@localhost ~]# service nagios restart
7)增加对windows的监控
1.Windows配置:上传程序进行安装,安装完成以后需要关闭防火墙
2. 6-1进行配置
#只需要仅主配置文件调用windows.cfg
[root@localhost ~]# vim /usr/local/nagios/etc/nagios.cfg
[root@localhost ~]# grep "windows.cfg" /usr/local/nagios/etc/nagios.cfg
cfg_file=/usr/local/nagios/etc/objects/windows.cfg
#cfg_file=/usr/local/nagios/etc/objects/windows.cfg

#更改windows.cfg的ip地址
[root@localhost ~]# vim /usr/local/nagios/etc/objects/windows.cfg
[root@localhost ~]# grep "192.168.18.101" /usr/local/nagios/etc/objects/windows.cfg
	address		192.168.18.101	; IP address of the host

#根据实际邮箱更改
[root@localhost ~]# vim /usr/local/nagios/etc/objects/contacts.cfg
[root@localhost ~]# grep "qq.com" /usr/local/nagios/etc/objects/contacts.cfg
        email                           1208779136@qq.com	; <<***** CHANGE THIS TO YOUR EMAIL ADDRESS ******


[root@localhost ~]# service nagios restart				#重启nagios