[TOC]
3 Docker-网络管理
一、Docker 网络通讯
网络具有:
联通性:
容器之间的联通:bridge、veth
容器与外部:SNAT
外部网络:DNAT
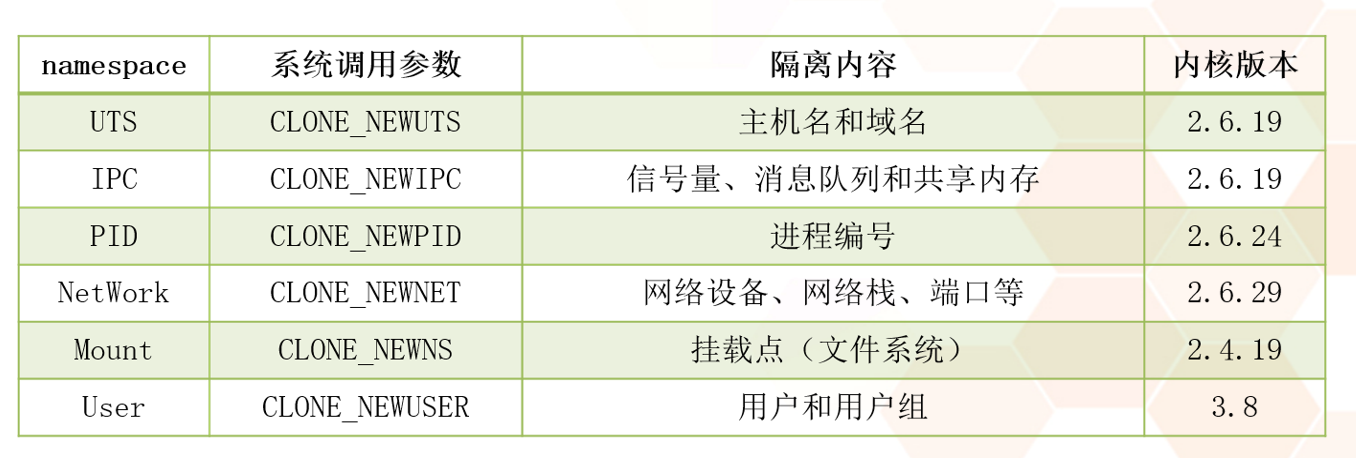
隔离性:
Linux kernel NS Network # NS (namespace)
1、实验1:Namespace - 网络
netns 是在 linux 中提供网络虚拟化的一个项目,使用 netns 网络空间虚拟化可以在本地虚拟化出多个网络环境,目前 netns 在 lxc 容器中被用来为容器提供网络
使用 netns 创建的网络空间独立于当前系统的网络空间,其中的网络设备以及 iptables 规则等都是独立的,就好像进入了另外一个网络一样
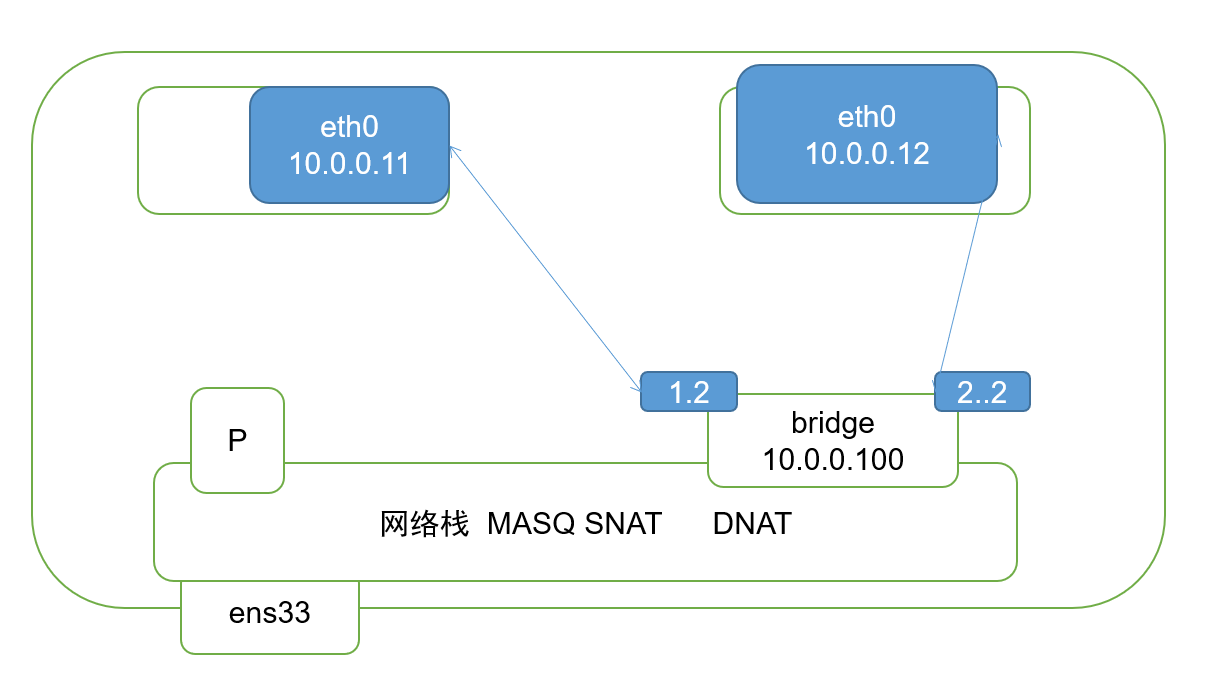
实验拓扑图:
实验详细步骤:
注意:使用没有安装 docker 的环境进行实验
1)r1、r2虚拟空间配置:
1.创建虚拟空间
2.创建两对veth设备
3.将设备放入虚拟空间中
4.虚拟空间中改网卡名,启动网卡,配置ip
[root@localhost ~]# ip netns add r1					#创建虚拟空间r1		$ ip netns delete r1	#删除虚拟空间
[root@localhost ~]# ip netns add r2					#创建虚拟空间r2
[root@localhost ~]# ip netns ls						#查看所有的虚拟空间
r2
r1


[root@localhost ~]# ip netns exec r1 bash			# 进入虚拟网络空间

[root@localhost ~]# ip link add veth1.1 type veth peer name veth1.2			#在根空间中创建一对veth设备 veth1.1 veth1.2
[root@localhost ~]# ip link add veth2.1 type veth peer name veth2.2			#在根空间中创建一对veth设备 veth2.1 veth2.2
											$ ip link delete veth1.1 type veth peer name veth1.2		#删除一对veth设备


[root@localhost ~]# ip link set veth1.1 netns r1		#将veth1.1放入r1空间中
[root@localhost ~]# ip link set veth2.1 netns r2		#将veth2.1放入r2空间中


[root@localhost ~]# ip netns exec r1 bash				#进入r1空间
[root@localhost ~]# ip link set veth1.1 name eth0		#将veth1.1改名为eth0
[root@localhost ~]# ip link set eth0 up					#启动eth0网卡
[root@localhost ~]# ip link set lo up					#启动lo本地回环网卡
[root@localhost ~]# ip addr add 10.0.0.11/24 dev eth0	#设置eth0网卡ip
[root@localhost ~]# exit


[root@localhost ~]# ip netns exec r2 bash				#进入r2空间
[root@localhost ~]# ip link set veth2.1 name eth0		#将veth2.1改名为eth0
[root@localhost ~]# ip link set lo up					#启动lo本地回环网卡
[root@localhost ~]# ip link set eth0 up					#启动eth0网卡
[root@localhost ~]# ip addr add 10.0.0.12/24 dev eth0	#设置eth0网卡ip
[root@localhost ~]# exit

						$ ip link set veth1.1 name eth0			#更改网络名称
						$ ip link set eth0 up					#启动网卡
						$ ip addr add 10.0.0.11/24 dev eth0		#设置网卡ip
2)根空间中创建网桥
[root@localhost ~]# ip link add name br0 type bridge			#根空间中创建网桥
[root@localhost ~]# ip link set br0 up							#启用br0网桥
[root@localhost ~]# ip addr add 10.0.0.100/24 dev br0			#设置网桥ip(和子空间中的地址在同一个网段)


[root@localhost ~]# ip link set veth1.2 up					#启用根空间中的veth设备
[root@localhost ~]# ip link set veth2.2 up

[root@localhost ~]# ip link set dev veth1.2 master br0		#将根空间中的veth设备连接至网桥
[root@localhost ~]# ip link set dev veth2.2 master br0
3)r1空间中测试,访问r2空间
访问成功:
2、拓展:docker 中启动容器时,会自动创建网桥、网络子空间
1)注意:docker 启动容器后,ip netns ls 命令无法查看子空间
2)原因:docker 将 NS 显示关闭了(NS:namespace)
3)解决:docker NS 显示
原理:将 docker 删除的文件,重新创建
实验步骤:(本次实验在安装 docker 的环境中实现)
1、启动容器
	$ docker run --name test -d 163

2、获取容器id
    $ docker inspect --format='{{.State.Pid}}' test
    2243

3、创建 ip netns 能过滤出信息的目录、文件(软链接)
    $ mkdir /var/run/netns
    $ ln -s /proc/2243/ns/net /var/run/netns/2243

4、查看
    $ ip netns ls
    2243 (id: 0)
3、实验2:子空间与外部相互访问
本次实验采用 C7-1、C7-2
1)子空间访问外部网页
原理:SNAT,源地址转换
C 7-1 做外部服务器 ip:192.168.20.201
C 7-2 做内部,存在子空间 ip:192.168.20.202
实验步骤:
1、C 7-1 部署网站服务
[root@localhost ~]# yum -y install httpd
[root@localhost ~]# echo "hello YQ..." > /var/www/html/index.html
[root@localhost ~]# systemctl enable httpd --now
2、C 7-2 部署内部环境
ip netns add r1
ip netns add r2
ip link add veth1.1 type veth peer name veth1.2
ip link add veth2.1 type veth peer name veth2.2
ip link set veth1.1 netns r1
ip link set veth2.1 netns r2


ip netns exec r1 bash
ip link set veth1.1 name eth0
ip link set eth0 up ; ip link set lo up
ip addr add 10.0.0.11/24 dev eth0
exit


ip netns exec r2 bash
ip link set veth2.1 name eth0
ip link set eth0 up ; ip link set lo up
ip addr add 10.0.0.12/24 dev eth0
exit


ip link add name br0 type bridge
ip link set br0 up
ip addr add 10.0.0.100/24 dev br0
ip link set veth1.2 up ; ip link set veth2.2 up
ip link set dev veth1.2 master br0
ip link set dev veth2.2 master br0
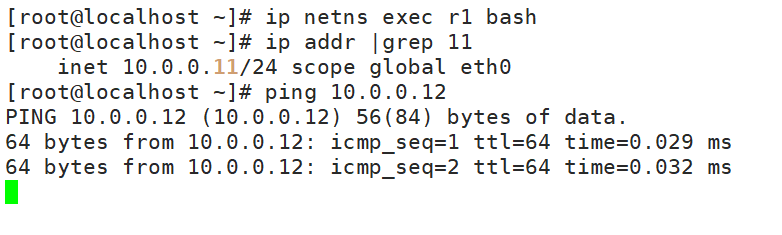
3、C 7-2 中子空间之间测试访问
[root@localhost ~]# ip netns exec r1 bash
[root@localhost ~]# ip addr |grep 11
    link/ether 1e:6b:d6:0f:0e:11 brd ff:ff:ff:ff:ff:ff link-netnsid 0
    inet 10.0.0.11/24 scope global eth0
    inet6 fe80::1c6b:d6ff:fe0f:e11/64 scope link
[root@localhost ~]# ping 10.0.0.12
PING 10.0.0.12 (10.0.0.12) 56(84) bytes of data.
64 bytes from 10.0.0.12: icmp_seq=1 ttl=64 time=0.025 ms
64 bytes from 10.0.0.12: icmp_seq=2 ttl=64 time=0.047 ms
64 bytes from 10.0.0.12: icmp_seq=3 ttl=64 time=0.030 ms
^C
--- 10.0.0.12 ping statistics ---
3 packets transmitted, 3 received, 0% packet loss, time 1999ms
rtt min/avg/max/mdev = 0.025/0.034/0.047/0.009 ms
4、在C 7-2根空间中写入防火墙规则(SNAT)
iptables -t nat -A POSTROUTING -s 10.0.0.0/24 -o ens33 -j SNAT --to-source 192.168.20.202
5、在C 7-2子空间中设置根空间的网桥地址为网关
ip netns exec r1 bash
route add default gw 10.0.0.100
exit

ip netns exec r2 bash
route add default gw 10.0.0.100
exit
6、在C 7-2子空间中测试访问外部网页(192.168.20.201)
[root@localhost ~]# ip netns exec r1 bash
[root@localhost ~]# curl 192.168.20.201				#r1子空间访问外部网页成功
hello YQ...
[root@localhost ~]# exit
exit
[root@localhost ~]#
[root@localhost ~]# ip netns exec r2 bash
[root@localhost ~]# curl 192.168.20.201				#r2子空间访问外部网页成功
hello YQ...
[root@localhost ~]#
[root@localhost ~]# exit
firewalld 规则

(1) 容器访问外部网络
$ iptables -t nat -A POSTROUTING -s 172.17.0.0/16 -o docker0 -j MASQUERADE

(2) 外部网络访问容器
$ docker run -d -p 80:80 apache

$ iptables -t nat -A  PREROUTING -m addrtype --dst-type LOCAL -j DOCKER
$ iptables -t nat -A DOCKER ! -i docker0 -p tcp -m tcp --dport 80 -j  DNAT --to-destination 172.17.0.2:80
4、传统虚拟化网络 与 容器级虚拟化网络
1)传统虚拟化网络:
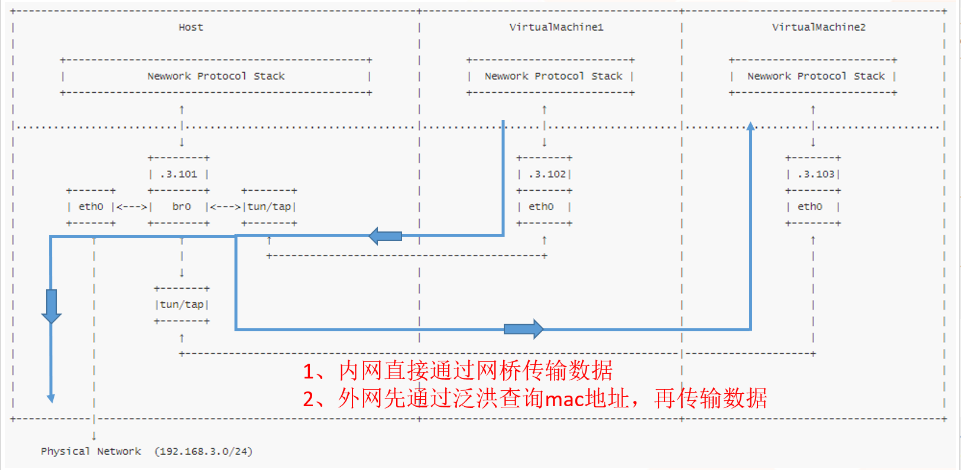
缺点:
    1.虚拟机网卡的 MAC 地址会通过物理机网卡对外广播,可能会出现 MAC 地址冲突
    2.对无线网卡支持较差

优点:
    不管是 VM 之间的访问,还是内部外部的相互访问,都是以二层网络工作模式为主
2)容器级虚拟化网络
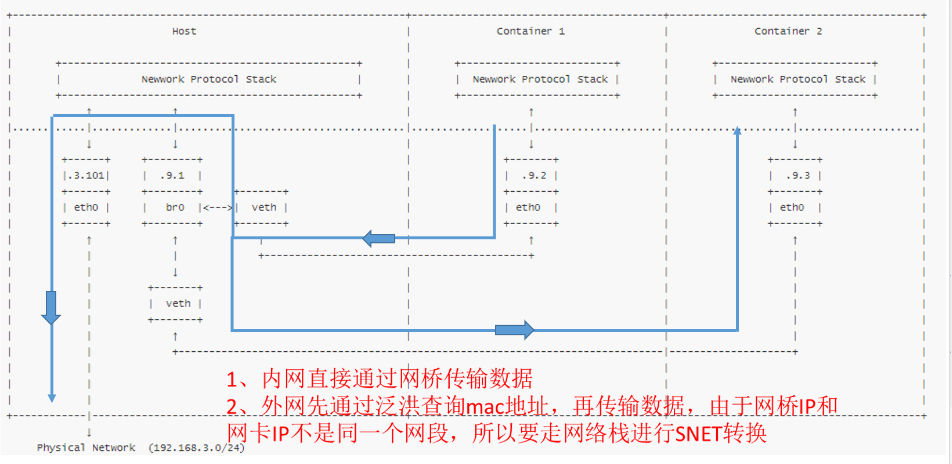
缺点:
        若容器内部访问外部,外部访问容器内部,都需要做对应的 NAT 转换,消耗资源,有追加延迟

优点:
        1.容器中的网卡 MAC 地址不会被传播到此主机以外的网络中,不会出现 MAC 冲突
        2.对 802.1 协议支持比较好(无线网卡)
传统虚拟化网络存在:真实机中的虚拟机与其他真实机,mac地址冲突的问题:

二、 Docker 网络修改
1、Docker 进程进行修改
-b, --bridge=””   		#指定 Docker 使用的网桥设备,默认情况下 Docker 会自动创建和使用 docker0 网桥设备,通过此参数可以使用已经存在的设备

--bip 					#指定 Docker0 的 IP 和掩码,使用标准的 CIDR 形式,如 10.10.10.10/24

--dns 					#配置容器的 DNS,在启动 Docker 进程是添加,所有容器全部生效

拓展:容器 DNS 相关设置信息
    容器在创建 /etc/resolv.conf 是会与物理机中的 /etc/resolv.conf 保持一致
    /etc/hosts 			#记载了容器自身的一些地址和名称
    /etc/hostname 		#记载了容器当中的主机名
2、容器修改
--dns 			#用于指定启动的容器的 DNS

--net 			#用于指定容器的网络通讯方式,有以下四个值
  bridge		#Docker 默认方式,网桥模式
  none			#容器没有网络栈
  container		#使用其它容器的网络栈,Docker容器会加入其它容器的 network namespace		--network container:(ContainerName)
  host			#表示容器使用 Host 的网络,没有自己独立的网络栈。容器可以完全访问 Host 的网络,不安全	--network host
实验:容器四种网络模式
1)bridge
Docker 默认方式,网桥模式:
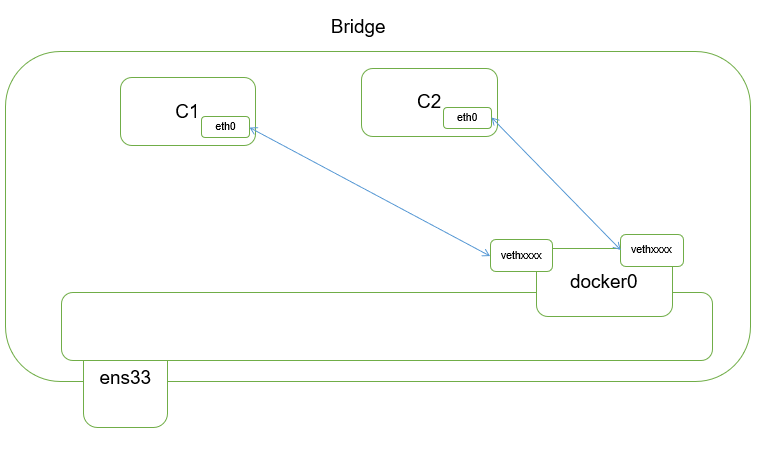
#bridge
$ docerk run --name bridge --net bridge -d 163			#默认创建bridge模式,加不加 --net bridge 都行
$ docker inspect bridge
$ docker exec bridge ifconfig -a
2)None
容器没有网络栈:
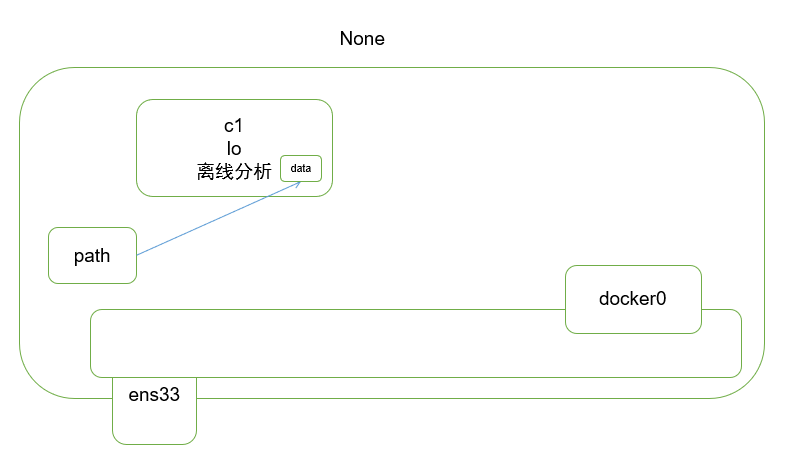
#None
$ docekr run --name none --net none -d 163
$ docker exec none config -a
3)container
使用其它容器的网络栈,Docker容器会加入其它容器的 network namespace --net container:(ContainerName)
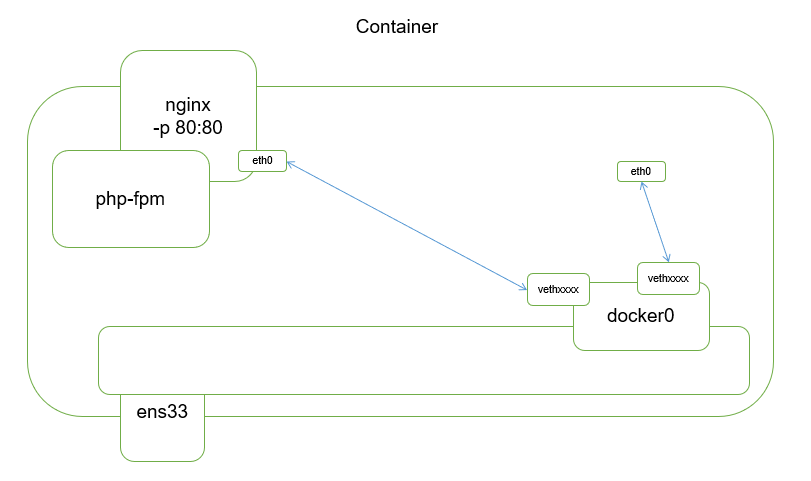
#container
$ docker run --name nginx -d nginx:v1
$ docker run --name container --net container:nginx -d 163
$ docker exec nginx curl localhost						#测试
$ docker exec container curl localhost

		#实例:nginx 与 php-fpm 两个容器实现container网络模式
            $ docker run --name nginx -d nginx:latest
            $ docker run --name php-fpm --net container:nginx -d php-fpm:latest
            $ docker exec nginx curl localhost				#测试
            $ docker exec php-fpm curl localhost
4)host
表示容器使用 Host 的网络,没有自己独立的网络栈。容器可以完全访问 Host 的网络,不安全 --network host
#host
$ docker run --name host --net host -d nginx:v1
$ curl localhost
#此时,浏览器能直接访问物理机地址,从而访问nginx
3、bridge模式下----暴露端口
-p / P 选项的使用格式
	-p  <ContainerPort>							#将制定的容器端口映射至主机所有地址的一个动态端口
	-p  <HostPort>:<ContainerPort>				#映射至指定的主机端口
	-p  <IP>::<ContainerPort>					#映射至指定的主机的 IP 的动态端口
	-p  <IP>:<HostPort>:<ContainerPort>			#映射至指定的主机 IP 的主机端口
	-P(大)									#暴露所有EXPOSE声明的端口

$ docker port ContainerName 			#可以查看容器与物理机的映射关系
4、自定义 Docker0 的网桥地址
修改 /etc/docker/daemon.json 文件
后续 k8s 配置会自动改配置文件
修改 /etc/docker/daemon.json 文件

{
    "bip": "192.168.1.5/24",
    "fixed-cidr": "192.168.1.0/24",
    "fixed-cidr-v6": "2001:db8::/64",
    "mtu": "1500",
    "default-gateway": "192.168.1.1",
    "default-gateway-v6": "2001:db8:abcd::89",
    "dns": ["192.168.1.2","192.168.1.3"]
}
三、常见的隔离方式
$ docker network ls #查看当前可用的网络类型
基础命令说明
# 查看当前可用的网络类型
$ docker network ls

# 网络空间名称
$ docker network create -d 类型
	# 类型分为:
		# overlay network
		# bridge network

#独立至不同的网络命名空间进行隔离
$ docker network create -d bridge --subnet "172.26.0.0/16" --gateway "172.26.0.1" my-bridge-network

#使用 Linux 桥接器进行主机间的通讯
#!/bin/bash
ip addr del dev ens33 192.168.66.11/24
ip link add link ens33 dev br0 type macvlan mode bridge
ip addr add 192.168.66.11/24 dev br0
ip link set dev br0 up
ip route add default via 192.168.66.1 dev br0


设置容器地址分配
$ pipework br0 test 192.168.66.200/24@192.168.66.1
实验1:创建两类项目的容器
每个项目中的容器互相通讯,项目之间不能通讯
#项目规划:
项目1:www.xinxianghf.com
				容器1:	MySQL
				容器2:	Tomcat

项目2:yq.com
				容器1:	Nginx
				容器2:	Tomcat
实验步骤:
1、创建网桥
独立至不同的网络命名空间进行隔离
#创建网桥
$ docker network create -d bridge --subnet "172.26.0.0/26" --gateway "172.26.0.1" xxhf

$ docker network create -d bridge --subnet "172.27.0.0/26" --gateway "172.27.0.1" yq

$ docker network ls

NETWORK ID          NAME                DRIVER              SCOPE
ada94ced64a8        bridge              bridge              local
2dcd060f9162        host                host                local
332bd86be3dc        none                null                local
92ae8d37407f        xxhf                bridge              local
2bf4d8cce636        yq                  bridge              local
2、指定网络类型启动容器
#指定网络类型启动容器
$ docker run --name xxhf-db --net xxhf -d 163

$ docker run --name xxhf-tomcat --link xxhf-db:mysql -d -p 127.0.0.1:8080:80 --net xxhf 163

$ docker run --name yq-tomcat --net yq -d 163

$ docker run --name yq-nginx --link yq-tomcat:tomcat --net yq -d -p 127.0.0.1:8081:80 163

$ docker run --name proxy -d -p 80:80 -p 443:443 163			#创建反向代理的容器,再去容器中写入反向代理回环接口到不同端口即可实现
		或者:	$ docker run --name proxy --net host -d 163


#测试:项目中网络连通性(通)、项目之间网络连通性(不通)
[root@localhost ~]# docker inspect xxhf-tomcat |grep 172			#获取容器的ip地址
                    "Gateway": "172.26.0.1",
                    "IPAddress": "172.26.0.3",
[root@localhost ~]# docker inspect xxhf-db |grep 172
                    "Gateway": "172.26.0.1",
                    "IPAddress": "172.26.0.2",
[root@localhost ~]# docker inspect yq-tomcat |grep 172
                    "Gateway": "172.27.0.1",
                    "IPAddress": "172.27.0.2",
[root@localhost ~]# docker inspect yq-nginx |grep 172
                    "Gateway": "172.27.0.1",
                    "IPAddress": "172.27.0.3",
[root@localhost ~]# docker exec xxhf-tomcat ping 172.26.0.2			#同项目之间网络联通
PING 172.26.0.2 (172.26.0.2) 56(84) bytes of data.
64 bytes from 172.26.0.2: icmp_seq=1 ttl=64 time=0.152 ms
64 bytes from 172.26.0.2: icmp_seq=2 ttl=64 time=0.074 ms
64 bytes from 172.26.0.2: icmp_seq=3 ttl=64 time=0.047 ms
^C
[root@localhost ~]# docker exec xxhf-tomcat ping 172.27.0.2			#不同项目之间网络不通
^C
[root@localhost ~]#
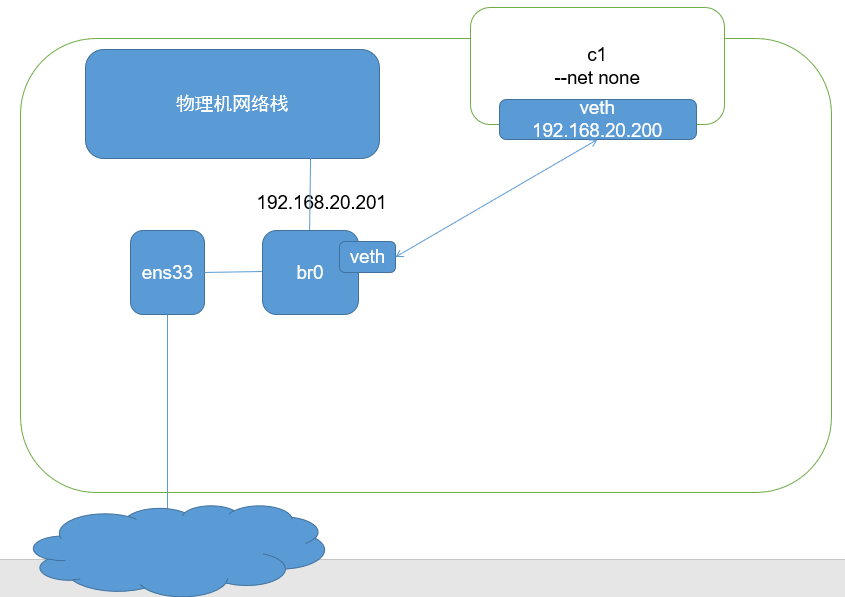
实验2:将真实网卡托管给网桥
**注意:**生产环境中很少用,他将传统虚拟化和容器虚拟化的优缺点极限化,优点更优,缺点更缺(更极端化了)
			优点:轻量级,消耗代价低
				 网络直接与外部直连
			缺点:安全性差(由于容器是物理机中的一个进程)
				 对无线网卡支持较差
				 mac地址直接对外部广播,容易冲突
**实验:**将真实网卡托管给网桥,容器直接通过网桥与外部联系,本次实现外部直接 ssh 远程连接容器
实验步骤:
1、前提,配置一个 ssh 的镜像
#基于163镜像创建一个容器,确认容器ssh能连接,修改root密码
[root@localhost ~]# docker run --name 163 -d -p 80:80 -p 2222:22 163
docker exec 163 egrep "^Password|RootLogin" /etc/ssh/sshd_config
#PermitRootLogin yes
PasswordAuthentication yes
# the setting of "PermitRootLogin without-password".
[root@localhost ~]# docker exec -it 163 /bin/bash
[root@130ee03dbd94 /]# passwd
Changing password for user root.
New password:
BAD PASSWORD: The password is shorter than 8 characters
Retype new password:
passwd: all authentication tokens updated successfully.

[root@localhost ~]# docker commit 163 ssh:v1			#制作ssh镜像
2、关闭其他网卡,仅留一张网卡
[root@localhost ~]# vim /etc/sysconfig/network-scripts/ifcfg-ens34
[root@localhost ~]# grep "ONBOOT" /etc/sysconfig/network-scripts/ifcfg-ens34
ONBOOT=no
[root@localhost ~]# systemctl restart network
3、使用 Linux 桥接器进行主机间的通讯
$ ip addr del dev ens33 192.168.20.201/24
$ ip link add link ens33 dev br0 type macvlan mode bridge
$ ip addr add 192.168.20.201/24 dev br0
$ ip link set dev br0 up
$ ip route add default via 192.168.20.2 dev br0			#若没有网关路由,可不执行
可以写成一个脚本(加入开机自启动运行,从而实现网络配置持久化)
[root@localhost ~]# vim /usr/local/bin/br-init.sh
[root@localhost ~]# chmod a+x /usr/local/bin/br-init.sh
[root@localhost ~]# cat /usr/local/bin/br-init.sh
#!/bin/bash
ip addr del dev ens33 192.168.20.201/24
ip link add link ens33 dev br0 type macvlan mode bridge
ip addr add 192.168.20.201/24 dev br0
ip link set dev br0 up
ip route add default via 192.168.20.2 dev br0


#设置开机自动实现
[root@localhost ~]# vim /etc/rc.d/rc.local
[root@localhost ~]# tail -n 1 /etc/rc.d/rc.local
/usr/local/bin/br-init.sh
[root@localhost ~]# chmod a+x /etc/rc.d/rc.local
#重启测试
4、使用none模式运行ssh容器,使用工具给容器设置ip地址
$ docker run --name ssh --net none -d ssh:v1
上传工具: 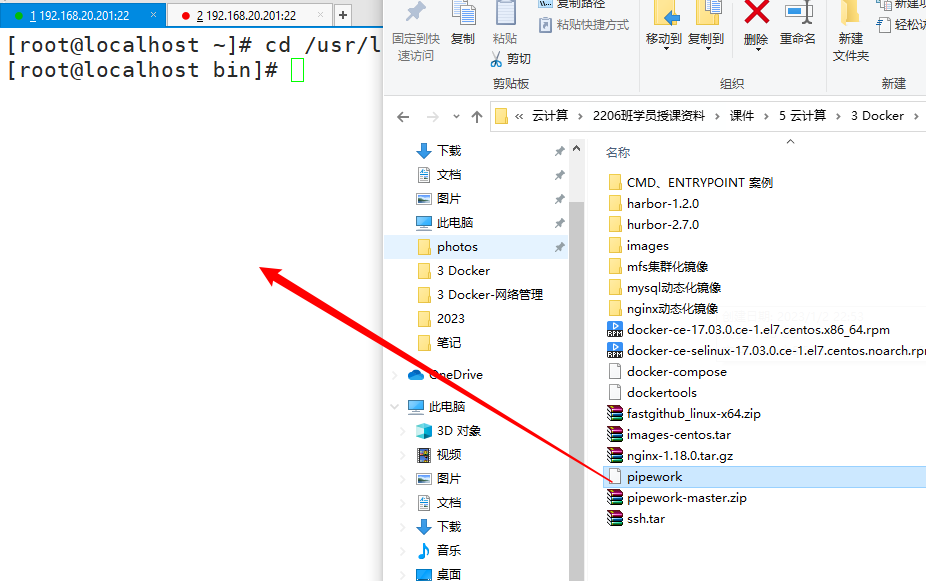
$ chmod a+x pipework
$ pipework br0 ssh 192.168.20.200/24
5、测试:外部直接ssh容器