17 数据库
1 基本概述
1)去IOEC
I				IBM HP					联想 浪潮 曙光 宝德
O				ORACLE					达梦
E				EMC						华为 宏杉 (联想、神州数码属于OEM)
C				cisco     				华为 华三 锐捷
2)常见数据库

3)为什么需要数据库:
    文件存储:
           速度慢、明文存储、无法同时操作、数据量大时索引效率低、关联性差
    数据库:
           速度快、加密存储、多用户、多权限、共享
4)数据库分类
EDBMS:关联型数据库(类似二维表)
NoSQL:非关系型数据库
5)存储结构:
MySQL:数据库管理系统
可以创建多个库,每个库可以创建多个表,每个表可创建多行记录、多个字段(每个字段都有自己的类型)
6)Nosql:
优势:多格式存储,多数据处理维护,速度快效率高,扩展简单(解决高并发,稳定,成本低)
种类:	Redis:键值存储(每个单独项存为键值对)
                MongoBb:面向文档(每个键与文档复杂结构配对)
                HBase:宽列存储(列存储,取代行)
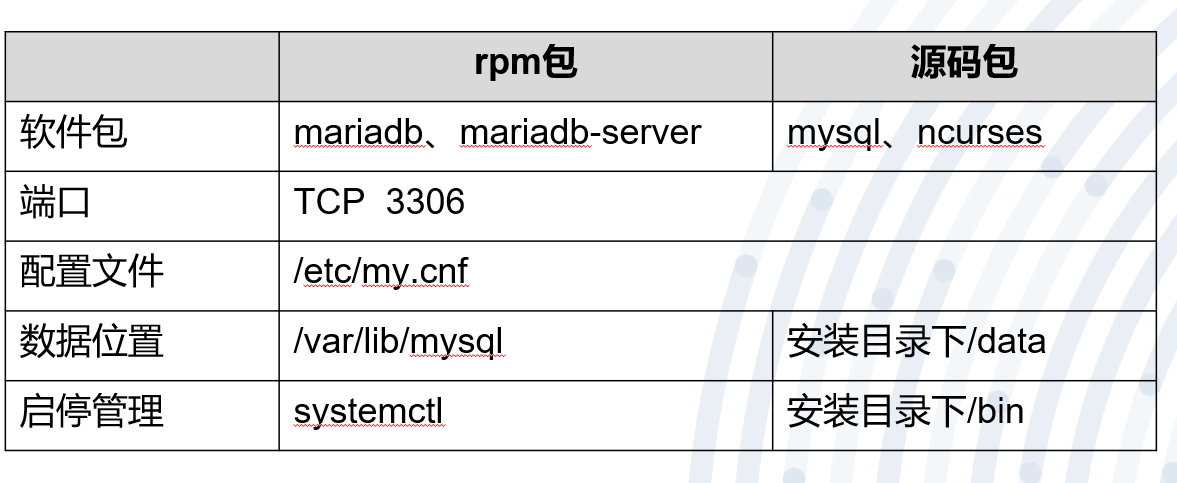
7)rpm包、源码包安装对比:
8)数据文件:
| 文件后缀 | 作用 |
|---|---|
| .frm | 表结构文件(describe命令相关) |
| .MYD | 数据文件 |
| .MYI | 索引文件 |
9)存储引擎:(可理解为文件系统)
| 存储引擎 | 解释 |
|---|---|
| MyISAM | 最开始默认的存储引擎 |
| InooDB | 5.5版本之后 |
| Memory | 内存式数据库存储引擎 |
innodb存储引擎:
1)支持事务:
		C:一致性,事务运行时不改变数据库中的数据(不改变总状态)
		A:原子性,事务里的语句要么全部执行、要么全部不执行
		I:隔离性,指两个以上事务间独立运行、互不干扰
		D:持久性,事务运行完对文件影响是持久的、不会随意回滚
		展示数据(读取数据文件转换成用户识别的数据库表)
2)支持行级锁
拓展:
行级锁:	消耗大、影响小
页级锁:	中、中
表级锁:	消耗小、影响大
3)支持外键
10)sql分类
| 分类 | 解释 | 命令 |
|---|---|---|
| DDL | 数据定义语言 | create、alter、drop |
| DML | 数据操作语言 | insert、update、delete |
| DQL | 数据查询语言 | select |
| DCL | 数据控制语言 | grant |
11)sql语法:
1.命令、字段(别)名  忽略大小写
2.库名、表名、变量名	区分大小写
3.每个命令后	;	结尾
12)数据完整性
域完整性:列完整性,需要满足特定数据类型或约束
实体完整性:行完整性,需记录:非空、唯一且不重复
表间完整性:需保证多表数据的一致性
13)修改数据表(主键、唯一键)
添加主键:
alter table 表名 add primary key (列名) #非空、唯一且不重复
添加唯一键:
alter table 表名 add unique key (列名) #唯一且不重复
14)数据查询顺序
缓存、索引、数据结构
15)索引
单列索引:在表中某字段上创建索引
普通索引:允许重复、允许为空
唯一索引:不允许重复、允许为空
主键索引:不允许重复、不允许为空
组合索引:在表中多个字段组合上创建索引
16)存储的key-value
主键索引:key 主键值、values 该行的记录
辅助索引:key 索引列值、values 该行主键的值
17)创建索引:
单列:			create (unique) index 索引名 on 表名 (列名)
组合:			 create index 索引名 on 表名 (列名1,列名2)
删除索引:		drop index 索引名 on 表名
查看索引:		show index from 表名
18)排序查询
默认排序:
select  * from  表名;

按指定列排序:
select  *   from  表名  order by 列名

按指定列倒序排序:
select  *   from  表名  order by 列名  desc;
19)条件查询
where

in操作符:		列名 in (值1,值2)
not操作符:		列名 not in (值1,值2)
like操作符:	列名 like '字符串%'			%表示任何字符出现任意次
			  列名 like '字符串_'		  _表示单个字符
20)mysql多表操作
**多表关联:**不同表中、有关联、可以同时查
表连接:
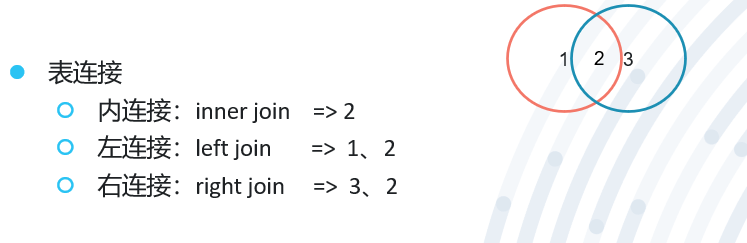
表关系:
一对一、一对多、多对多
E-R图:仅有字段关系
实体图:有具体数据
21)视图:
虚拟的表、仅包含使用时动态检索数据的查询
create view 视图名 as select语句;				#创建
select * from 视图名;							#查看
drop view 视图名;								#删除
22)存储过程:
(相当于将sql语句作为整体执行)
特点:效率高、可自定义、可反复执行
create procedure 存储过程名 (动作);				#创建
call 存储过程名;									 #调用
drop peocedure 存储过程名;						 #删除
23)授权
flush privileges;								  #刷新授权
revoke 权限 on 库.表 from '用户'@'登录地址';			#取消授权
24)数据库日志:
show variables like '%log%’;
		查询日志:		general_log				记录所有查询语句
		慢查询日志:		slow_query_log			显示时间较慢的查询
		二进制日志:		log_bin					记录改变数据结构的语句
		中继日志:		relay_log				中从结构中的同步的二进制日志
2 数据库的安装
软件包名:	 mariadb		mariadb-server
			客户端			 服务端

服务名:mysqld

端口:3306

主配置文件: /etc/my.cnf

初始化脚本: mysql_install_db				#为了创建授权表(用于登录)

启动命令: mysql_safe 					&		mysql_multi
		单进程、多线程模式					多进程模式

数据目录: /var/lib/mysql

套接字文件: /var/lib/mysql/mysql.sock		#以mysql用户创建的

注意:当意外关闭时,再次无法启动,删除台阶子文件即可再启动

进程文件: /var/run/mysqld/mysqd.pid
3 登录及退出mysql环境
a)  设置密码 		mysqladmin  	-u	root  	password	 ‘123’
b)  登录   			mysql 	-u用户名		-p密码
                                            -p 用户密码
                                            -h 登陆位置(主机名或ip地址)
                                            -P 端口号(3306改了就不是了)
                                            -S 套接字文件(/var/lib/mysql/mysql.sock)
c)  退出   			exit && ctrl+d && quit
**注意:**选项后都不加空格
4 Mysql sql语句
show databases;       						 #查看服务器中当前有哪些数据库
use 数据库名;       						  #选择所使用的数据库
create database 数据库名; 		 			  #创建数据库
drop database 数据库名;    					  #删除指定的数据库
create table 表名 (字段1 类型1,...); 		    #在当前数据库中创建数据表
show tables;     						    #显示当前数据库中有哪些数据表
describe 表名;     						   #显示当前或指定数据库中指定数据表的结构(字段)信息
drop table 表名;    						   #删除当前或指定数据库中指定的数据表
alter table 旧表名 rename 新表名;  			  #修改数据表的名称
alter table 表名 modify 字段 新类型;  			 #修改字段的类型
alter table 表名 change 旧字段名 新字段名 类型;    #修改字段名
alter table 表名 add 字段 类型(first/after)    #增加字段
alter table 表名 drop 字段            			 #删除字段
insert into 表名(字段1,字段2,……) values(字段1的值, 字段2的值,……); 	#向数据表中插入新的记录
update 表名 set 字段名=新数据 where 条件表达式; 					 #修改、更新数据表中的记录
select 字段名1,字段名2……from 表名 where 条件表达式;			 #从数据表中查找符合条件的记录
select * from 表名;   								    #显示当前数据库的表中的记录
delete from 表名 where 条件表达式;
		between...and...   								#在数据表中删除指定范围的记录
delete from 表名;  									    #将当前数据库表中记录清空
注:库和表的删除用drop,记录删除用delete
5 用户权限
grant 		权限1,权限2,...... on 数据库.数据表 	to 	用户@登录位置 	identified	 by	 ‘密码’;

revoke	 取消的权限1,取消的权限2,......	 on 	数据库.数据表 	from 	用户@登录位置;

show	 grants	 for 	用户@登录位置;
6 备份和还原
mysqldump命令
备份:
mysqldump	 -u用户名 	-p密码  	数据库名 >	 /备份路径/备份文件名(备份整个数据库)

mysqldump	 -u 用户名 	-p 数据库名 	表名 > 	/备份路径/备份文件名(备份数据表)

	  	--databases	 库1 	库2 	(还原:mysql < 备份文件)			#备份包括数据库产生的方式

	  	 --all-databases 									#备份服务器中的所有数据库内容
还原:mysql 数据库 < 备份文件
1)日志备份
mysql>  show global variables like ‘%log%’

	列出mysql中和日志相关的变量
错误日志
                服务器启动和关闭时的信息
                服务器运行过程中的错误信息
                从服务器启动从服务器进程时产生的信息
                log-error 错误日志的路径
一般日志(不启用)
                记录用户对数据库的查询操作
                general-log=ON 启动一般查询日志
                log=ON       全局日志开关
                log-output     日志的记录类型
慢查询日志
                记录需要较长时间的查询操作
                log-slow-queries=保存路径 启动慢查询日志,并设置个路径
二进制日志(重点)
(默认不开启、可用于:数据备份、数据同步)
                所有对数据库状态更改的操作(create、drop、update等)
                log-bin=位置 启动二进制日志
                >mysql show binary logs 查看当前使用的二进制日志
                >mysql show binlog events in ‘二进制日志(mysql-bin.000001)’ 查看二进制日志的内容
还原:(mysqlbinlog)
                按时间还原:
                                    mysqlbinlog --start-datetime ‘YY-MM-DD HH:MM:SS’ --stop-datetime ‘YY-MM-DD HH:MM:SS’ 二进制日志 | mysql(-uroot -p)
                按文件大小还原:
                                    --start-position
                                    --stop-position
事务日志:记录事务相关的日志信息
中继日志:记录从服务器的备份信息
2)多机备份
主从配置:实时备份
主主配置:(互为主从)实时备份、负载均衡、高可用
一主多从:实时备份(更多的备份节点)
多主一从:实时备份、节约成本、#此实验中两主之间不同步
读写分离:数据备份、负载均衡
7 数据库实验
1.创建用户:
创建本地登录的数据库用户: create user 用户@‘localhost’ identified by '密码'
MariaDB [(none)]> create user 'zhangsan'@'localhost' identified by '123456';
创建远程登录的数据库用户: create user 用户@'%' identified by '密码'
MariaDB [(none)]> create user 'zhangsan'@'%' identified by '12345';
注意:用户定义的相关内容中,尽量都用单引号包含起来
2.测试用户登录
[root@localhost]# yum -y install mariadb
[root@localhost]# mysql -uzhangsan -p12345 -h 192.168.18.201
MariaDB [(none)]>
3.用户为自己更改密码
#客户端远程登陆,并修改密码
[root@localhost ~]# mysql -uzhangsan -p12345 -h192.168.18.201			#登录

MariaDB [(none)]> set password=password('123123');						#修改密码
Query OK, 0 rows affected (0.01 sec)
MariaDB [(none)]>
MariaDB [(none)]> Ctrl-C -- exit!
Aborted
[root@localhost ~]# mysql -uzhangsan -p123123 -h192.168.18.201			#新密码再次登录
MariaDB [(none)]>
4.root用户为其他用户找回密码
#服务端修改其他远程登陆的用户密码
[root@localhost ~]# mysql
MariaDB [(none)]> set password for zhangsan@'%'=password('123');
MariaDB [(none)]>
#客户端再次远程登录
[root@localhost ~]# mysql -uzhangsan -p123 -h192.168.18.201
MariaDB [(none)]>
5.root找回自己的密码并修改
[root@localhost ~]# mysqladmin -uroot password '123456'								#给root设置密码
[root@localhost ~]# mysql															#不能直接登录root
ERROR 1045 (28000): Access denied for user 'root'@'localhost' (using password: NO)
[root@localhost ~]# mysql -uroot -p123456											#密码登录成功
MariaDB [(none)]> exit
Bye
1)关闭数据库、修改配置文件(/etc/my.cnf)<------ skip-grant-tables、启动数据库
[root@localhost]# systemctl stop mariadb
[root@localhost]# vim /etc/my.cnf
[mysql]
skip-grant-tables
[root@localhost]# systemctl start mariadb
2)空密码登录并修改密码
[root@localhost ~]# mysql
#不能直接使用set命令改密码,直接更新数据库更改密码,确定行和列,从而更改密码
MariaDB [(none)]> update mysql.user set password=password('123123') where user='root' and host='localhost';
MariaDB [(none)]>
MariaDB [(none)]> exit
Bye
3)删除skip-grant-tables,重启数据库验证新密码
[root@localhost]# vim /etc/my.cnf
[mysql]
#skip-grant-tables
[root@localhost]# systemctl restart mariadb
[root@localhost ~]# mysql -uroot -p123123				#更改新密码为123123,登录成功
MariaDB [(none)]>
6.数据库的增删改查
1)创建数据库
[root@localhost ~]# mysql -uroot -p123123
MariaDB [(none)]> show databases;
+--------------------+
| Database           |
+--------------------+
| information_schema |
| mysql              |
| performance_schema |
| test               |
+--------------------+

MariaDB [(none)]> create database hf2205;				#创建hf2205库
Query OK, 1 row affected (0.00 sec)

MariaDB [(none)]> create database hf2206;				#创建hf2206库
Query OK, 1 row affected (0.00 sec)

MariaDB [(none)]> show databases;
+--------------------+
| Database           |
+--------------------+
| information_schema |
| hf2205             |
| hf2206             |
| mysql              |
| performance_schema |
| test               |
+--------------------+
2)创建数据表
MariaDB [(none)]> use hf2206;          					    					 	#选择要使用的数据库
MariaDB [hf2206]> create table user_list (ID int(11),NAME char(15),AGE int(3));		#创建user_list表,并添加ID、NAME、AGE字段以及类
MariaDB [hf2206]> describe user_list;												#查看表结构(字段)
+-------+----------+------+-----+---------+-------+
| Field | Type     | Null | Key | Default | Extra |
+-------+----------+------+-----+---------+-------+
| ID    | int(11)  | YES  |     | NULL    |       |
| NAME  | char(15) | YES  |     | NULL    |       |
| AGE   | int(3)   | YES  |     | NULL    |       |
+-------+----------+------+-----+---------+-------+
复杂一点的:
MariaDB [hf2206]> create table user_list2 (
    -> ID int unsigned not null auto_increment,		#字段要求为正数、且自增长、主键
    -> NAME char(15) not null default '',			#字符型长度15字节,默认值为空格
    -> AGE int not null default '18',				#字段默认值为18
    -> primary key (ID));							#设置ID为主键

MariaDB [hf2206]> describe hf2206.user_list2;
+-------+------------------+------+-----+---------+----------------+
| Field | Type             | Null | Key | Default | Extra          |
+-------+------------------+------+-----+---------+----------------+
| ID    | int(10) unsigned | NO   | PRI | NULL    | auto_increment |
| NAME  | char(15)         | NO   |     |         |                |
| AGE   | int(11)          | NO   |     | 18      |                |
+-------+------------------+------+-----+---------+----------------+
注意:在某一字段设置为数值自增模式后,可以使用null代替后续的数值实现自动自增
3)插入数据
MariaDB [(none)]> insert into hf2206.user_list (ID,NAME,AGE) values(1,'zhangsan',21);	 #指明插入字段和数据
MariaDB [(none)]> select * from hf2206.user_list;
+------+----------+------+
| ID   | NAME     | AGE  |
+------+----------+------+
|    1 | zhangsan |   21 |
+------+----------+------+
MariaDB [(none)]> insert into hf2206.user_list values (2,'lisi',19);					#按顺序插入指定字段
MariaDB [(none)]> select * from hf2206.user_list;
+------+----------+------+
| ID   | NAME     | AGE  |
+------+----------+------+
|    1 | zhangsan |   21 |
|    2 | lisi     |   19 |
+------+----------+------+
MariaDB [(none)]> insert into hf2206.user_list values (3,'laowang',30),(4,'laosong',25);	#插入多条数据
MariaDB [(none)]> select * from hf2206.user_list;
+------+----------+------+
| ID   | NAME     | AGE  |
+------+----------+------+
|    1 | zhangsan |   21 |
|    2 | lisi     |   19 |
|    3 | laowang  |   30 |
|    4 | laosong  |   25 |
+------+----------+------+
4)将表 user_list 的数据复制到表user_list2
MariaDB [(none)]> select * from hf2206.user_list2;
#查询 user_list 的值,并写入user_list2 中
MariaDB [(none)]> insert into hf2206.user_list2 (ID,NAME,AGE) select ID,NAME,AGE from hf2206.user_list;
MariaDB [(none)]> select * from hf2206.user_list2;
+----+----------+-----+
| ID | NAME     | AGE |
+----+----------+-----+
|  1 | zhangsan |  21 |
|  2 | lisi     |  19 |
|  3 | laowang  |  30 |
|  4 | laosong  |  25 |
+----+----------+-----+
5)删除
a.删除表里的数据记录
MariaDB [(none)]> create database hf2205;										#创建库
MariaDB [(none)]> use hf2205;													#进入库
MariaDB [hf2205]> create table list (id int(11),name char(15),age int(3));		#创建表
#向表中插入4条记录
MariaDB [hf2205]> insert into list (id,name,age) values (1,'zhangsan',18),(2,'lisi',20),(3,'laowang',30),(4,'laosong',25);
MariaDB [hf2205]> select * from list;
+------+----------+------+
| id   | name     | age  |
+------+----------+------+
|    1 | zhangsan |   18 |
|    2 | lisi     |   20 |
|    3 | laowang  |   30 |
|    4 | laosong  |   25 |
+------+----------+------+
MariaDB [hf2205]> delete from list where id=4;			#删除id=4的记录
MariaDB [hf2205]> select * from list;
+------+----------+------+
| id   | name     | age  |
+------+----------+------+
|    1 | zhangsan |   18 |
|    2 | lisi     |   20 |
|    3 | laowang  |   30 |
+------+----------+------+
MariaDB [hf2205]> delete from list where age>=20;		#删除age>=20的记录
MariaDB [hf2205]> select * from list;
+------+----------+------+
| id   | name     | age  |
+------+----------+------+
|    1 | zhangsan |   18 |
+------+----------+------+
b.删除数据表
MariaDB [hf2205]> create table hf2205.list (id int,name char(15),age int(3));
MariaDB [hf2205]> drop table hf2205.list;										#删除hf2205库下的list表
MariaDB [hf2205]> show tables;
Empty set (0.00 sec)
c.删除数据库
MariaDB [(none)]> show databases;
+--------------------+
| Database           |
+--------------------+
| information_schema |
| hf2205             |
| hf2206             |
| mysql              |
| performance_schema |
| test               |
+--------------------+
MariaDB [(none)]> drop database hf2205;				#删hf2205库
MariaDB [(none)]> show databases;
+--------------------+
| Database           |
+--------------------+
| information_schema |
| hf2206             |
| mysql              |
| performance_schema |
| test               |
+--------------------+
6)修改
a.改表中数据
MariaDB [(none)]> use hf2206;
MariaDB [hf2206]> select * from user_list;
+------+----------+------+
| ID   | NAME     | AGE  |
+------+----------+------+
|    1 | zhangsan |   21 |
|    2 | lisi     |   19 |
|    3 | laowang  |   30 |
|    4 | laosong  |   25 |
+------+----------+------+
MariaDB [hf2206]> update user_list set NAME='lw' where id=3;		#更改老王的名字为lw
MariaDB [hf2206]> select * from hf2206.user_list;
+------+----------+------+
| ID   | NAME     | AGE  |
+------+----------+------+
|    1 | zhangsan |   21 |
|    2 | lisi     |   19 |
|    3 | lw       |   30 |
|    4 | laosong  |   25 |
+------+----------+------+
b.改表名称
MariaDB [hf2206]> show tables;
+------------------+
| Tables_in_hf2206 |
+------------------+
| user_list        |
| user_list2       |
+------------------+
MariaDB [hf2206]> alter table user_list rename list;		#更改user_list的表名为list
MariaDB [hf2206]> show tables;
+------------------+
| Tables_in_hf2206 |
+------------------+
| list             |
| user_list2       |
+------------------+
c.改表字段类型
MariaDB [hf2206]> describe list;
| NAME  | char(15) | YES  |     | NULL    |       |

MariaDB [hf2206]> alter table list modify NAME char(20);		#修改NAME的字段类型
MariaDB [hf2206]> describe list;

| NAME  | char(20) | YES  |     | NULL    |       |
## 修改数据表的字段类型详情

MariaDB [hf2206]> describe list;
| NAME  | char(20) | YES  |     | NULL    |       |

MariaDB [hf2206]> alter table list change NAME N char(25) not null default '';		#将NAME字段名改为N,并修改类型
| N     | char(25) | NO   |     |         |       |
d.添加字段
MariaDB [hf2206]> alter table list add time datetime;		#添加新的字段time,类型为datetime
MariaDB [hf2206]> describe list;
+----------+----------+------+-----+---------+-------+
| Field    | Type     | Null | Key | Default | Extra |
+----------+----------+------+-----+---------+-------+
| ID       | int(11)  | YES  |     | NULL    |       |
| username | char(25) | NO   |     |         |       |
| AGE      | int(3)   | YES  |     | NULL    |       |
| time     | datetime | YES  |     | NULL    |       |
+----------+----------+------+-----+---------+-------+
添加位置默认在末尾
MariaDB [hf2206]> alter table list add bir year first;				#添加新字段bir,类型为year,在最开头
MariaDB [hf2206]> alter table list add sex nchar(1) after id;		#添加新字段sex,类型为nchar(1),在id后
MariaDB [hf2206]> describe list;
+----------+----------+------+-----+---------+-------+
| Field    | Type     | Null | Key | Default | Extra |
+----------+----------+------+-----+---------+-------+
| bir      | year(4)  | YES  |     | NULL    |       |
| ID       | int(11)  | YES  |     | NULL    |       |
| sex      | char(1)  | YES  |     | NULL    |       |
| username | char(25) | NO   |     |         |       |
| AGE      | int(3)   | YES  |     | NULL    |       |
| time     | datetime | YES  |     | NULL    |       |
+----------+----------+------+-----+---------+-------+
e.删除字段
MariaDB [hf2206]> alter table list drop bir;				#删除bir字段(列)
MariaDB [hf2206]> describe list;
+----------+----------+------+-----+---------+-------+
| Field    | Type     | Null | Key | Default | Extra |
+----------+----------+------+-----+---------+-------+
| ID       | int(11)  | YES  |     | NULL    |       |
| sex      | char(1)  | YES  |     | NULL    |       |
| username | char(25) | NO   |     |         |       |
| AGE      | int(3)   | YES  |     | NULL    |       |
| time     | datetime | YES  |     | NULL    |       |
+----------+----------+------+-----+---------+-------+
7 用户授权
1)授予用户全部权限
MariaDB [(none)]> select host,user,password from mysql.user;
+-----------------------+----------+-------------------------------------------+
| host                  | user     | password                                  |
+-----------------------+----------+-------------------------------------------+
| localhost             | root     | *E56A114692FE0DE073F9A1DD68A00EEB9703F3F1 |
| localhost.localdomain | root     |                                           |
| 127.0.0.1             | root     |                                           |
| ::1                   | root     |                                           |
| localhost             |          |                                           |
| localhost.localdomain |          |                                           |
| localhost             | zhangsan | *6BB4837EB74329105EE4568DDA7DC67ED2CA2AD9 |
| %                     | zhangsan | *E56A114692FE0DE073F9A1DD68A00EEB9703F3F1 |
| localhost             | lisi     | *6BB4837EB74329105EE4568DDA7DC67ED2CA2AD9 |
+-----------------------+----------+-------------------------------------------+
MariaDB [(none)]> grant all on hf2206.* to zhangsan@'%';							#给张三设置权限:对hf2206库的所有表拥有所有权限
MariaDB [(none)]> grant all on hf2205.* to laosong@'%' identified by '123456';		#创建新用户老王,并设置权限:对hf2205库的所有表拥有所有权限
MariaDB [(none)]> show grants for zhangsan@'%';										#显示远程登陆用户张三的权限
+---------------------------------------------------------------------------------------------------------+
| Grants for zhangsan@%                                                                                   |
+---------------------------------------------------------------------------------------------------------+
| GRANT USAGE ON *.* TO 'zhangsan'@'%' IDENTIFIED BY PASSWORD '*E56A114692FE0DE073F9A1DD68A00EEB9703F3F1' |
| GRANT ALL PRIVILEGES ON `hf2206`.* TO 'zhangsan'@'%'                                                    |
+---------------------------------------------------------------------------------------------------------+
MariaDB [(none)]> show grants for laosong@'%';										#显示远程登录用户老宋的权限
+--------------------------------------------------------------------------------------------------------+
| Grants for laosong@%                                                                                   |
+--------------------------------------------------------------------------------------------------------+
| GRANT USAGE ON *.* TO 'laosong'@'%' IDENTIFIED BY PASSWORD '*6BB4837EB74329105EE4568DDA7DC67ED2CA2AD9' |
| GRANT ALL PRIVILEGES ON `hf2205`.* TO 'laosong'@'%'                                                    |
+--------------------------------------------------------------------------------------------------------+
2)取消abc用户的删除库、表、表中数据的权限
MariaDB [(none)]> revoke drop,delete,update,insert on hf2206.* from zhangsan@'%';			#取消删除权限
MariaDB [(none)]> show grants for zhangsan@'%';												#查看用户权限
8 备份实验
1)mysqldump(适合定时备份)
==7-1:(201服务器端创建数据库,数据表,并写入数据,通过mysqldump命令到处备份文件)==
    1.安装软件
    2.启动服务
    3.进入数据库创建库、表、记录
    4.导出文件到客户端
[root@localhost ~]# mysqldump -uroot --databases hf2206 > /root/hf2206.sql			#mysql命令导出hf2206.sql
[root@localhost ~]# scp hf2206.sql 192.168.18.202:/root/							#将hf2206.sql传给202
完整实验过程:
[root@localhost ~]# yum -y install mariadb mariadb-server
[root@localhost ~]# systemctl restart mariadb
[root@localhost ~]# msyql													#进入mysql创建hf2206库,创建user_list表,并写入数据
MariaDB [(none)]> create database hf2206;
MariaDB [(none)]> create table hf2206.user_list(id int,name char(15),age int(3));
MariaDB [(none)]> use hf2206;
MariaDB [hf2206]> show tables;
+------------------+
| Tables_in_hf2206 |
+------------------+
| user_list        |
+------------------+
MariaDB [hf2206]> insert into user_list values (1,'zhangsan',25),(2,'lisi',18),(3,'laowang',30),(4,'laosong',29);
MariaDB [hf2206]> select * from user_list;
+------+----------+------+
| id   | name     | age  |
+------+----------+------+
|    1 | zhangsan |   25 |
|    2 | lisi     |   18 |
|    3 | laowang  |   30 |
|    4 | laosong  |   29 |
+------+----------+------+
4 rows in set (0.00 sec)
MariaDB [hf2206]> update user_list set name='lisiiiii' where id=2;
MariaDB [hf2206]> select * from user_list;
+------+----------+------+
| id   | name     | age  |
+------+----------+------+
|    1 | zhangsan |   25 |
|    2 | lisiiiii |   18 |
|    3 | laowang  |   30 |
|    4 | laosong  |   29 |
+------+----------+------+
4 rows in set (0.00 sec)
MariaDB [hf2206]> Bye
[root@localhost ~]# mysqldump -uroot --databases hf2206 > /root/hf2206.sql			#mysql命令导出hf2206.sql
[root@localhost ~]# file hf2206.sql
hf2206.sql: ASCII text
[root@localhost ~]# scp hf2206.sql 192.168.18.202:/root/							#将hf2206.sql传给202
==7-2:(202,通过7-1导出的文件进行恢复)==
        1.安装软件
        2.启动服务
        3.导入文件
[root@localhost ~]# mysql <  hf2206.sql

        4.进入数据库检查
完整实验过程:
[root@localhost ~]# yum -y install mariadb mariadb-server
[root@localhost ~]# systemctl restart mariadb
[root@localhost ~]# ls
anaconda-ks.cfg  hf2206.sql  ifcfg-ens33
[root@localhost ~]# mysql
MariaDB [(none)]> show databases;							#为导入之前,没有hf2206库
+--------------------+
| Database           |
+--------------------+
| information_schema |
| mysql              |
| performance_schema |
| test               |
+--------------------+
4 rows in set (0.00 sec)
MariaDB [(none)]> Bye
[root@localhost ~]# mysql <  hf2206.sql
[root@localhost ~]# mysql
MariaDB [(none)]> show databases;							#导入之后检查hf2206库,以及库中的表、记录
+--------------------+
| Database           |
+--------------------+
| information_schema |
| hf2206             |
| mysql              |
| performance_schema |
| test               |
+--------------------+
5 rows in set (0.00 sec)

MariaDB [(none)]> select * from hf2206.user_list;
+------+----------+------+
| id   | name     | age  |
+------+----------+------+
|    1 | zhangsan |   25 |
|    2 | lisiiiii |   18 |
|    3 | laowang  |   30 |
|    4 | laosong  |   29 |
+------+----------+------+
4 rows in set (0.00 sec)
2)二进制日志(适合实时备份,binlog)
实验步骤:
==7-1服务端:==
1.安装软件(mariadb、mariadb-server)
2.修改配置文件
[root@localhost ~]# vim /etc/my.cnf
log-bin=mariadb-bin
server-id=201
3.启动服务、检查二进制文件存在
[root@localhost ~]# systemctl restart mariadb
[root@localhost ~]# ls /var/lib/mysql/mariadb-bin*
/var/lib/mysql/mariadb-bin.000001  /var/lib/mysql/mariadb-bin.index
4.创建库、表、记录
MariaDB [(none)]> create database xxhf;
MariaDB [(none)]> create table xxhf.user_list (id int,name char(15),age int(3));
MariaDB [(none)]> use xxhf
MariaDB [xxhf]> insert into user_list(id,name,age) values(1,'zhangsan',18);			#故意创建重复记录,再删除,以判断二进制日志文件记录
MariaDB [xxhf]> insert into user_list(id,name,age) values(1,'zhangsan',18);
MariaDB [xxhf]> delete from user_list limit 1;
MariaDB [xxhf]> insert into user_list values(2,'yq1',19);
MariaDB [xxhf]> insert into user_list values(3,'yq2',20);
MariaDB [xxhf]> insert into user_list values(4,'yq3',21);
MariaDB [xxhf]> insert into user_list values(5,'yq4',22);
MariaDB [xxhf]> select * from xxhf.user_list;
+------+----------+------+
| id   | name     | age  |
+------+----------+------+
|    1 | zhangsan |   18 |
|    2 | yq1      |   19 |
|    3 | yq2      |   20 |
|    4 | yq3      |   21 |
|    5 | yq4      |   22 |
+------+----------+------+
5 rows in set (0.00 sec)
5.检查二进制文件(记录了库、表、记录创建过程)、传给客户端
[root@localhost ~]# mysqlbinlog /var/lib/mysql/mariadb-bin.000001 |less
[root@localhost ~]# scp /var/lib/mysql/mariadb-bin.000001 192.168.18.202:/root/
==7-2客户端:==
通过 mysqlbinlog 命令还原(指定时间起始、大小起始还原)
[root@localhost ~]# mysqlbinlog mariadb-bin.000001 |less		#通过查看,判断指定时间起始、大小起始还原
[root@localhost ~]# mysqlbinlog --start-datetime='2022-11-15 10:41:13' --stop-datetime='2022-11-15 10:43:30' mariadb-bin.000001|less												#通过管道符,检查指定起始时间的操作
[root@localhost ~]# mysqlbinlog --start-datetime='2022-11-15 10:41:13' --stop-datetime='2022-11-15 10:43:30' mariadb-bin.000001|mysql												#将确定好的时间范围操作,交给mysql命令执行
[root@localhost ~]# mysql
MariaDB [(none)]> select * from xxhf.user_list;					#进入mysql检查,是否导入成功
+------+----------+------+
| id   | name     | age  |
+------+----------+------+
|    1 | zhangsan |   18 |
+------+----------+------+
1 row in set (0.00 sec)
MariaDB [(none)]> Bye
[root@localhost ~]# mysqlbinlog --start-position 1135 --stop-position 1859 mariadb-bin.000001|less		#检查指定大小之间的操作
[root@localhost ~]# mysqlbinlog --start-position 1135 --stop-position 1859 mariadb-bin.000001|mysql		#将操作交给mysql命令执行
[root@localhost ~]# mysql
MariaDB [(none)]> select * from xxhf.user_list;					#进入mysql检查,是否导入成功
+------+----------+------+
| id   | name     | age  |
+------+----------+------+
|    1 | zhangsan |   18 |
|    2 | yq1      |   19 |
|    3 | yq2      |   20 |
|    4 | yq3      |   21 |
|    5 | yq4      |   22 |
+------+----------+------+
5 rows in set (0.00 sec)
9 同步实验
基于mysql的binlog日志功能的实验
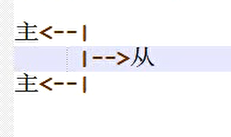
a.主从数据同步
                        主:能写,能读
                        从:仅读,数据来源于主
                        作用:1)数据备份;2)分摊访问压力,提高读并发
b.主主数据同步:互为主从
                        作用:1)数据备份;2)分摊读写压力,提高读写并发
c.多主多从:作用:1)数据备份;2)极大分摊读写压力
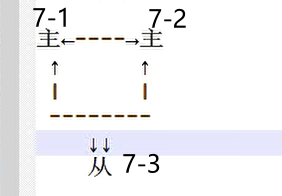
9-1)主从同步(7-3、7-4)
实验步骤:
==7-3 主服务器;ip:192.168.18.203==
(1)配置:
安装软件(mariadb、mariadb-server)

修改配置文件	/etc/my.cnf
    [root@localhost ~]# vim /etc/my.cnf
    server-id=203
    log-bin=mariadb-bin

重启mariadb、加入自启动
(2)进入mysql创建从服务器账号,并检查记录日志的文件
[root@localhost ~]# mysql
MariaDB [(none)]> grant replication slave on *.* to slave@'192.168.18.204' identified by		#创建从服务器的授权
MariaDB [(none)]> show master status;
+--------------------+----------+--------------+------------------+
| File               | Position | Binlog_Do_DB | Binlog_Ignore_DB |
+--------------------+----------+--------------+------------------+
| mariadb-bin.000003 |      399 |              |                  |
+--------------------+----------+--------------+------------------+
1 row in set (0.00 sec)
[root@localhost ~]# netstat -anpt |grep :3306												#在7-2配置完成以后再检查端口
tcp        0      0 0.0.0.0:3306            0.0.0.0:*               LISTEN      7540/mysqld
tcp        0      0 192.168.18.203:3306     192.168.18.204:37448    ESTABLISHED 7540/mysqld
==7-4 从服务器;ip:192.168.18.204==
(1)配置:
安装软件(mariadb、mariadb-server)

修改配置文件	/etc/my.cnf
    [root@localhost ~]# vim /etc/my.cnf
    server-id=204

重启mariadb、加入自启动
(2)接受主服务器的授权,检查slave状态状态、启动slave
[root@localhost ~]# mysql
MariaDB [(none)]> change master to
-> master_host='192.168.18.203',
-> master_user='slave',
-> master_password='123456',
-> master_log_file='mariadb-bin.000003',
-> master_log_pos=399;
Query OK, 0 rows affected (0.01 sec)
MariaDB [(none)]> Bye
[root@localhost ~]# cat /var/lib/mysql/master.info
18
mariadb-bin.000003
399
192.168.18.203
slave
123456
3306
60
0
[root@localhost ~]# mysql
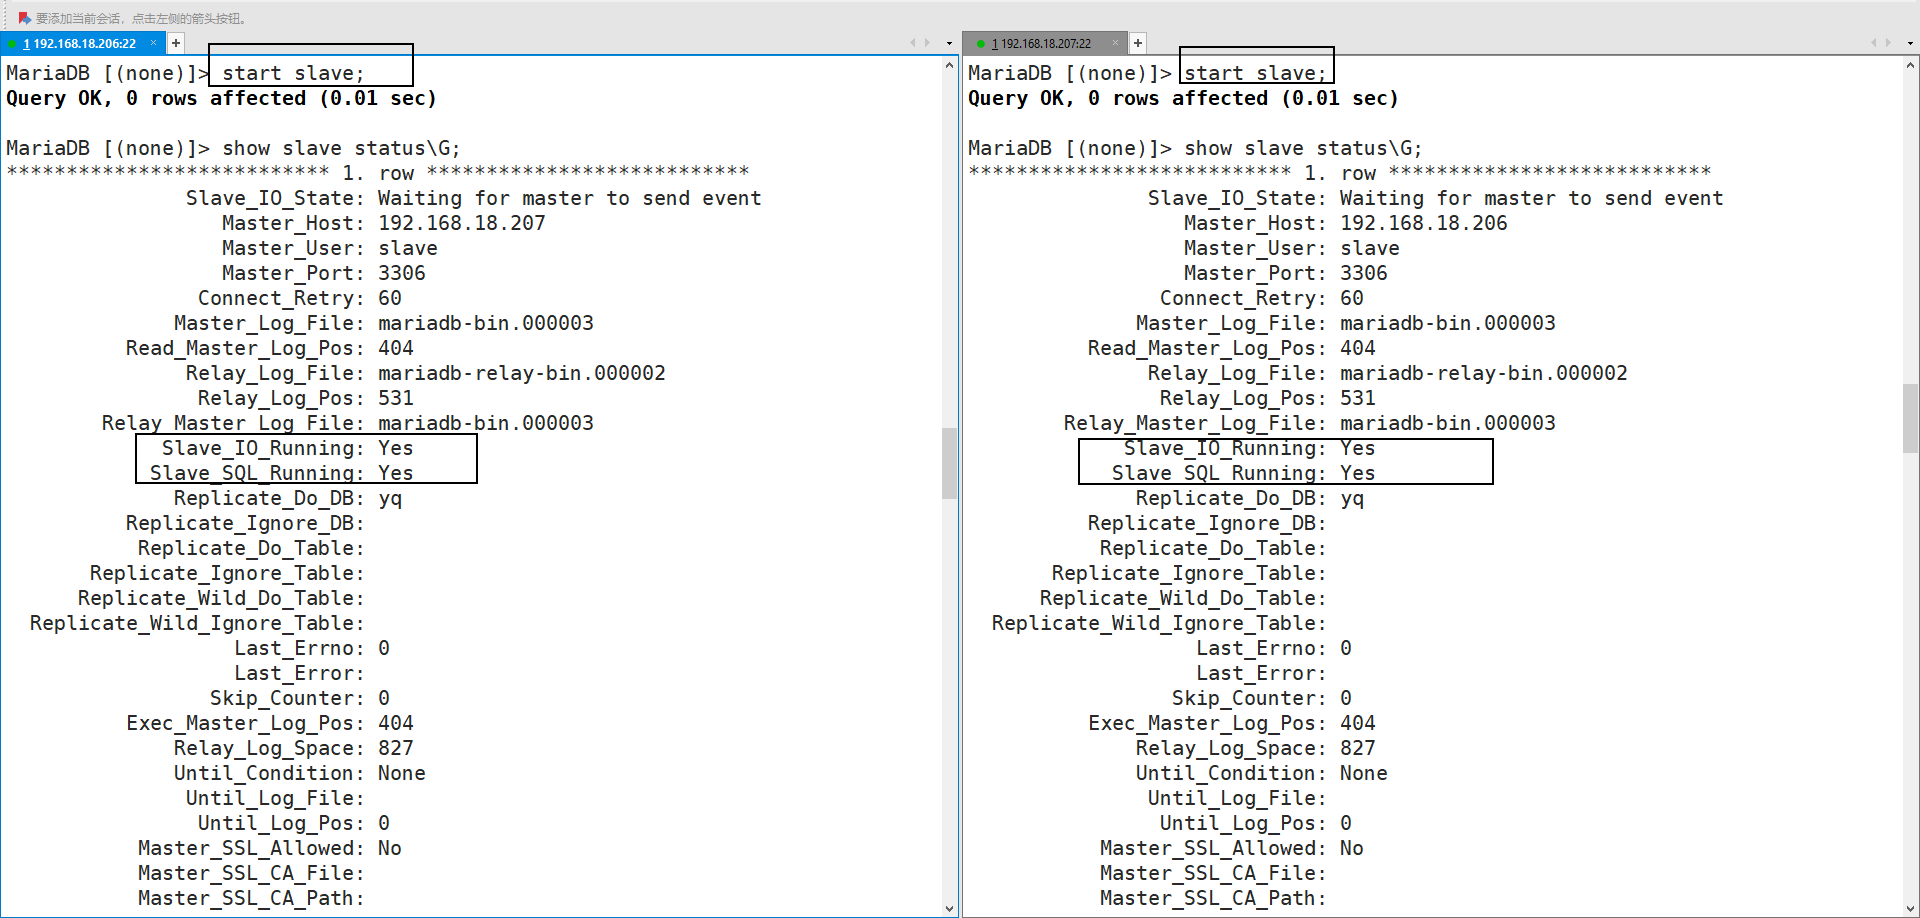
MariaDB [(none)]> start slave; #启动slave
MariaDB [(none)]> show slave status\G; #检查slave状态
Slave_IO_Running: Yes #连接主服务器的线程,运行成功
Slave_SQL_Running: Yes #命令解析线程,运行成功
==测试:==
主服务器创建库、表、记录,从服务器进入查看
#7-3主服务器进入mysql,创建库、表、记录
[root@localhost ~]# mysql
MariaDB [(none)]> create database hf2206;
MariaDB [(none)]> create table hf2206.user_list(id int,name char(15),age int(3));
MariaDB [(none)]> insert into hf2206.user_list(id,name,age) values(1,'zhangsan',18),(2,'lisi',20);

#7-4从服务器进入mysql查看
[root@localhost ~]# mysql
MariaDB [(none)]> select * from hf2206.user_list;		#主服务器未创建完成库、表后,未插入记录前,表中没有数据
Empty set (0.00 sec)

MariaDB [(none)]> select * from hf2206.user_list;		#主服务器向表中插入数据之后,有了记录
+------+----------+------+
| id   | name     | age  |
+------+----------+------+
|    1 | zhangsan |   18 |
|    2 | lisi     |   20 |
+------+----------+------+
2 rows in set (0.00 sec)
9-2)主主同步(7-6、7-7)
实验步骤:
==7-6 (192.168.18.206)==
(1)配置:
安装软件(mariadb、mariadb-server)

修改配置文件 (/etc/my.cnf)
    [root@localhost ~]# vim /etc/my.cnf
    server-id=206
    log-bin=mariadb-bin
    replicate-do-db=yq					#仅同步的库
    binlog-ignore-db=mysql				#忽略同步的库
    auto-increment-offset=1				#初始值
    auto-increment-increment=2			#自增幅度

启动服务mariadb,加入自启动
(2)配置数据库
进入mysql、创建7-6的授权
MariaDB [(none)]> grant replication slave on *.* to slave@'192.168.18.207' identified by '123456';
在7-7中检查master状态,进入mysql、并接受7-7的授权(在7-7创建授权之后执行)
MariaDB [(none)]> show master status;										#7-7执行:7-7master状态
+--------------------+----------+--------------+------------------+
| File               | Position | Binlog_Do_DB | Binlog_Ignore_DB |
+--------------------+----------+--------------+------------------+
| mariadb-bin.000003 |      404 |              | mysql            |
+--------------------+----------+--------------+------------------+
1 row in set (0.00 sec)

MariaDB [(none)]> change master to											#7-6执行:通过7-7master状态,接受7-7授权
    -> master_host='192.168.18.207',
    -> master_user='slave',
    -> master_password='123456',
    -> master_log_file='mariadb-bin.000003',
    -> master_log_pos=404;
Query OK, 0 rows affected (0.01 sec)
==7-7 (192.168.18.207)==
(1)配置:
安装软件(mariadb、mariadb-server)
修改配置文件 (/etc/my.cnf)
[root@localhost ~]# vim /etc/my.cnf
server-id=207
log-bin=mariadb-bin
replicate-do-db=yq
binlog-ignore-db=mysql
auto-increment-offset=2
auto-increment-increment=2
启动服务mariadb,加入自启动
(2)配置数据库
进入mysql、创建7-7的授权
MariaDB [(none)]> grant replication slave on *.* to slave@'192.168.18.206' identified by '123456';
进入mysql、接受7-6的授权(在7-6创建授权之后执行)
MariaDB [(none)]> show master status;										#7-6执行:7-6master状态
+--------------------+----------+--------------+------------------+
| File               | Position | Binlog_Do_DB | Binlog_Ignore_DB |
+--------------------+----------+--------------+------------------+
| mariadb-bin.000003 |      404 |              | mysql            |
+--------------------+----------+--------------+------------------+
1 row in set (0.00 sec)

MariaDB [(none)]> change master to											#7-7执行:通过7-6master状态,接受7-6授权
    -> master_host='192.168.18.206',
    -> master_user='slave',
    -> master_password='123456',
    -> master_log_file='mariadb-bin.000003',
    -> master_log_pos=404;
==测试:==
1. 7-6、7-7在mysql中,同时启动slave、并检查slave状态

2. 创建yq库,并在其中创建表,写入记录(创建表的id字段有自增,非空类型,以验证auto-increment功能)
[root@localhost ~]# mysql													#7-6进入mysql创建库、表、记录
MariaDB [(none)]> use yq;
MariaDB [yq]> create table user_list (ID int unsigned not null auto_increment,NAME char(15) not null default '',AGE int not null default '18', primary key (ID));
Query OK, 0 rows affected (0.00 sec)
MariaDB [yq]> show tables;
+--------------+
| Tables_in_yq |
+--------------+
| user_list    |
+--------------+
1 row in set (0.00 sec)
MariaDB [yq]> insert into user_list values(null,'zhangsan',18);				#插入两条记录
MariaDB [yq]> insert into user_list values(null,'lisi',18);
MariaDB [yq]> select * from user_list;
+----+----------+-----+
| ID | NAME     | AGE |
+----+----------+-----+
|  1 | zhangsan |  18 |
|  3 | lisi     |  18 |
+----+----------+-----+
2 rows in set (0.00 sec)

[root@localhost ~]# mysql													#7-7进入mysql检查
MariaDB [(none)]> use yq;
MariaDB [yq]> select * from user_list;
+----+----------+-----+
| ID | NAME     | AGE |
+----+----------+-----+
|  1 | zhangsan |  18 |
|  3 | lisi     |  18 |
+----+----------+-----+
2 rows in set (0.00 sec)
MariaDB [yq]> insert into user_list values(null,'laowang',25);				#插入记录再次检查
MariaDB [yq]> select * from user_list;
+----+----------+-----+
| ID | NAME     | AGE |
+----+----------+-----+
|  1 | zhangsan |  18 |
|  3 | lisi     |  18 |
|  4 | laowang  |  25 |
+----+----------+-----+
3 rows in set (0.00 sec)
9-3)多主多从
主从从:
主---> 从(主)--->从		(模式不合理,无法实现主一、主二之间的数据同步)

(模式合理,一主多从,通一个主的模式)
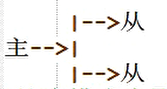
多主多从(主主的升级)
核心选项:
	log-slave-updates		#将服务器同步下来的命令写入到自己的binlog日志中
==实验1 主主从==
实验步骤:
9-3-1.1)7-1、7-2搭建主主
1)安装软件
2)修改配置文件、启动服务
#7-1
[root@localhost ~]# vim /etc/my.cnf
server-id=201
log-bin=mariadb-bin
log-slave-updates			#同步命令到binlog日志的核心选项
#7-2
[root@localhost ~]# vim /etc/my.cnf
server-id=202
log-bin=mariadb-bin
log-slave-updates
3)7-1、7-2分别给对方创建授权、并接受对方的授权、启动slave
#7-1
[root@localhost ~]# mysql
MariaDB [(none)]> grant replication slave on *.* to 'slave'@'192.168.18.202' identified by '123456';		#给7-2主创建授权
MariaDB [(none)]> grant replication slave on *.* to 'slave'@'192.168.18.203' identified by '123456';		#给7-3从创建授权
MariaDB [(none)]> show master status;
+--------------------+----------+--------------+------------------+
| File               | Position | Binlog_Do_DB | Binlog_Ignore_DB |
+--------------------+----------+--------------+------------------+
| mariadb-bin.000003 |      557 |              |                  |
+--------------------+----------+--------------+------------------+
MariaDB [(none)]> change master to master_host='192.168.18.202',master_user='slave',master_password='123456',master_log_file='mariadb-bin.000003',master_log_pos=401;																			#接受7-2主的授权
MariaDB [(none)]> start slave;
MariaDB [(none)]> show slave status\G;
             Slave_IO_Running: Yes
            Slave_SQL_Running: Yes

#7-2
[root@localhost ~]# mysql
MariaDB [(none)]> grant replication slave on *.* to 'slave'@'192.168.18.201' identified by '123456';	#给7-1主创建授权
MariaDB [(none)]> change master to master_host='192.168.18.201',master_user='slave',master_password='123456',master_log_file='mariadb-bin.000003',master_log_pos=557;																			#接受7-1的授权
MariaDB [(none)]> show master status;
+--------------------+----------+--------------+------------------+
| File               | Position | Binlog_Do_DB | Binlog_Ignore_DB |
+--------------------+----------+--------------+------------------+
| mariadb-bin.000003 |      401 |              |                  |
+--------------------+----------+--------------+------------------+
MariaDB [(none)]> start slave;
MariaDB [(none)]> show slave status\G;
             Slave_IO_Running: Yes
            Slave_SQL_Running: Yes
4)测试主主:创建库、表、记录
#7-1创建库、表、记录
MariaDB [(none)]> show databases;
+--------------------+
| Database           |
+--------------------+
| information_schema |
| mysql              |
| performance_schema |
| test               |
+--------------------+
MariaDB [(none)]> create database yq;
MariaDB [(none)]> create table yq.user_list(id int,name char(15));
MariaDB [(none)]> insert into yq.user_list values(1,'yq1'),(2,'yq2');
MariaDB [(none)]> select * from yq.user_list;
+------+------+
| id   | name |
+------+------+
|    1 | yq1  |
|    2 | yq2  |
+------+------+

#7-2检查主主配置成功
MariaDB [(none)]> select * from yq.user_list;
+------+------+
| id   | name |
+------+------+
|    1 | yq1  |
|    2 | yq2  |
+------+------+
2 rows in set (0.00 sec)
9-3-1.2)7-3从服务器
1)安装软件(mariadb、mariadb-server)
2)修改配置文件(仅需配置 server-id )、启动服务
[root@localhost ~]# vim /etc/my.cnf
server-id=203
[root@localhost ~]# systemctl restart mariadb
[root@localhost ~]# systemctl  enable mariadb --now			#加入自启动并启动
3)接受7-1的授权、启动slave、检查状态
[root@localhost ~]# mysql
MariaDB [(none)]> change master to master_host='192.168.18.201',master_user='slave',master_password='123456',master_log_file='mariadb-bin.000003',master_log_pos=557;
MariaDB [(none)]> start slave;
MariaDB [(none)]> show slave status\G;
             Slave_IO_Running: Yes
            Slave_SQL_Running: Yes
4)测试:能使接受授权、启动slave之后,主从服务器数据一样
MariaDB [(none)]> select * from yq.user_list;
+------+------+
| id   | name |
+------+------+
|    1 | yq1  |
|    2 | yq2  |
+------+------+
2 rows in set (0.00 sec)
==实验2 主从从(mysql的多进程)==
实验步骤:
9-3-2.1)7-1、7-2搭建主主(不相互接受授权,即不是先相互数据同步)
1)安装软件、修改配置文件、启动服务
#7-1
[root@localhost ~]# yum -y install mariadb mariadb-server
[root@localhost ~]# vim /etc/my,cnf
server-id=201
bin-log=mariadb-bin
[root@localhost ~]# systemctl start mariadb
[root@localhost ~]# systemctl enable mariadb

#7-2
[root@localhost ~]# yum -y install mariadb mariadb-server
[root@localhost ~]# vim /etc/my,cnf
server-id=202
bin-log=mariadb-bin
[root@localhost ~]# systemctl start mariadb
[root@localhost ~]# systemctl enable mariadb
2)7-1、7-2仅给从服务创建授权
#7-1
MariaDB [(none)]> grant replication slave on *.* to 'slave'@'192.168.18.203' identified by '123456';
MariaDB [(none)]> show master status;
+--------------------+----------+--------------+------------------+
| File               | Position | Binlog_Do_DB | Binlog_Ignore_DB |
+--------------------+----------+--------------+------------------+
| mariadb-bin.000003 |      401 |              |                  |
+--------------------+----------+--------------+------------------+

#7-2
MariaDB [(none)]> grant replication slave on *.* to 'slave'@'192.168.18.203' identified by '123456';
MariaDB [(none)]> show master status;
+--------------------+----------+--------------+------------------+
| File               | Position | Binlog_Do_DB | Binlog_Ignore_DB |
+--------------------+----------+--------------+------------------+
| mariadb-bin.000003 |      401 |              |                  |
+--------------------+----------+--------------+------------------+
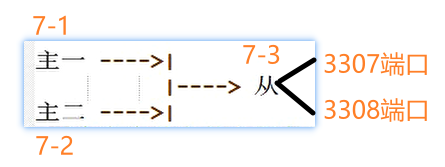
9-3-2.2)7-3搭建从服务器(多端口)
1)安装软件、修改配置文件
[root@localhost ~]# yum -y install mariadb mariadb-server
[root@localhost ~]# vim /etc/my.cnf
[mysqld_multi]
mysqld=/usr/bin/mysqld_safe
mysqladmin=/usr/bin/mysqldadmin
log=/tmp/multilog

[mysqld201]
port=3307
datadir=/var/lib/mysql201/
pid-file=/var/lib/mysql201/mysqld.pid
socket=/var/lib/mysql201/mysql.sock
user=mysql
server-id=203

[mysqld202]
port=3308
datadir=/var/lib/mysql202/
pid-file=/var/lib/mysql202/mysqld.pid
socket=/var/lib/mysql202/mysql.sock
user=mysql
server-id=203
2)初始化多进程、检查权限、启动服务、登录验证
[root@localhost ~]# mysql_install_db --datadir=/var/lib/mysql201/ --user=mysql
[root@localhost ~]# mysql_install_db --datadir=/var/lib/mysql202/ --user=mysql
[root@localhost ~]# ls /var/lib/mysql201/
aria_log.00000001  aria_log_control  mysql  performance_schema  test
[root@localhost ~]# ls /var/lib/mysql202
aria_log.00000001  aria_log_control  mysql  performance_schema  test
[root@localhost ~]# mysqld_multi --defaults-file=/etc/my.cnf start 201
[root@localhost ~]# mysqld_multi --defaults-file=/etc/my.cnf start 202
[root@localhost ~]# ls /var/lib/mysql201/
aria_log.00000001  aria_log_control  ibdata1  ib_logfile0  ib_logfile1  mysql  mysqld.pid  mysql.sock  performance_schema  test
[root@localhost ~]# ls /var/lib/mysql202
aria_log.00000001  aria_log_control  ibdata1  ib_logfile0  ib_logfile1  mysql  mysqld.pid  mysql.sock  performance_schema  test
[root@localhost ~]# netstat -anpt |egrep ":3307|:3308"
tcp        0      0 0.0.0.0:3307            0.0.0.0:*               LISTEN      8004/mysqld
tcp        0      0 0.0.0.0:3308            0.0.0.0:*               LISTEN      8241/mysqld
[root@localhost ~]# mysql -P3307 -S/var/lib/mysql201/mysql.sock
MariaDB [(none)]>
[root@localhost ~]# mysql -P3308 -S/var/lib/mysql201/mysql.sock
MariaDB [(none)]>
3)接受7-1、7-2的授权、启动slave
#3307端口
[root@localhost ~]# mysql -P 3307 -S /var/lib/mysql201/mysql.sock
MariaDB [(none)]> change master to master_host='192.168.18.201',master_user='slave',master_password='123456',master_log_file='mariadb-bin.000003',master_log_pos=401;
MariaDB [(none)]> start slave;
             Slave_IO_Running: Yes
            Slave_SQL_Running: Yes


#3308端口
[root@localhost ~]# mysql -P 3308 -S /var/lib/mysql202/mysql.sock
MariaDB [(none)]> change master to master_host='192.168.18.202',master_user='slave',master_password='123456',master_log_file='mariadb-bin.000003',master_log_pos=401;
MariaDB [(none)]> start slave;
             Slave_IO_Running: Yes
            Slave_SQL_Running: Yes
9-3-2.3)测试
1)7-1创建hf2206库、表、记录,7-2没有同步、7-3mysql201登录检查:有同步
#7-1主,创建hf2206库、表、记录
MariaDB [(none)]> create database hf2206;
MariaDB [(none)]> create table hf2206.user_list(id int,name char(15));
MariaDB [(none)]> insert into hf2206.user_list values(1,'zhangsan'),(2,'lisi');

#7-3的3307端口有同步
MariaDB [(none)]> show databases;
+--------------------+
| Database           |
+--------------------+
| information_schema |
| hf2206             |
| mysql              |
| performance_schema |
| test               |
+--------------------+
MariaDB [(none)]> select * from hf2206.user_list;
+------+----------+
| id   | name     |
+------+----------+
|    1 | zhangsan |
|    2 | lisi     |
+------+----------+

#7-3的3308端口没有同步
MariaDB [(none)]> show databases;
+--------------------+
| Database           |
+--------------------+
| information_schema |
| mysql              |
| performance_schema |
| test               |
+--------------------+
2)7-2创建yq库、表、记录,7-1没有同步、7-3mysql202登录检查:有同步
#7-2主,创建yq库、表、记录
MariaDB [(none)]> create database yq;
MariaDB [(none)]> create table yq.list(id int,name char(15),age int(3));
MariaDB [(none)]> insert into yq.list values(1,'yq1',18),(2,'yq2',19),(3,'yq3',20);

#7-3的3307端口没有同步
MariaDB [(none)]> show databases;
+--------------------+
| Database           |
+--------------------+
| information_schema |
| hf2206             |
| mysql              |
| performance_schema |
| test               |
+--------------------+

#7-3的3308端口同步成功
MariaDB [(none)]> show databases;
+--------------------+
| Database           |
+--------------------+
| information_schema |
| mysql              |
| performance_schema |
| test               |
| yq                 |
+--------------------+
MariaDB [(none)]> select * from yq.list;
+------+------+------+
| id   | name | age  |
+------+------+------+
|    1 | yq1  |   18 |
|    2 | yq2  |   19 |
|    3 | yq3  |   20 |
+------+------+------+
9-4)MySQL的读写分离+负载均衡
实验步骤:
==9-4-1.1)7-2、7-3、7-4搭建主从从==
1)安装软件、修改配置文件、启动服务
#7-2
[root@localhost ~]# yum -y install mariadb mariadb-server
[root@localhost ~]# vim /etc/my.cnf
server-id=202
log-bin=mariadb-bin
[root@localhost ~]# systemctl start mariadb
[root@localhost ~]# systemctl enable mariadb

#7-3
[root@localhost ~]# yum -y install mariadb mariadb-server
[root@localhost ~]# vim /etc/my.cnf
server-id=203
[root@localhost ~]# systemctl start mariadb
[root@localhost ~]# systemctl enable mariadb

#7-4
[root@localhost ~]# yum -y install mariadb mariadb-server
[root@localhost ~]# vim /etc/my.cnf
server-id=204
[root@localhost ~]# systemctl start mariadb
[root@localhost ~]# systemctl enable mariadb
2)搭建主从从(主创建授权、从接受、从开启slave同步)
#7-2
[root@localhost ~]# mysql
MariaDB [(none)]> grant replication slave on *.* to 'slave'@'192.168.18.203' identified by '123456';
MariaDB [(none)]> grant replication slave on *.* to 'slave'@'192.168.18.204' identified by '123456';

#7-3
[root@localhost ~]# mysql
MariaDB [(none)]> change master to master_host='192.168.18.202',master_user='slave',master_password='123456',master_log_file='mariadb-bin.000003',master_log_pos=401;
MariaDB [(none)]> start slave;
             Slave_IO_Running: Yes
            Slave_SQL_Running: Yes

#7-4
[root@localhost ~]# mysql
MariaDB [(none)]> change master to master_host='192.168.18.202',master_user='slave',master_password='123456',master_log_file='mariadb-bin.000003',master_log_pos=401;
MariaDB [(none)]> start slave;
             Slave_IO_Running: Yes
            Slave_SQL_Running: Yes
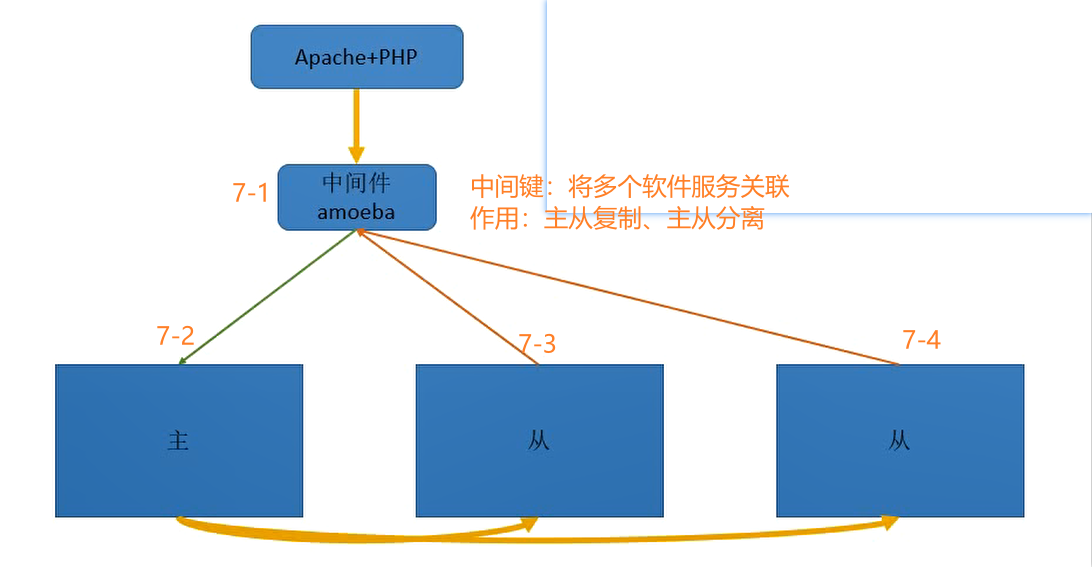
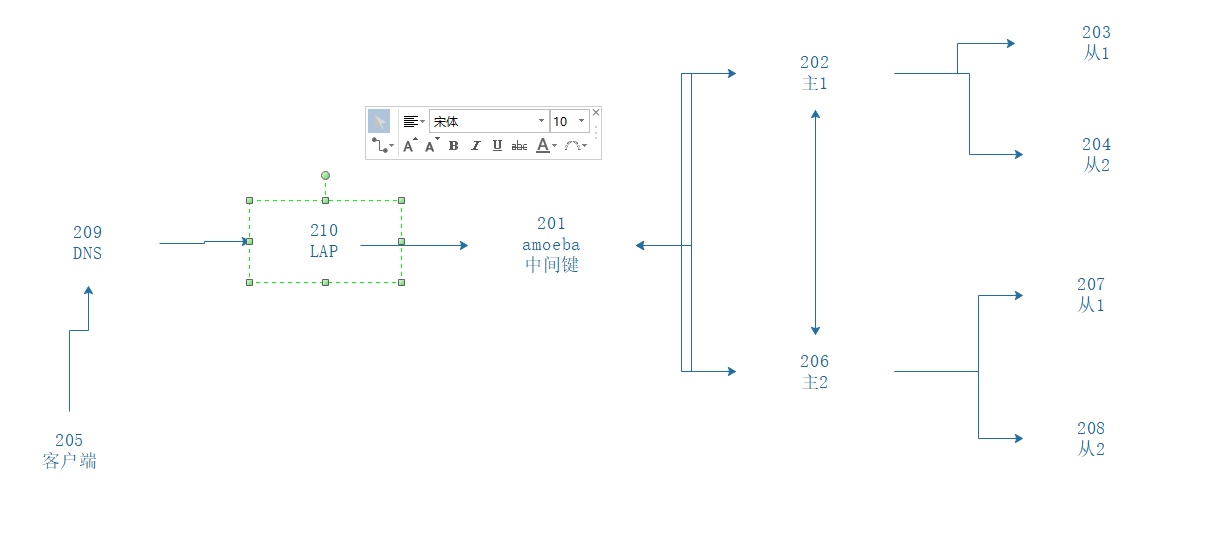
==9-4-1.2)7-1搭建amoeba==
介绍:
中间键:将多个软件服务关联
作用:主从复制、主从分离
环境:a.主从从身份
                    账号:slave		密码:123456
            b.三台数据库授予amoeba远程登录
                    账号:yq			密码:123456
            c.客户端连接sql集群
                    账号:amoebaroot	密码:123456
1)7-2主:
给amoeba创建授权用户:yq,库web

创建web库,表、记录

7-3、7-4:为了测试结果,关闭slave,让从服务器数据不一样


#7-2
MariaDB [(none)]> grant all on web.* to 'yq'@'192.168.18.201' identified by '123456';
MariaDB [(none)]> create database web;
MariaDB [(none)]> use web;
MariaDB [web]> create table web.user_list(id int,name char(15));
MariaDB [web]> insert web.user_list values(1,'zhangsan'),(2,'lisi');
MariaDB [web]> insert web.user_list values(3,'laowang');

#7-3
MariaDB [(none)]> select * from web.user_list;
+------+----------+
| id   | name     |
+------+----------+
|    1 | zhangsan |
|    2 | lisi     |
|    4 | laozhang |
+------+----------+

#7-4
MariaDB [(none)]> select * from web.user_list;
+------+----------+
| id   | name     |
+------+----------+
|    1 | zhangsan |
|    2 | lisi     |
+------+----------+
2)配置amoeba端
a.安装软件(mariadb、mariadb-server)、修改配置文件、启动服务、测试登录主从从的yq账号
[root@localhost ~]# yum -y install mariadb mariadb-server
[root@localhost ~]# vim /etc/my.cnf
server-id=201
[root@localhost ~]# systemctl start mariadb
[root@localhost ~]# systemctl enable mariadb
[root@localhost ~]# mysql -uyq -p123456 -h192.168.18.202
MariaDB [(none)]>
MariaDB [(none)]> select * from web.user_list;
+------+----------+
| id   | name     |
+------+----------+
|    1 | zhangsan |
|    2 | lisi     |
|    3 | laowang  |
+------+----------+
3 rows in set (0.001 sec)
b.安装amoeba(绿色免安装)
1)上传、解压
[root@localhost ~]# pwd
/root
[root@localhost ~]# ls amoeba-n.zip
amoeba-n.zip
[root@localhost ~]# mkdir amoeba
[root@localhost ~]# yum -y install unzip &>/dev/null
[root@localhost ~]# unzip amoeba-n.zip -d amoeba/
[root@localhost amoeba-n]# cd /root/amoeba/amoeba-n/
[root@localhost amoeba-n]# ls
amoeba-mysql-1.3.1-BETA.zip  jdk-7u40-linux-x64.gz
[root@localhost amoeba-n]# tar -xf jdk-7u40-linux-x64.gz
[root@localhost amoeba-n]# ls
amoeba-mysql-1.3.1-BETA.zip  jdk1.7.0_40  jdk-7u40-linux-x64.gz


复制 jdk-7u40-linux-x64 到/usr/local/jdk
[root@localhost amoeba-n]# cp -r jdk1.7.0_40 /usr/local/jdk

解压 amoeba-mysql-1.3.1-BETA.zip 到/usr/local/amoeba
[root@localhost amoeba-n]# unzip amoeba-mysql-1.3.1-BETA.zip -d /usr/local/amoeba

2)在/etc/profile中写入环境变量,并启用环境变量,检查java版本
[root@localhost ~]# vim /etc/profile
#jdk相关
export JAVA_HOME=/usr/local/jdk
export CLASSPATH=/usr/local/jdk/lib/tools.jar:/usr/local/jdk/lib/dt.jar
export PATH=$PATH:$JAVA_HOME/bin

[root@localhost local]# source /etc/profile
[root@localhost local]# java -version
java version "1.7.0_40"
Java(TM) SE Runtime Environment (build 1.7.0_40-b43)
Java HotSpot(TM) 64-Bit Server VM (build 24.0-b56, mixed mode)


3)导出 /usr/local/amoeba/conf/amoeba.xml 到Windows借助工具修改后,在导入/usr/local/amoeba/conf 目录下
[root@localhost amoeba-n]# sz /usr/local/amoeba/conf/amoeba.xml
注意:导入windows需要修改的有:

c.修改amoeba配置文件
(1)server标签中:确定amoeba服务端的端口、ip、客户端连接amoeba的账号密码等
(2)connectionManageList 标签中:表示运行的一些设置,可修改工作生成的进程数(processors)
(3)dbserverList标签中:配置好各个server的端口、库名、以及连接主从的账号密码
		 dbserver name 标签中:标记WritePool、ReadPool分别对应server
(4)queryRouter 标签中标记:默认标签、读、写标签


[root@localhost ~]# vim /usr/local/amoeba/conf/amoeba.xml
<?xml version="1.0" encoding="utf-8"?>

<!DOCTYPE amoeba:configuration SYSTEM "amoeba.dtd">
<amoeba:configuration xmlns:amoeba="http://amoeba.meidusa.com/">

	<server>
		<property name="port">8066</property>
		<property name="ipAddress">192.168.18.201</property>
		<property name="readThreadPoolSize">20</property>
		<property name="clientSideThreadPoolSize">30</property>
		<property name="serverSideThreadPoolSize">30</property>
		<property name="netBufferSize">128</property>
		<property name="tcpNoDelay">true</property>
		<property name="user">amoebaroot</property>
		<property name="password">123456</property>
		<property name="queryTimeout">60</property>
	</server>

	<connectionManagerList>
		<connectionManager name="defaultManager" class="com.meidusa.amoeba.net.MultiConnectionManagerWrapper">
			<property name="subManagerClassName">com.meidusa.amoeba.net.AuthingableConnectionManager</property>
			<property name="processors">5</property>
		</connectionManager>
	</connectionManagerList>

	<dbServerList>
		<dbServer name="server1">
			<factoryConfig class="com.meidusa.amoeba.mysql.net.MysqlServerConnectionFactory">
				<property name="manager">defaultManager</property>
				<property name="port">3306</property>
				<property name="ipAddress">192.168.18.202</property>
				<property name="schema">web</property>
				<property name="user">yq</property>
				<property name="password">123456</property>
			</factoryConfig>

			<poolConfig class="com.meidusa.amoeba.net.poolable.PoolableObjectPool">
				<property name="maxActive">200</property>
				<property name="maxIdle">200</property>
				<property name="minIdle">10</property>
				<property name="minEvictableIdleTimeMillis">600000</property>
				<property name="timeBetweenEvictionRunsMillis">600000</property>
				<property name="testOnBorrow">true</property>
				<property name="testWhileIdle">true</property>
			</poolConfig>
		</dbServer>
		<dbServer name="server2">
			<factoryConfig class="com.meidusa.amoeba.mysql.net.MysqlServerConnectionFactory">
				<property name="manager">defaultManager</property>
				<property name="port">3306</property>
				<property name="ipAddress">192.168.18.203</property>
				<property name="schema">web</property>
				<property name="user">yq</property>
				<property name="password">123456</property>
			</factoryConfig>

			<poolConfig class="com.meidusa.amoeba.net.poolable.PoolableObjectPool">
				<property name="maxActive">200</property>
				<property name="maxIdle">200</property>
				<property name="minIdle">10</property>
				<property name="minEvictableIdleTimeMillis">600000</property>
				<property name="timeBetweenEvictionRunsMillis">600000</property>
				<property name="testOnBorrow">true</property>
				<property name="testWhileIdle">true</property>
			</poolConfig>
		</dbServer>
		<dbServer name="server3">
			<factoryConfig class="com.meidusa.amoeba.mysql.net.MysqlServerConnectionFactory">
				<property name="manager">defaultManager</property>
				<property name="port">3306</property>
				<property name="ipAddress">192.168.18.204</property>
				<property name="schema">web</property>
				<property name="user">yq</property>
				<property name="password">123456</property>
			</factoryConfig>

			<poolConfig class="com.meidusa.amoeba.net.poolable.PoolableObjectPool">
				<property name="maxActive">200</property>
				<property name="maxIdle">200</property>
				<property name="minIdle">10</property>
				<property name="minEvictableIdleTimeMillis">600000</property>
				<property name="timeBetweenEvictionRunsMillis">600000</property>
				<property name="testOnBorrow">true</property>
				<property name="testWhileIdle">true</property>
			</poolConfig>
		</dbServer>

		<dbServer name="WritePool" virtual="true">
			<poolConfig class="com.meidusa.amoeba.server.MultipleServerPool">
				<property name="loadbalance">1</property>
				<property name="poolNames">server1</property>
			</poolConfig>
		</dbServer>
		<dbServer name="ReadPool" virtual="true">
			<poolConfig class="com.meidusa.amoeba.server.MultipleServerPool">
				<property name="loadbalance">1</property>
				<property name="poolNames">server2,server3</property>
			</poolConfig>
		</dbServer>
	</dbServerList>

	<queryRouter class="com.meidusa.amoeba.mysql.parser.MysqlQueryRouter">
		<property name="ruleConfig">${amoeba.home}/conf/rule.xml</property>
		<property name="functionConfig">${amoeba.home}/conf/functionMap.xml</property>
		<property name="ruleFunctionConfig">${amoeba.home}/conf/ruleFunctionMap.xml</property>
		<property name="LRUMapSize">1500</property>
		<property name="defaultPool">WritePool</property>
		<property name="writePool">WritePool</property>
		<property name="readPool">ReadPool</property>
		<property name="needParse">true</property>
	</queryRouter>
</amoeba:configuration>
d.修改amoeba运行脚本,使其能运行
[root@localhost ~]# chmod +x /usr/local/amoeba/bin/amoeba
[root@localhost ~]# vim /usr/local/amoeba/bin/amoeba
DEFAULT_OPTS="-server -Xms256m -Xmx256m -Xss256k"
==9-4-1.3)放入后台、脱离终端运行amoeba,检查端口==
& nohup
[root@localhost ~]# nohup bash -x /usr/local/amoeba/bin/amoeba &
[1] 39699
[root@localhost ~]# nohup: 忽略输入并把输出追加到"nohup.out"

[root@localhost ~]# netstat -anpt |grep :8066
tcp6       0      0 192.168.18.201:8066     :::*                    LISTEN      39699/java
tcp6       0      0 192.168.18.201:8066     192.168.18.205:49252    ESTABLISHED 39699/java
==9-4-1.4)测试==
测试1: 打开7-5(205)进行测试:
[root@localhost ~]# yum -y install mariadb mariadb-server httpd php
[root@localhost ~]# systemctl enable mariadb --now

[root@localhost ~]# mysql -uamoebaroot -p123456 -h192.168.18.201 -P8066
MySQL [(none)]> show databases;
+--------------------+
| Database           |
+--------------------+
| information_schema |
| test               |
| web                |
+--------------------+
MySQL [(none)]> select * from web.user_list;			#因为负载均衡,两次查询不一样
+------+----------+
| id   | name     |
+------+----------+
|    1 | zhangsan |
|    2 | lisi     |
+------+----------+
2 rows in set (0.00 sec)

MySQL [(none)]> select * from web.user_list;
+------+----------+
| id   | name     |
+------+----------+
|    1 | zhangsan |
|    2 | lisi     |
|    4 | laozhang |
+------+----------+
3 rows in set (0.01 sec)
#从服务器都打开slave后,同步主服务器的数据后,客户端再次查看表,结果一样
测试2:7-5部署网站环境,将amoeba作为数据库
# C7-2 主数据库
MariaDB [web]> create database www;
MariaDB [web]> grant all on www.* to 'yq'@'192.168.2.201' identified by '123456';
MariaDB [web]> show databases;
+--------------------+
| Database           |
+--------------------+
| information_schema |
| mysql              |
| performance_schema |
| web                |
| www                |
+--------------------+


# C7-5 网站服务器-数据库客户端(连接数据库,创建表,插入数据)
[root@localhost bash]# mysql -uamoebaroot -p123456 -h192.168.18.201 -P8066
MySQL [(none)]> use www;

MySQL [www]> create table www.list(ID int,NAME char(15),age int(3));

MySQL [www]> show tables;

MySQL [www]> insert into www.list values(1,'zhangsan',18),(2,'lisi',19);

MySQL [www]> select * from www.list;
+------+----------+------+
| ID   | NAME     | age  |
+------+----------+------+
|    1 | zhangsan |   18 |
|    2 | lisi     |   19 |
+------+----------+------+

# C7-5安装网站服务
[root@localhost bash]# yum -y install httpd php php-mysql	# 安装php-mysql让typecho安装时可以选择数据库适配器
[root@localhost bash]# systemctl enable httpd --now

上传网站服务压缩包
[root@localhost ~]# pwd
/root
[root@localhost ~]# ls 1.1-17.10.30-release.tar.gz
1.1-17.10.30-release.tar.gz

解压
[root@localhost ~]# tar -xf 1.1-17.10.30-release.tar.gz
[root@localhost ~]# ls
1.1-17.10.30-release.tar.gz  anaconda-ks.cfg  build  original-ks.cfg

网页服务配置
[root@localhost ~]# mv build/* /var/www/html/
[root@localhost ~]# cd /var/www/html/
[root@localhost html]# chown -R apache:apache *
[root@localhost ~]# systemctl restart httpd
[root@localhost ~]# netstat -anpt |grep httpd
tcp6       0      0 :::80                   :::*                    LISTEN      29238/httpd
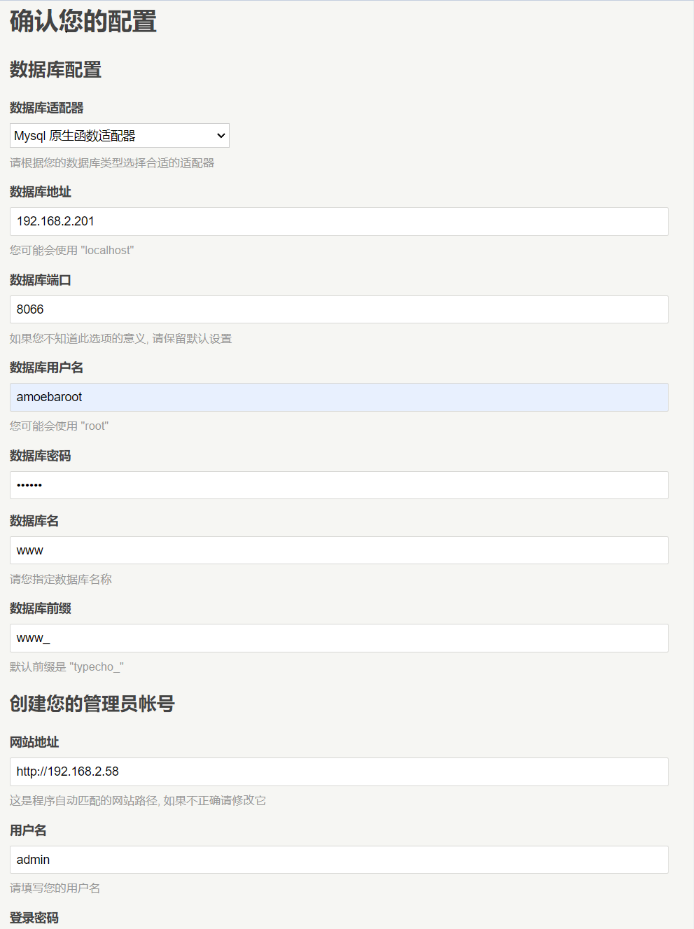
确认数据库配置
安装程序无法自动创建 **config.inc.php** 文件
您可以在网站根目录下手动创建 **config.inc.php** 文件, 并复制如下代码至其中
[root@localhost ~]# vim /var/www/html/config.inc.php
<?php
/**
 * Typecho Blog Platform
 *
 * @copyright  Copyright (c) 2008 Typecho team (http://www.typecho.org)
 * @license    GNU General Public License 2.0
 * @version    $Id$
 */

/** 定义根目录 */
define('__TYPECHO_ROOT_DIR__', dirname(__FILE__));

/** 定义插件目录(相对路径) */
define('__TYPECHO_PLUGIN_DIR__', '/usr/plugins');

/** 定义模板目录(相对路径) */
define('__TYPECHO_THEME_DIR__', '/usr/themes');

/** 后台路径(相对路径) */
define('__TYPECHO_ADMIN_DIR__', '/admin/');

/** 设置包含路径 */
@set_include_path(get_include_path() . PATH_SEPARATOR .
__TYPECHO_ROOT_DIR__ . '/var' . PATH_SEPARATOR .
__TYPECHO_ROOT_DIR__ . __TYPECHO_PLUGIN_DIR__);

/** 载入API支持 */
require_once 'Typecho/Common.php';

/** 载入Response支持 */
require_once 'Typecho/Response.php';

/** 载入配置支持 */
require_once 'Typecho/Config.php';

/** 载入异常支持 */
require_once 'Typecho/Exception.php';

/** 载入插件支持 */
require_once 'Typecho/Plugin.php';

/** 载入国际化支持 */
require_once 'Typecho/I18n.php';

/** 载入数据库支持 */
require_once 'Typecho/Db.php';

/** 载入路由器支持 */
require_once 'Typecho/Router.php';

/** 程序初始化 */
Typecho_Common::init();

/** 定义数据库参数 */
$db = new Typecho_Db('Mysql', 'www_');
$db->addServer(array (
  'host' => '192.168.2.201',
  'user' => 'amoebaroot',
  'password' => '123456',
  'charset' => 'utf8',
  'port' => '8066',
  'database' => 'www',
), Typecho_Db::READ | Typecho_Db::WRITE);
Typecho_Db::set($db);
[root@localhost ~]# chown -R apache:apache /var/www/html/config.inc.php

# 主、从数据库获取 网页服务创建的表
MariaDB [(none)]> use www

MariaDB [www]> show tables;
+-------------------+
| Tables_in_www     |
+-------------------+
| list              |
| www_comments      |
| www_contents      |
| www_fields        |
| www_metas         |
| www_options       |
| www_relationships |
| www_users         |
+-------------------+