4 squid-缓存服务器
一:概述
缓存静态资源:js、css、html、jpeg、MP4等
1)CDN(CDN内容分发网络)
原理图:
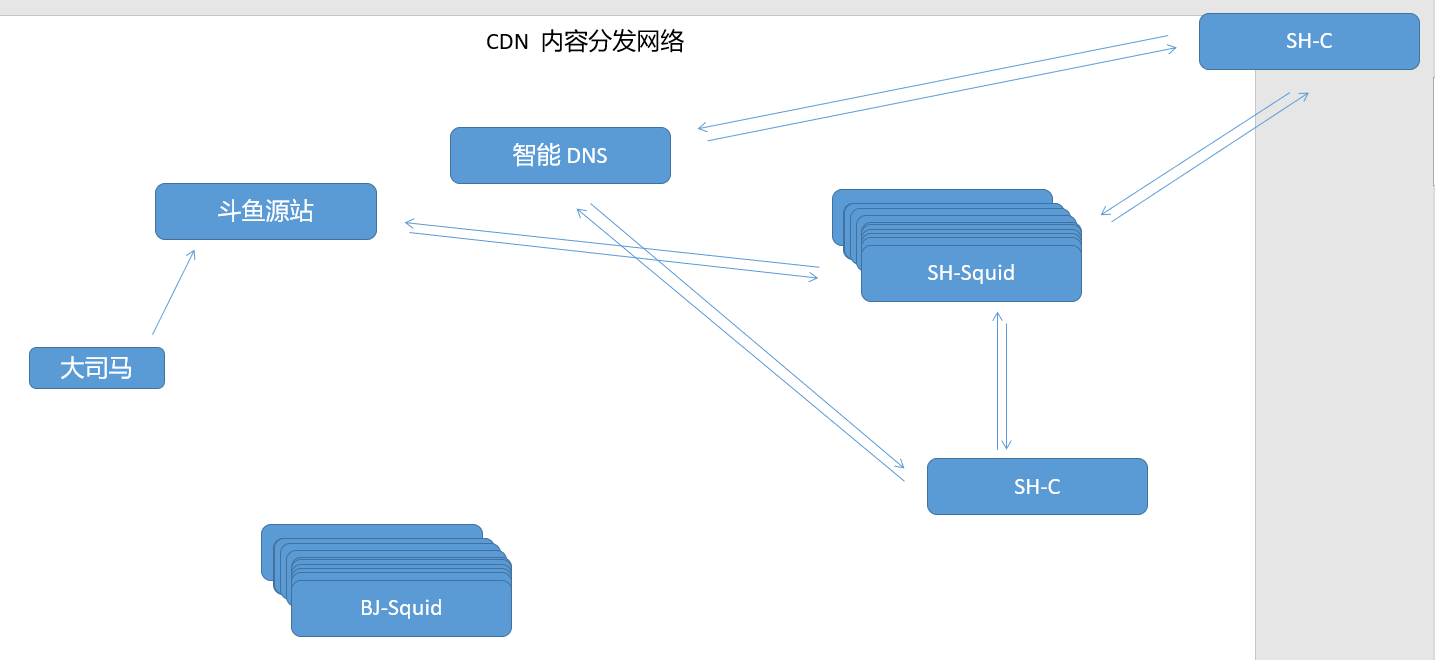
智能DNS(DNS得分离解析)
缓存服务器:
		squid:缓存服务器得守护进程
			协议:http、SSL、FTP
			所有的缓存元素称为对象,对象即缓存,对象存储在磁盘文件中(二级)

			hash tables
			digest tables

			利用UFS存储,unix文件系统
		Varnish:内存中存储
			支持正则,进行缓存清除
		Nginx:本身不支持,可添加第三方模块,从而支持缓存
2)squid工作方式

3)代理服务器类型
传统代理:(客户端代理实现)内部访问公网,且进行数据缓存
透明代理:(iptables实现)内部访问公网,且进行数据缓存
反向代理:公网用户访问内部应用服务器,且进行数据缓存
4)squid简介
软件包:squid-3.XXX
系统服务:squid
主程序:/usr/sbin/squid
主配置文件:/etc/squid/squid.conf
默认监听端口:TCP 3128
默认访问日志:/var/log/squid/access.log
二:实验
1)传统代理模式
| 虚拟机 | 环境 | 步骤 |
|---|---|---|
| C7-1 | client ens33 192.168.20.201 vmnat1 | 1.指向C7-2为网关 2.开启代理功能 |
| C7-2 | squid ens33 192.168.20.202 vmnat1 ens34 10.10.10.12 vmnat2 | 1.安装squid 2.修改squid配置文件,启动、自启动squid服务 3.开启路由转发功能 |
| C7-3 | WebServer ens33 10.10.10.13 vmnat2 | 安装httpd,配置网站 |
实验原理图:

squid配置文件详解:
		http_port 3128														#服务端口为3128
		access_log /var/log/squid/access.log squid							#记录访问日志的位置
		cache_mem 64 MB														#squid可用的物理内存大小
		cache_dir ufs /var/spool/squid 100 16 256							#缓存目录相关设置	100:磁盘可用空间为100M
																							 16:一级目录中最大的目录个数
																							 256:二级目录中最大的目录个数
			storeUfsDirFullPath( )								#利用的函数
										#一组页面的数据存储在相同的二级目录中,而且从实际情况来看,数据都是按顺序一个目录一个目录存放下去的
		visible_hostname proxy.benet.com									#squid自己的DNS域名
		dns_testnames www.google.com www.163.com							#squid自测时使用的DNS
		maximum_object_size 4096 KB											#不缓存的大小,超过限制后,不缓存(仍能进行代理)
		reply_body_max_size  10 MB											#单个文件最大代理限制,超过限制后,不会进行代理
实验步骤:
#C7-2
[root@localhost ~]# yum -y install squid
[root@localhost ~]# vim /etc/sysctl.conf
[root@localhost ~]# sysctl -p
net.ipv4.ip_forward = 1

[root@localhost ~]# vim /etc/squid/squid.conf
[root@localhost ~]# egrep "^cache_dir|^visible_hostname" /etc/squid/squid.conf
cache_dir ufs /var/spool/squid 100 16 256
visible_hostname proxy.yq.com
[root@localhost ~]# systemctl enable squid --now

#C7-3
[root@localhost ~]# yum -y install httpd
[root@localhost ~]# echo "this is 10.10.10.13" > /var/www/html/index.html
[root@localhost ~]# systemctl enable httpd --now

#C7-1
[root@localhost ~]# yum -y install elinks
[root@localhost ~]# route -n
Kernel IP routing table
Destination     Gateway         Genmask         Flags Metric Ref    Use Iface
0.0.0.0         192.168.20.202  0.0.0.0         UG    100    0        0 ens33
192.168.20.0    0.0.0.0         255.255.255.0   U     100    0        0 ens33

#字符界面采用环境变量的方式,添加客户端代理;图形化再浏览器中设置代理服务器(都指向squid缓存服务器)

[root@localhost ~]# vim /etc/profile
[root@localhost ~]# tail -n 2 /etc/profile
HTTP_PROXY=HTTP://192.168.20.202:3128
export HTTP_PROXY
[root@localhost ~]# source /etc/profile
C7-1用elinks工具进行访问测试
[root@localhost ~]# elinks 10.10.10.13
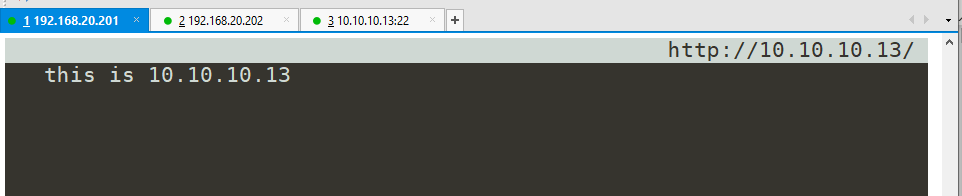
Webserver关闭httpd服务,C7-1再次测试
#C7-3关闭httpd服务
[root@localhost ~]# systemctl stop httpd

#C7-1再次访问
[root@localhost ~]# elinks 10.10.10.13

2)透明代理模式
核心:内网机器指向squid作为网关,squid中加入SNAT规则
| 虚拟机 | 环境 | 步骤 |
|---|---|---|
| C7-1 | client ens33 192.168.20.201 vmnat1 gw:192.168.20.202 | 1.指向squid为网关 2.访问测试 |
| C7-2 | squid ens33 192.168.20.202 vmnat1 ens34 10.10.10.12 vmnat2 | 1.开启路由转发 2.修改squid配置文件,启动、自启动squid服务 3.配置iptables,写SNAT规则 |
| C7-3 | Webserver ens33 10.10.10.13 vmnat2 | 配置网站服务 |
实验原理图:
实验步骤:
#先安装软件再配置网络
[root@localhost ~]# yum -y install elinks		#C7-1安装elinks软件
[root@localhost ~]# yum -y install squid		#C7-2安装squid
[root@localhost ~]# yum -y install httpd		#C7-3配置httpd服务

#C7-3	配置httpd服务
[root@localhost ~]# echo "this is 10.10.10.13" > /var/www/html/index.html
[root@localhost ~]# systemctl enable httpd --now

#C7-2	开启路由转发、配置squid、编写SNAT规则
[root@localhost ~]# vim /etc/sysctl.conf
[root@localhost ~]# sysctl -p
net.ipv4.ip_forward = 1

[root@localhost ~]# vim /etc/squid/squid.conf
[root@localhost ~]# egrep "^cache_dir|^visible_hostname|^http_port" /etc/squid/squid.conf
http_port 192.168.20.202:3128 transparent
cache_dir ufs /var/spool/squid 100 16 256
visible_hostname proxy.yq.com
[root@localhost ~]# systemctl enable squid --now

[root@localhost ~]# iptables -t nat -A PREROUTING -i ens33 -s 192.168.20.0/24 -p tcp --dport 80 -j REDIRECT --to-ports 3128
[root@localhost ~]# service iptables save

#C7-1 利用elinks工具进行测试
[root@localhost ~]# elinks 10.10.10.13

#C7-3停止httpd服务
[root@localhost ~]# systemctl stop httpd

#C7-1再次访问测试
[root@localhost ~]# elinks 10.10.10.13

测试下载限速:
应用服务器写一个100M的文件
squid重新配置squid服务,测试机测试能否下载
#C7-3 在网页主目录下写一个100M的文件
[root@localhost ~]# dd if=/dev/zero of=/var/www/html/1.txt bs=1M count=100
[root@localhost ~]# systemctl restart httpd

#C7-2	修改squid配置文件
[root@localhost ~]# vim /etc/squid/squid.conf
[root@localhost ~]# grep "reply" /etc/squid/squid.conf
reply_body_max_size 50 MB
[root@localhost ~]# systemctl reload squid

#C7-1	测试下载
[root@localhost ~]# wget http://10.10.10.13/index.html
2022-12-19 17:31:06 (1.07 MB/s) - 已保存 “index.html” [20/20])

[root@localhost ~]# wget http://10.10.10.13/1.txt
--2022-12-19 17:31:22--  http://10.10.10.13/1.txt
正在连接 10.10.10.13:80... 已连接。
已发出 HTTP 请求,正在等待回应... 403 Forbidden
2022-12-19 17:31:22 错误 403:Forbidden。
3)反向代理模式
| 虚拟机 | 环境 | 步骤 |
|---|---|---|
| C7-1 | httpd-1 ens33 192.168.20.201 vmnat1 gw:192.168.20.203 | 配置httpd服务,写两个网页 echo "20.201-1" > /var/www/html/1.html echo "20.201-2" > /var/www/html/2.html |
| C7-2 | httpd-2 ens33 192.168.20.202 vmnat1 gw:192.168.20.203 | 配置httpd服务,写两个网页 echo "20.202-1" > /var/www/html/1.html echo "20.202-2" > /var/www/html/2.html |
| C7-3 | squid ens33 192.168.20.203 vmnat1 ens34 10.10.10.13 vmnat2 | 配置squid反向代理模式,启动服务 |
实验原理图:

实验步骤:
#先安装软件,再配置网络
[root@localhost ~]# yum -y install httpd #C7-1安装httpd
[root@localhost ~]# yum -y install httpd #C7-2安装httpd
[root@localhost ~]# yum -y install squid #C7-3安装squid
#C7-1配置httpd服务
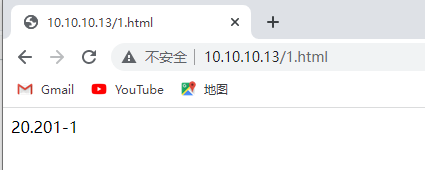
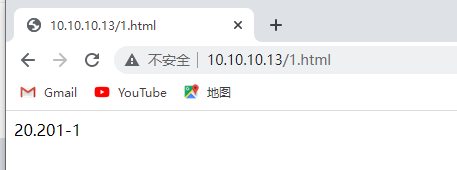
[root@localhost ~]# echo "20.201-1" > /var/www/html/1.html
[root@localhost ~]# echo "20.201-2" > /var/www/html/2.html
[root@localhost ~]# systemctl enable httpd --now
#C7-2配置httpd服务
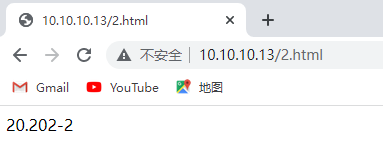
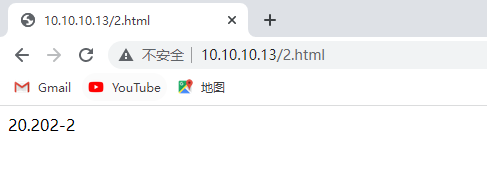
[root@localhost ~]# echo "20.202-1" > /var/www/html/1.html
[root@localhost ~]# echo "20.202-2" > /var/www/html/2.html
[root@localhost ~]# systemctl enable httpd --now
#C7-3配置squid反向代理模式
[root@localhost ~]# vim /etc/squid/squid.conf
[root@localhost ~]# egrep "^cache_dir|^visible|^http_port|^cache_peer" /etc/squid/squid.conf
http_port 10.10.10.13:80 vhost
cache_dir ufs /var/spool/squid 100 16 256
visible_hostname proxy.yq.com
cache_peer 192.168.20.201 parent 80 0 oringinserver round-robin
cache_peer 192.168.20.202 parent 80 0 oringinserver round-robin
[root@localhost ~]# systemctl enable squid --now
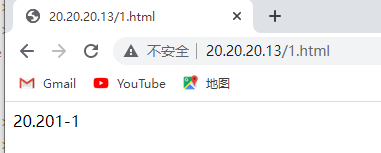
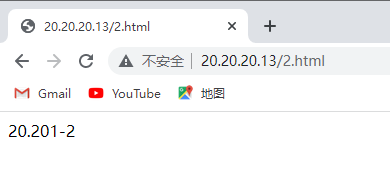
浏览器访问测试:
1)直接访问 10.10.10.13/1.html
10.10.10.13/2.html
2)关闭Webserver,再次访问
[root@localhost ~]# systemctl stop httpd			#C7-1停止httpd
[root@localhost ~]# systemctl stop httpd			#C7-2停止httpd
三:ACL访问控制列表
配置文件相关选项 /etc/squid/squid.conf
		acl	列表名称	列表类型	列表内容
		http_access	all或deny	列表名称
注意:
	1、默认情况下,若当前客户端网段不声明放行,默认拒绝
	2、若只定义ACL,不指定http_access,默认拒绝
	3、当http_access dent all 被注释,且只定义了ACL,那么这个ACL则会根据最后一个http_access项,反向操作决定拒绝与否
ACL访问控制实验:
添加一个squid默认不允许的公网ip,进行测试
| 虚拟机 | 环境 | 步骤 |
|---|---|---|
| C7-1 | httpd-1 ens33 192.168.20.201 vmnat1 gw:192.168.20.203 | 配置httpd服务,写两个网页 echo "20.201-1" > /var/www/html/1.html echo "20.201-2" > /var/www/html/2.html |
| C7-2 | httpd-2 ens33 192.168.20.202 vmnat1 gw:192.168.20.203 | 配置httpd服务,写两个网页 echo "20.202-1" > /var/www/html/1.html echo "20.202-2" > /var/www/html/2.html |
| C7-3 | squid ens33 192.168.20.203 vmnat1 ens34 20.20.20.13 vmnat2 | 配置squid反向代理模式,启动服务 |
实验步骤:
#先安装软件,再配置网络
[root@localhost ~]# yum -y install httpd			#C7-1安装httpd
[root@localhost ~]# yum -y install httpd			#C7-2安装httpd
[root@localhost ~]# yum -y install squid			#C7-3安装squid

#C7-1配置httpd服务
[root@localhost ~]# echo "20.201-1" > /var/www/html/1.html
[root@localhost ~]# echo "20.201-2" > /var/www/html/2.html
[root@localhost ~]# systemctl enable httpd --now

#C7-2配置httpd服务
[root@localhost ~]# echo "20.202-1" > /var/www/html/1.html
[root@localhost ~]# echo "20.202-2" > /var/www/html/2.html
[root@localhost ~]# systemctl enable httpd --now

#C7-3配置squid反向代理模式
[root@localhost ~]# vim /etc/squid/squid.conf
[root@localhost ~]# egrep "20.20.20|^cache_dir|^visible|^http_port|^cache_peer" /etc/squid/squid.conf
acl localnet src 20.20.20.0/24	# RFC1918 possible internal network

#添加ACL访问控制,若不添加到localnet列表名称中,也可以新建列表名称,后续需要添加 http_access allow 新建列表名称

http_port 20.20.20.13:80 vhost
cache_dir ufs /var/spool/squid 100 16 256
visible_hostname proxy.yq.com
cache_peer 192.168.20.201 parent 80 0 oringinserver round-robin
cache_peer 192.168.20.202 parent 80 0 oringinserver round-robin
[root@localhost ~]# systemctl enable squid --now
测试访问: